How To Pin Fit a Slipcover Right Side Out
Learn how to make a slipcover that truly fits your furniture and looks beautiful! Pin fitting a slipcover right side out is easy and intuitive, perfect for beginners.
In this tutorial, I share simple, step-by-step instructions that will have you making a better fitting custom cover in no time.
Over the years, I’ve practiced many different methods for making custom-fit slipcovers.
I’ve tried pinning fabric reverse side out with and without welt cord. I’ve traced off furniture with a pencil and paper. I’ve made muslin patterns. And, I’ve used the half pattern technique.
It’s been quite an education!
But, I have to say, I always come back to the right side out pin fit method. It’s what I use for my personal slipcover projects and my client jobs with excellent results.
What Is The Right Side Out Pin Fit Method?
The process goes like this:
Pin and cut the slipcover on your furniture with the right side of the fabric facing out.
Trim and notch all of the seam allowances.
Then, remove the slipcover, unpin it and sew the sections together in a specific order.
Why Is This Pin Fit Method Easy?
No guesswork. Pinning fabric right side out allows to you capture the furniture’s right and left side just as they are. There is no confusion about how the slipcover will look and fit after it’s sewn.
Simple. Pin fitting right side out omits extra work. There’s no pattern making. And, no sandwiching welt cord in the seams as you pin. FYI — You can opt to add welt cord later when you sew the slipcover pieces together.
Versatile. Pinning right side out gives you a choice to work with your actual slipcover fabric, or a fabric like natural canvas if you want to make a reusable slipcover pattern.
Intuitive. A slipcover that is pinned right side out gives you precut, ready-to-sew pieces. Stitching them together in an easy-to-follow sequence comes naturally for beginners who are familiar with sewing projects cut from paper patterns.
Tutorial Part 1 – Pin & Cut the Slipcover
This tutorial is Part 1 of a 4 part series. You will learn pin fit basics — the six steps I use to pin fit the slipcover body using the right side out method.
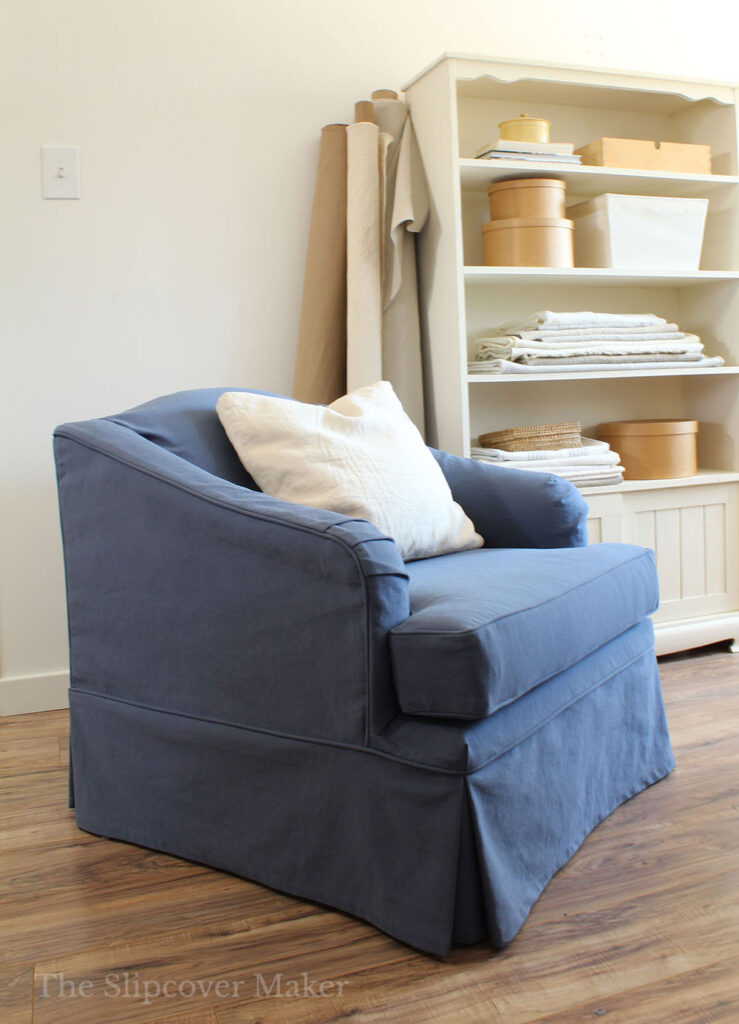
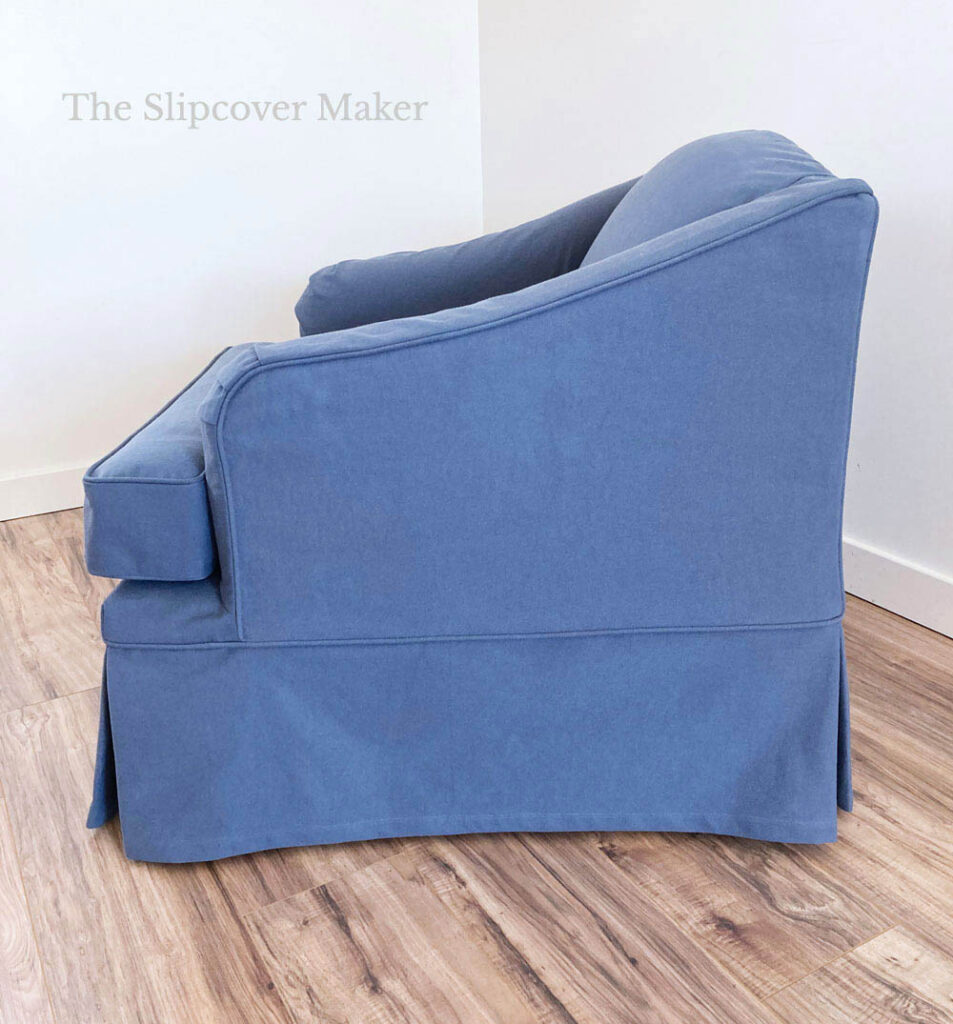
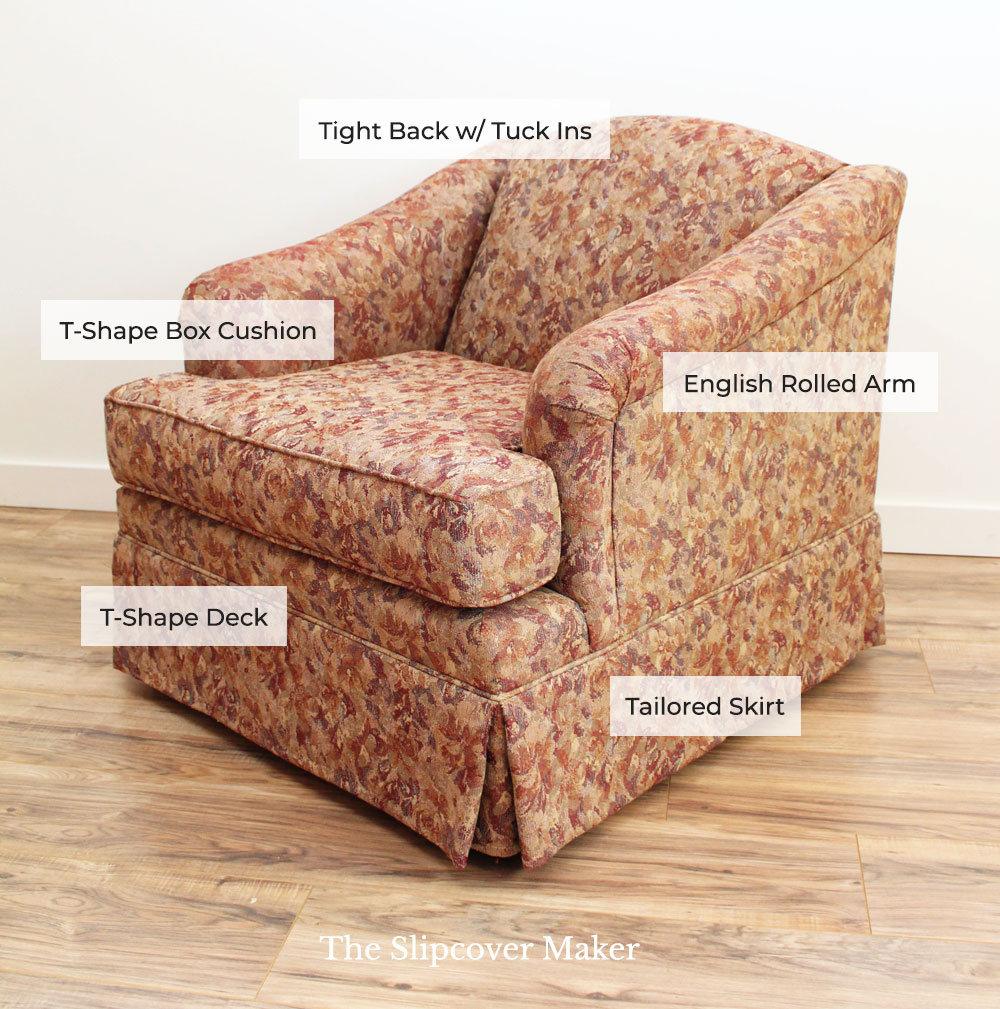
I demonstrate the process on this English rolled armchair. It makes a great teaching chair because it’s loaded with classic design features, many of which are similar to other types of chairs.
The pin fit techniques you learn in this tutorial can be applied to your own slipcover project.
Pin Fit Prep List
Before you start pin fitting, you will need to prep your project. Download these helpful guides to get started:
- Calculate yardage
- Gather up supplies
- Preshrink your yardage
- Cut fabric blocks
- Optional – If your chair has a English rolled arm, pin a string on it to mark the arm seam placement.
OK, now on with the tutorial!
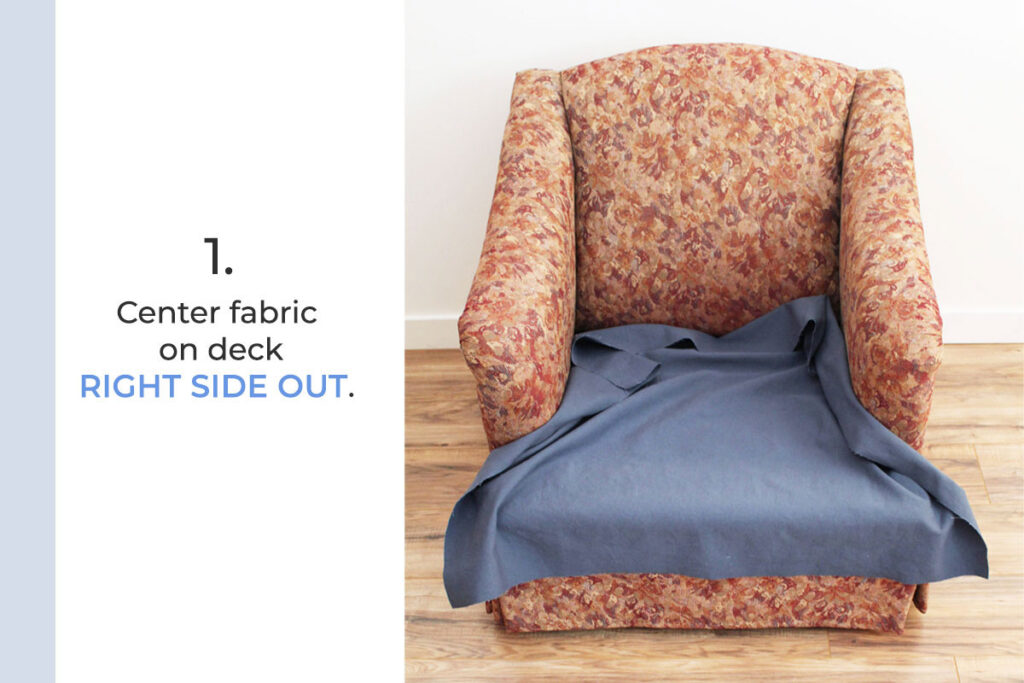
Step 1: Pin & Cut the Deck
I always start my slipcover projects by pinning the deck.
Think of the deck as the foundation of your slipcover. It holds the seat cushion and it’s where you create tuck-ins to help keep the slipcover in place. It’s also where the inner arms and inner back attach.
A good fitting deck will not only enhance the function of your slipcover but also make it easier to fit the inner slipcover sections and the skirt.
In this first slideshow, I show you how I pin and cut the T-shape deck.
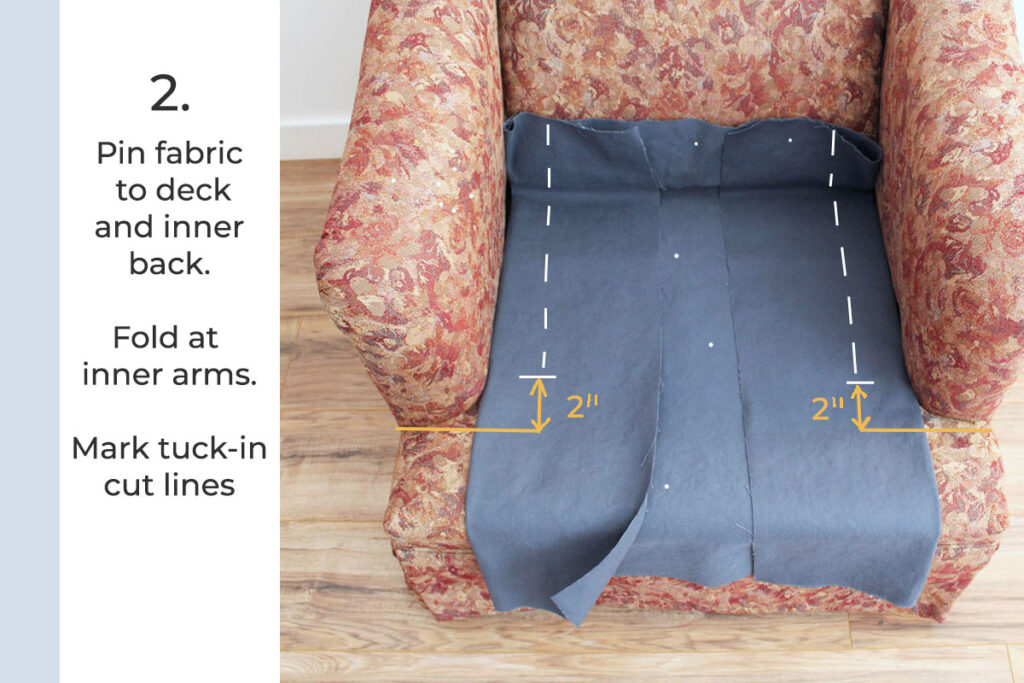
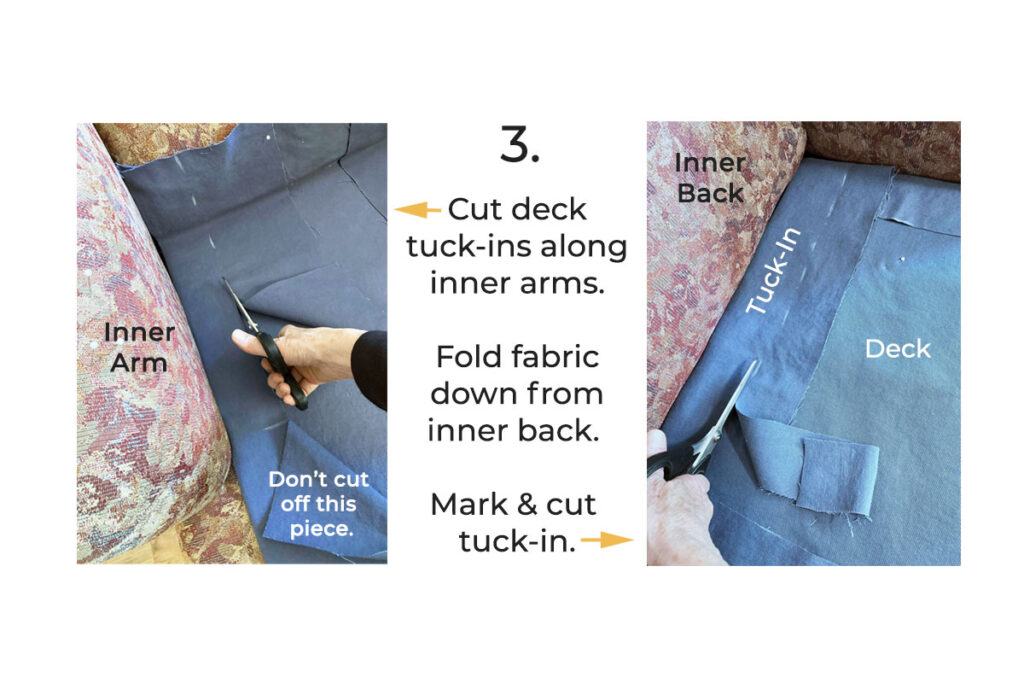
Are you new to creating deck tuck-ins? Here’s what you need to know:
- A tuck-in is an extension of the deck fabric. It holds the slipcover in place.
- It tucks into the snug space between the deck and the inner arms and inner back.
- The tuck-in width should equal the tuck-in depth. Stick a ruler down into the tuck-in space to measure the depth.
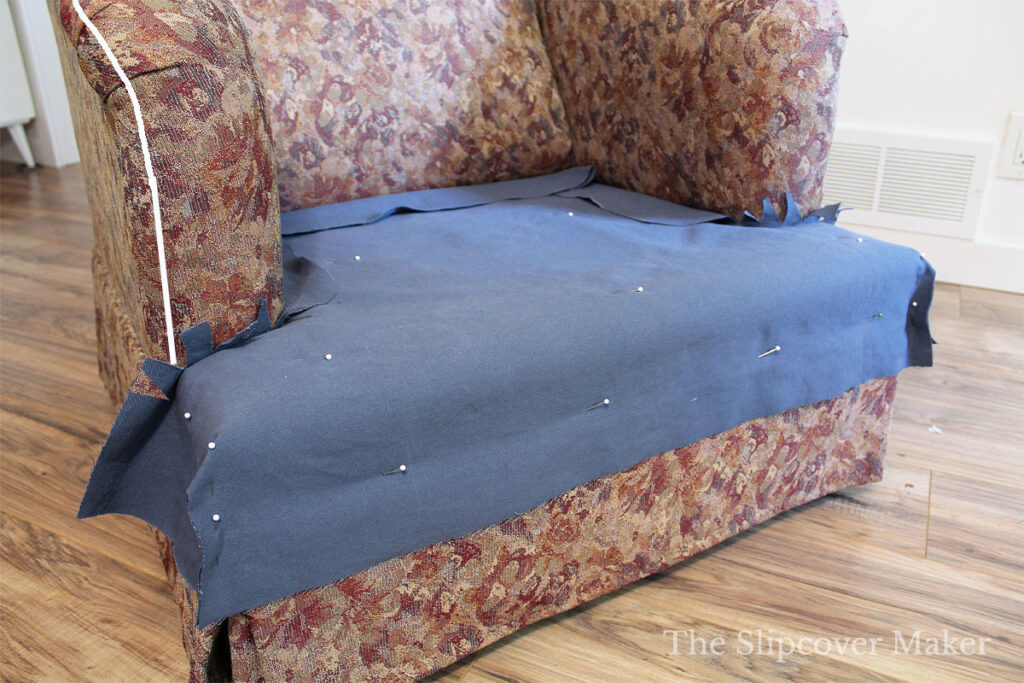
Deck completed! This is what the T-shape deck looks like after it’s pinned and cut.
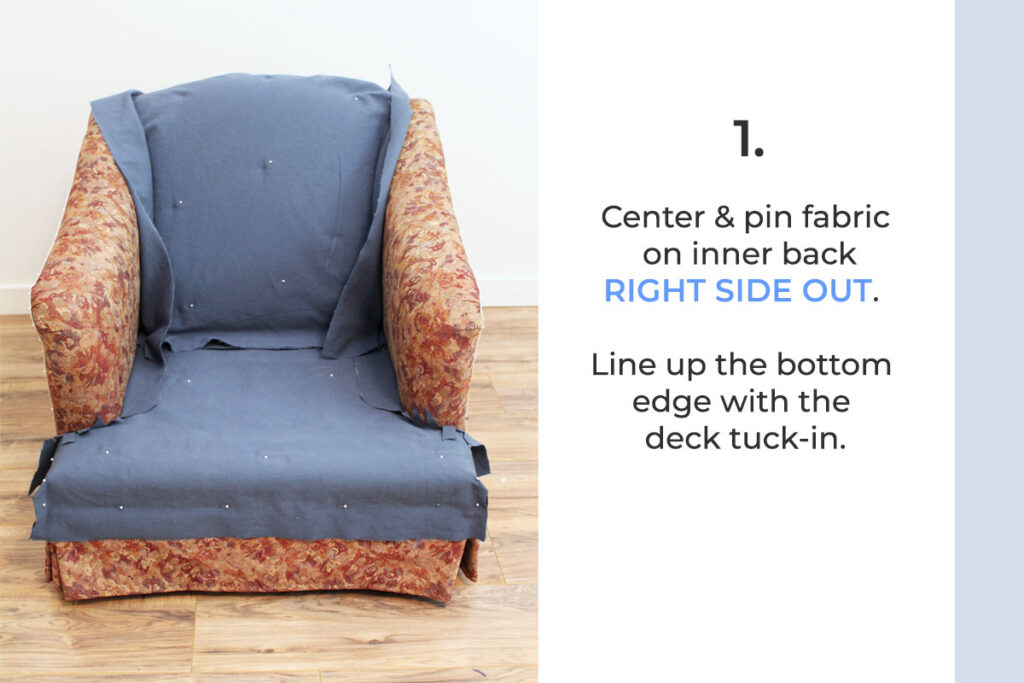
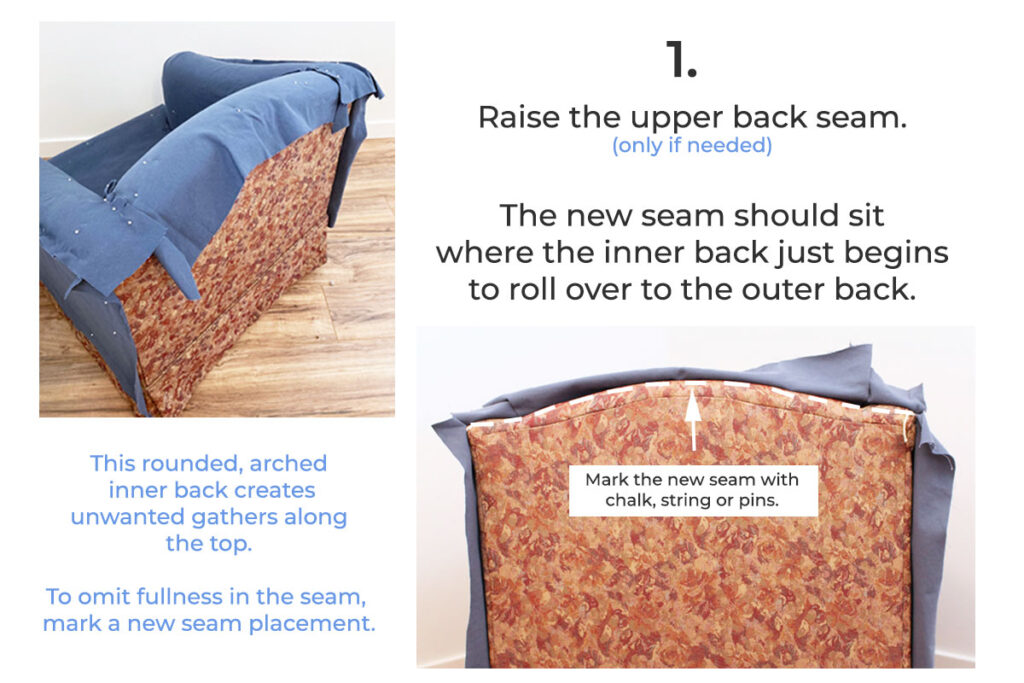
Step 2: Pin & Cut Inner Back
After the deck is in place, I pin and cut the inner back.
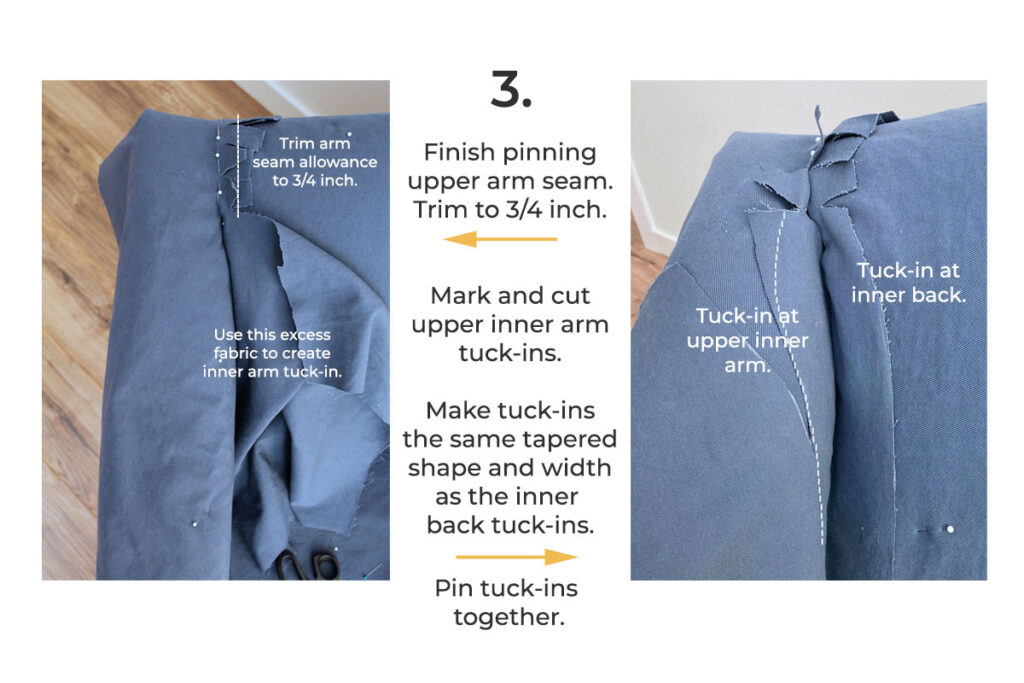
This armchair doesn’t have a loose back cushion. Instead, it’s designed with a rounded tight back, which needs tuck-ins at the upper inner arms and lower back to help hold it in place.
Follow this slideshow to learn the key steps for pinning the inner back.
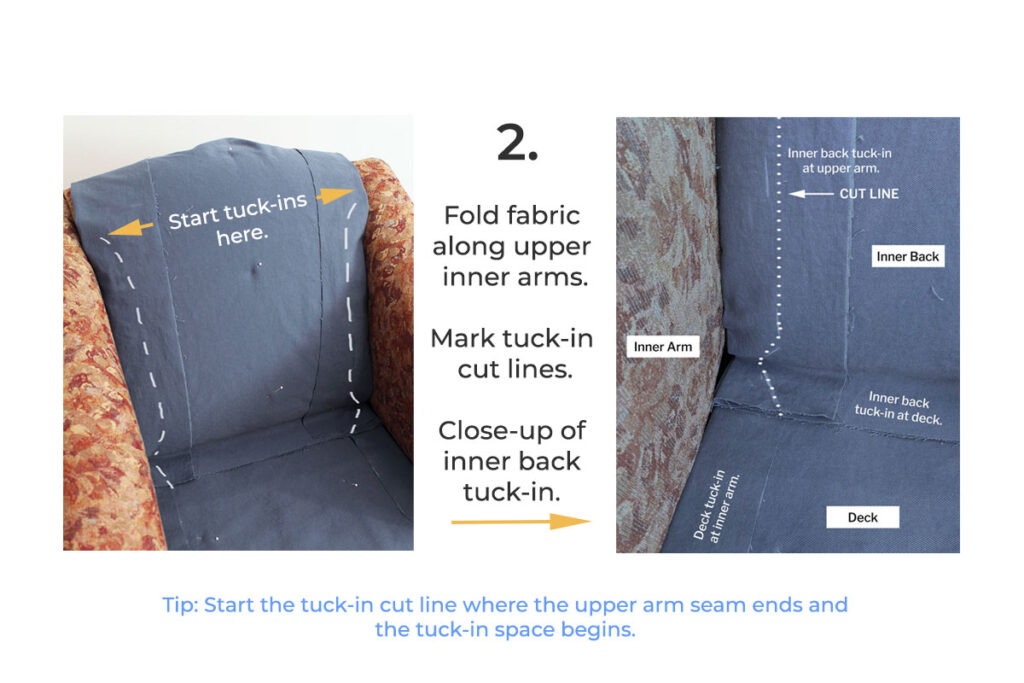
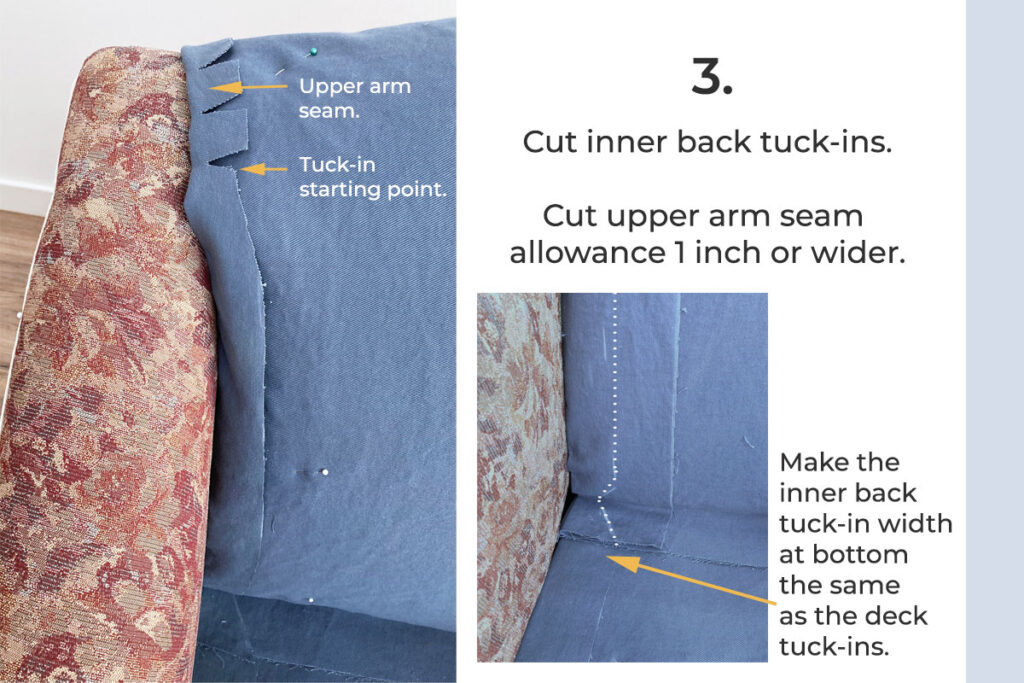
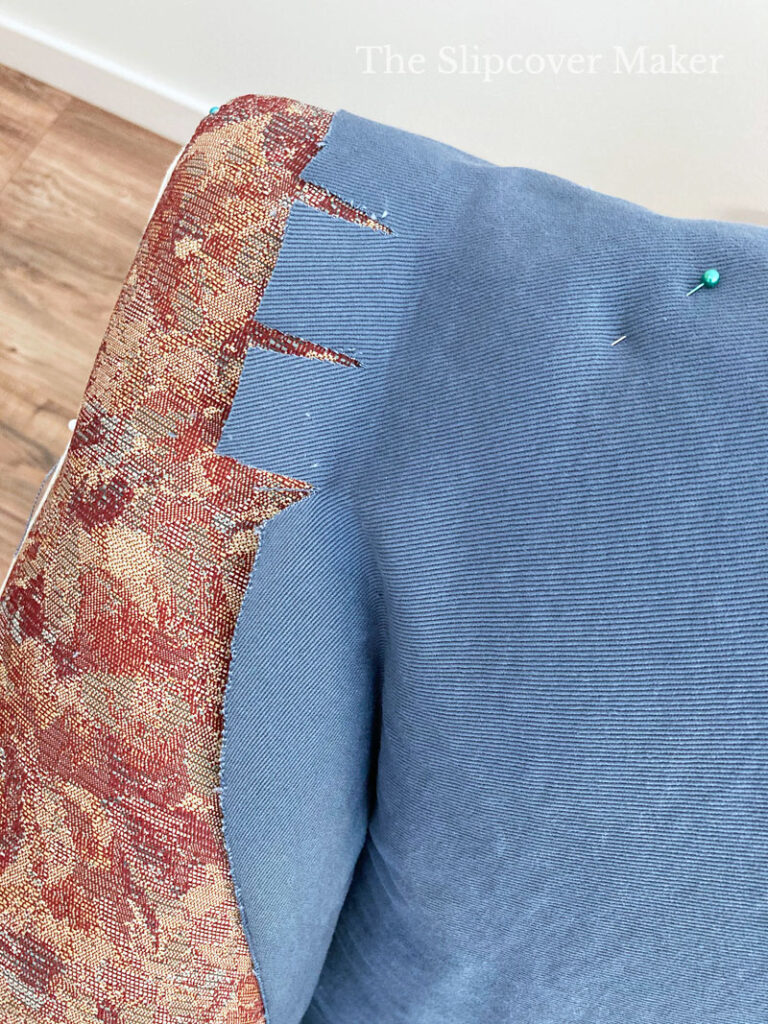
Inner back completed! This is what the inner back looks like after it’s pinned and cut with the tuck-ins and upper arm seam allowance.
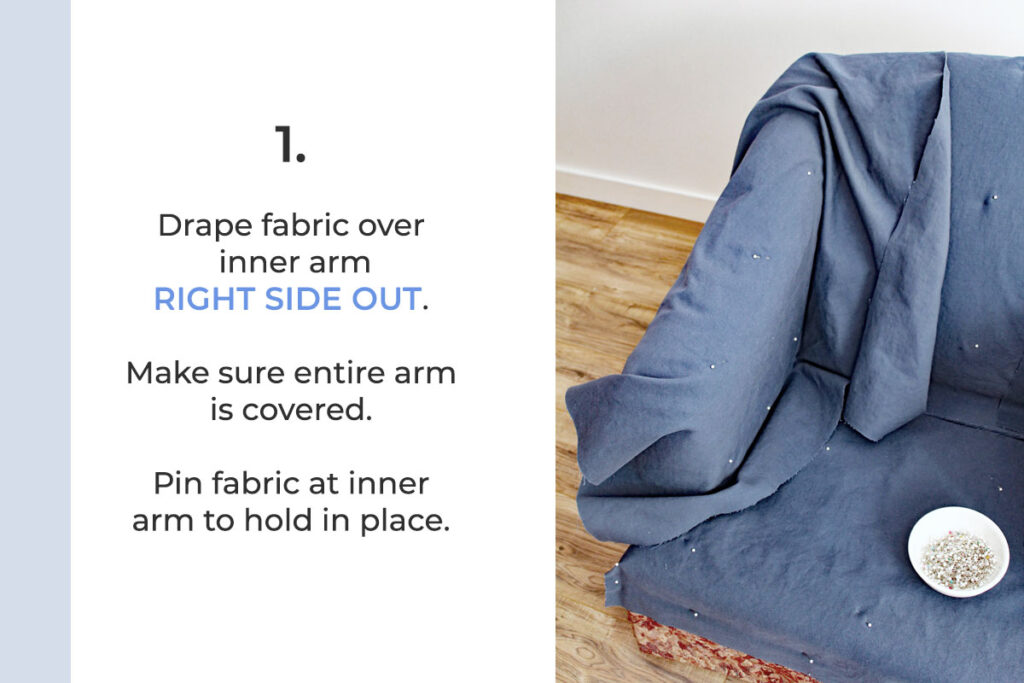
Step 3: Pin & Cut Inner Arms
Next, I pin fit the inner arms.
When this area of the chair is pinned and cut correctly, the rest of the slipcover pieces pin and fit together easily.
Because my English rolled arm chair has a sloped arm and a tight back, the inner arms require tuck-ins.
Have a look at this slideshow to see how I pinned the inner arms of my slipcover.
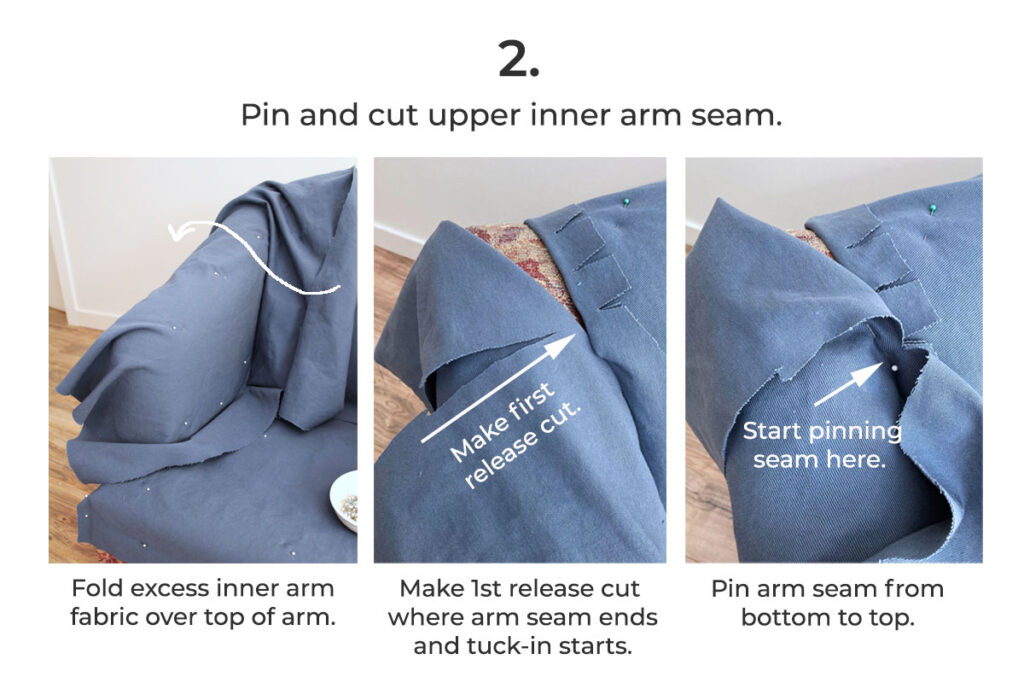
It usually takes a few attempts to position the fabric just right on an English rolled inner arm. Don’t be surprised if you have to shift your fabric piece at a slight angle to capture the entire inner arm and to get a smooth fit.
As you adjust the placement, make sure it:
- Covers the entire arm length
- Extends beyond the outer arm seam
- Allows for tuck-ins at upper inner arm and lower arm
- Wraps around the front arm to form pleats
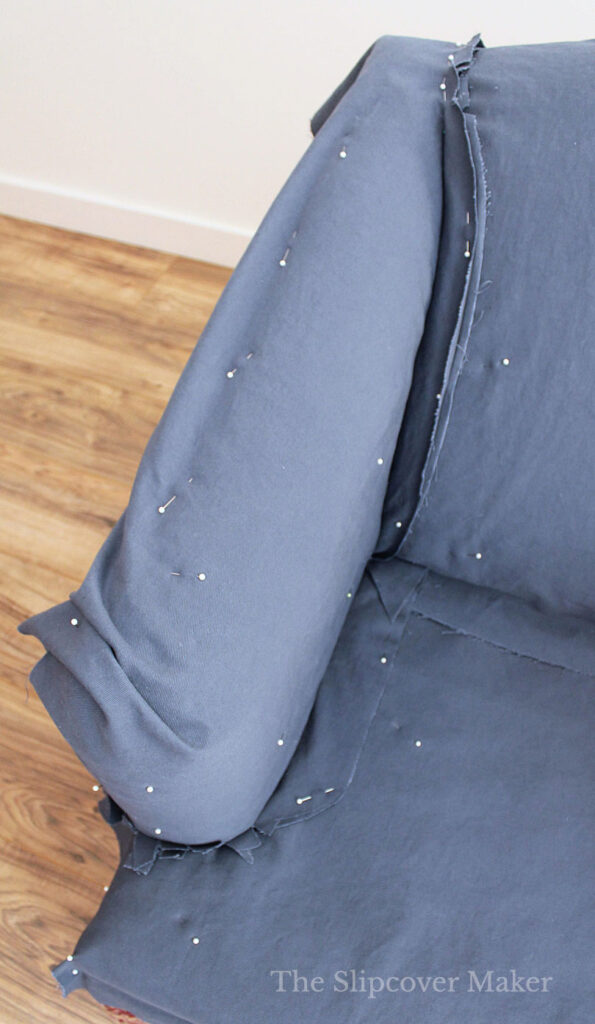
Inner arms completed! This is what the inner arm looks like after it’s cut and pinned with tuck-ins.
Repeat the pin and cut process for the opposite inner arm.
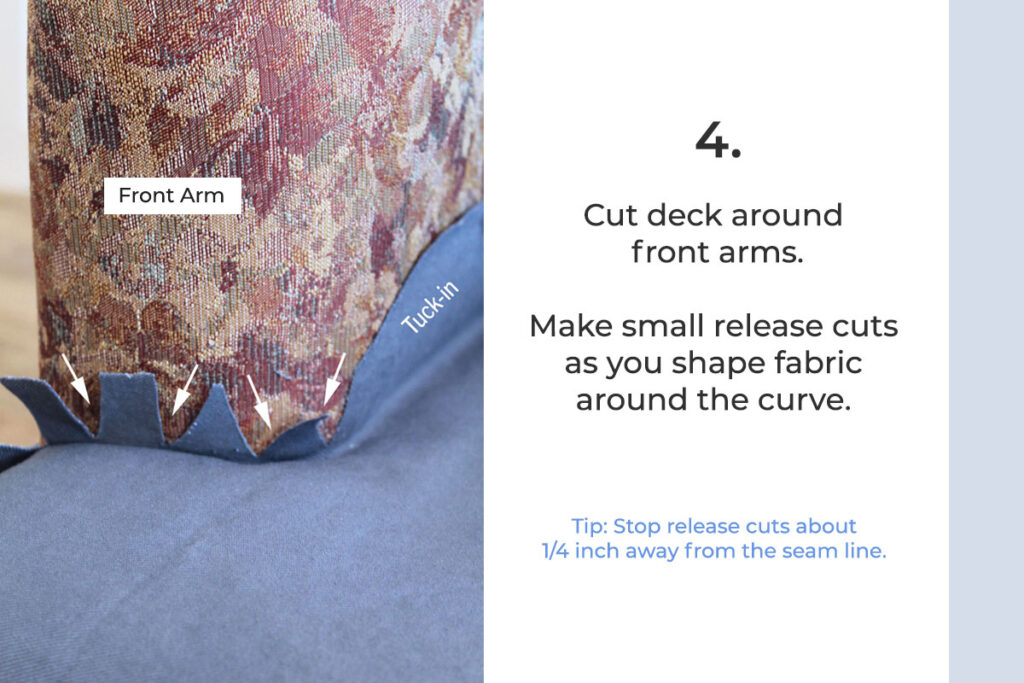
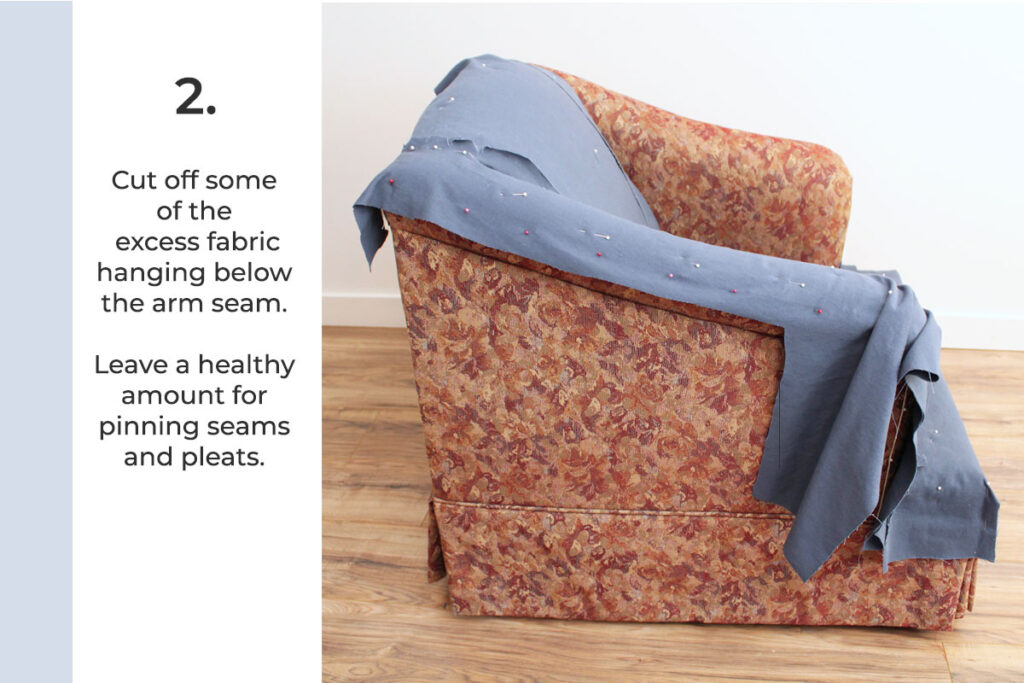
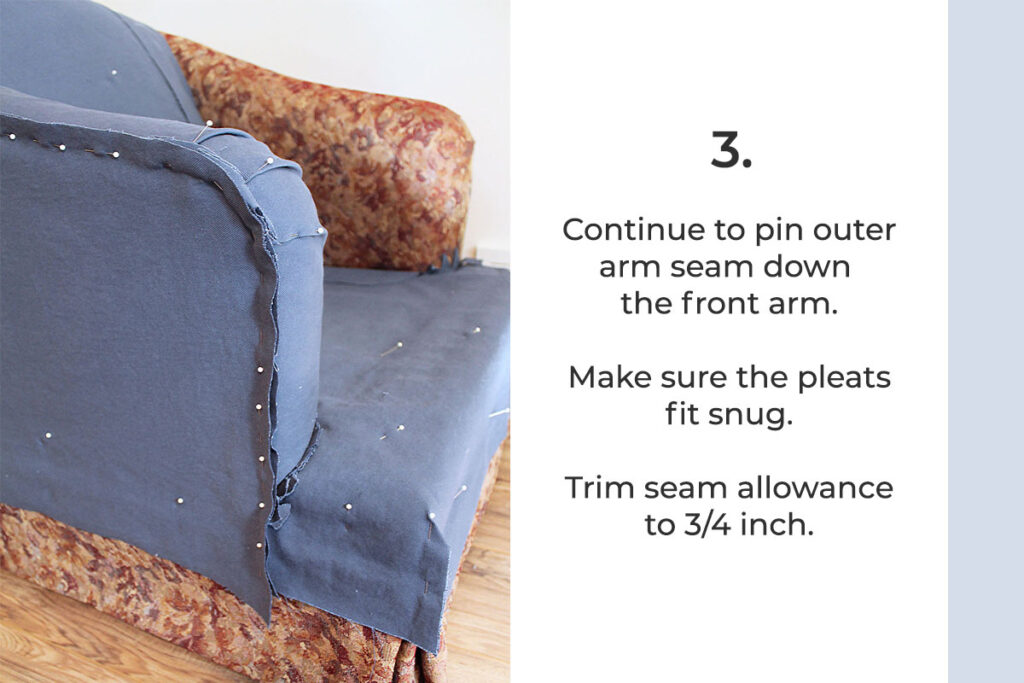
Step 4: Pin, Cut & Pleat Front Arms
Now, it’s time to fit the front arms, which includes pinning the English rolled arm pleats.
I pinned right side out so that means I placed the pleat folds facing forward on the arm. This is exactly how the pleats will look after I sew the slipcover. Easy-peasy!
Check out this slideshow for the step-by-step.
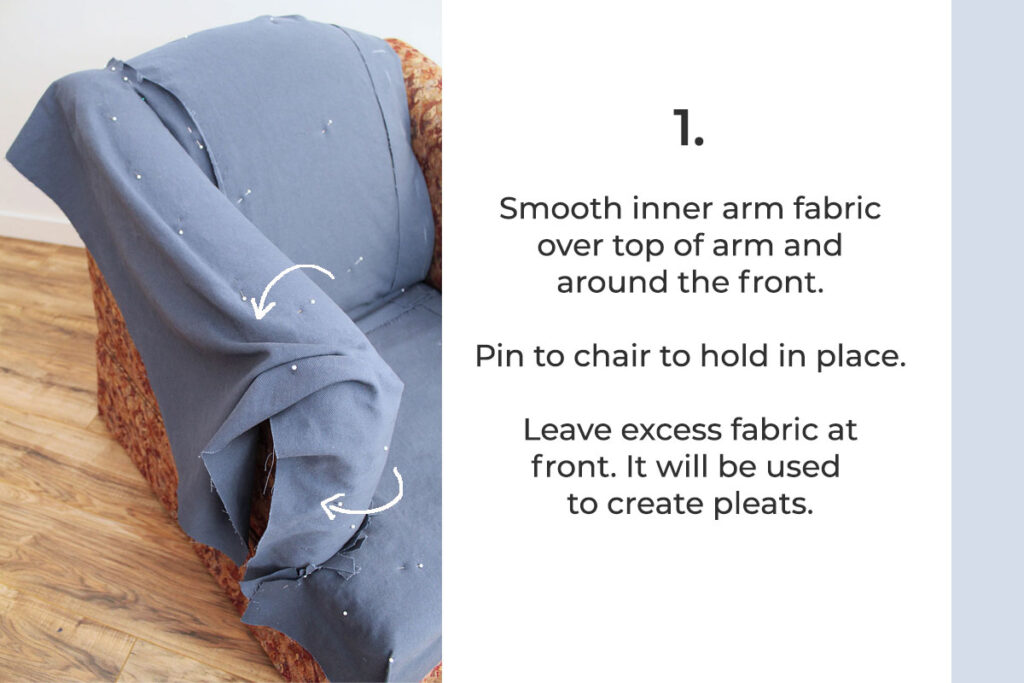
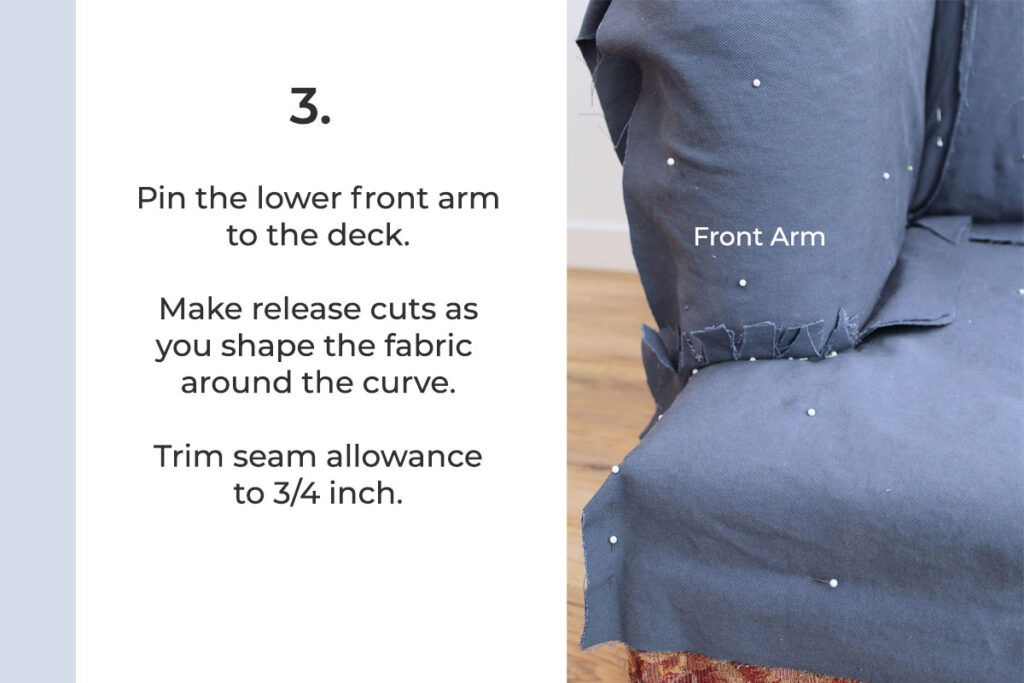
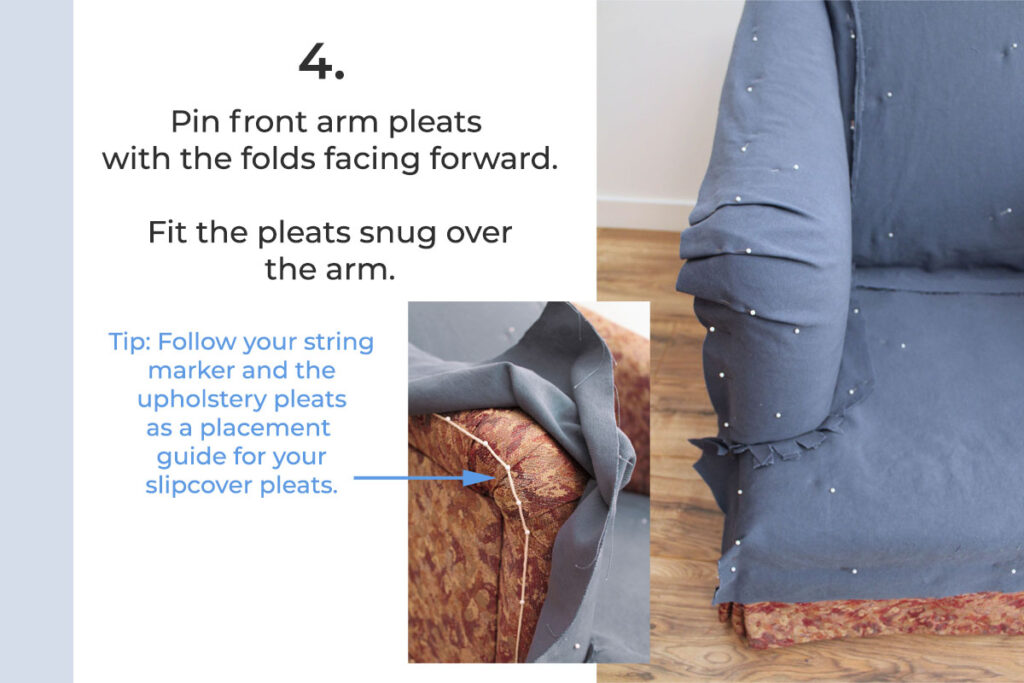
Pleats on an English rolled arm usually look best when they are spaced equal distance apart. And, when the pleats are positioned in the same spot on both the right and left arms.
Pleat depth may vary but typically the fullest pleat is the center one.
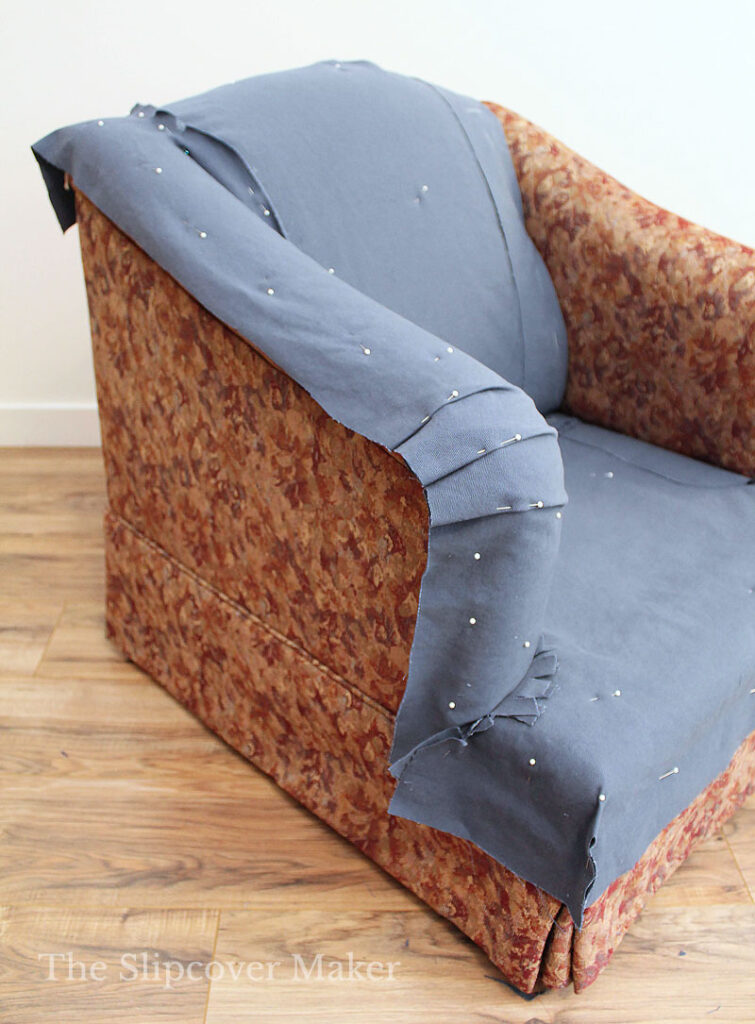
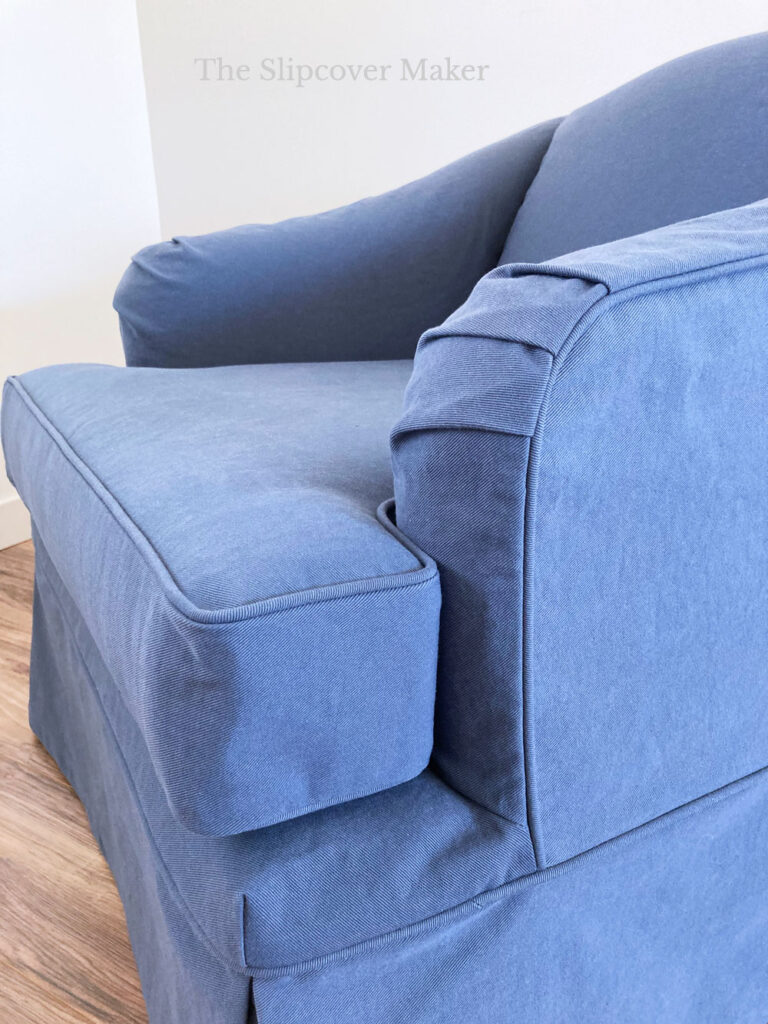
Front arm completed! This is what the arm looks like after it’s pinned, cut and pleated.
Repeat the pin fit process for the opposite front arm.
Step 5: Pin & Cut the Outer Arm
It’s time to pin fit the outer arm. And, it only takes three simple steps!
Pinning the outer arm on this English rolled arm chair was a breeze. It’s one flat piece that connects to the inner arm with a single seam.
Here’s how I pinned it.
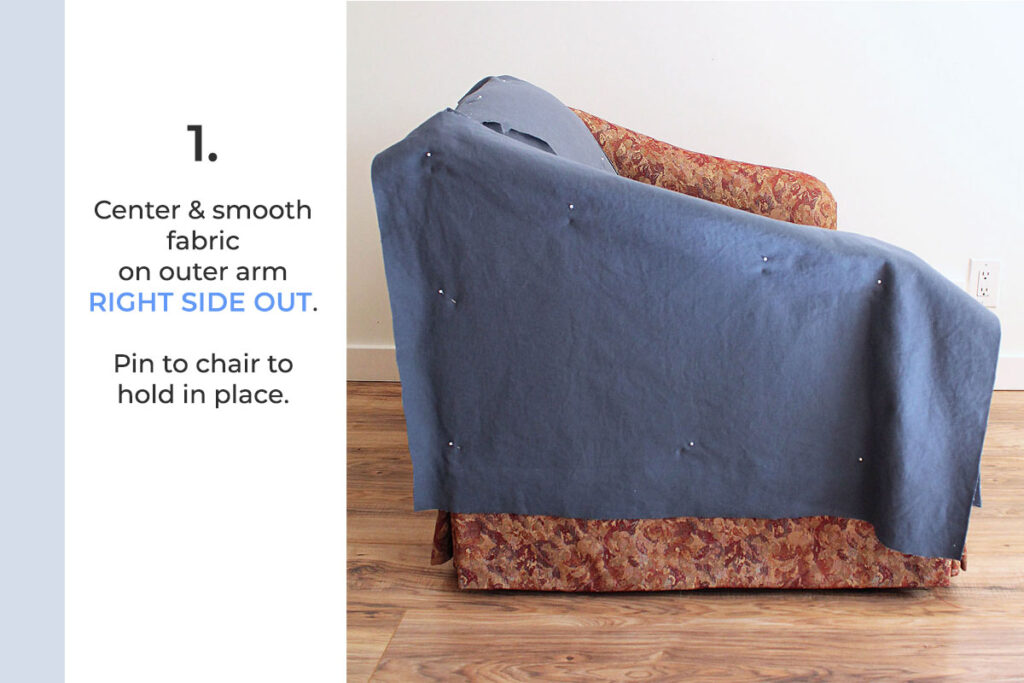
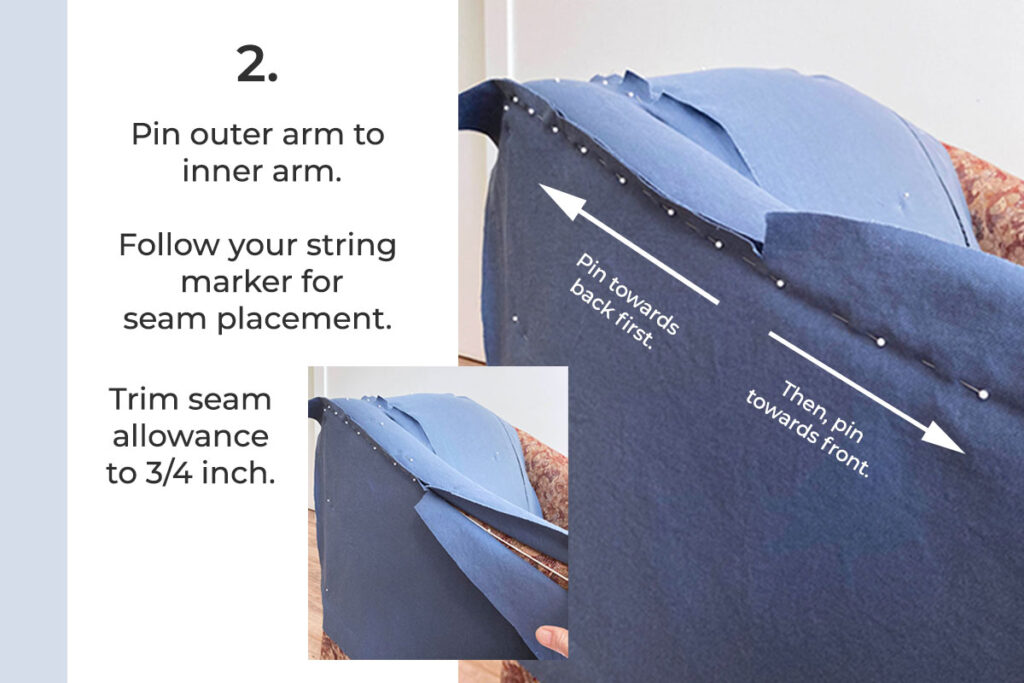
When you pin the outer arm seam all in one direction, it’s easy to pull the fabric too much to the right or left without knowing it. That’s what creates unwanted diagonal lines across the side.
To keep the fabric hanging straight and smooth, pin the seam directional. Start pinning the seam at the center. Pin towards the back first. The, pin towards the front and down the arm.
Outer arm completed! This is what the outer arms looks like after it’s pinned, cut, and seam allowance trimmed to 3/4 inch.
See how the fabric extends past the back corner and below the skirt line by at least a couple of inches? That’s what you want.
The extra fabric gives you plenty to work with when pinning the back seam and marking the skirt placement.
Repeat the process for the opposite arm.
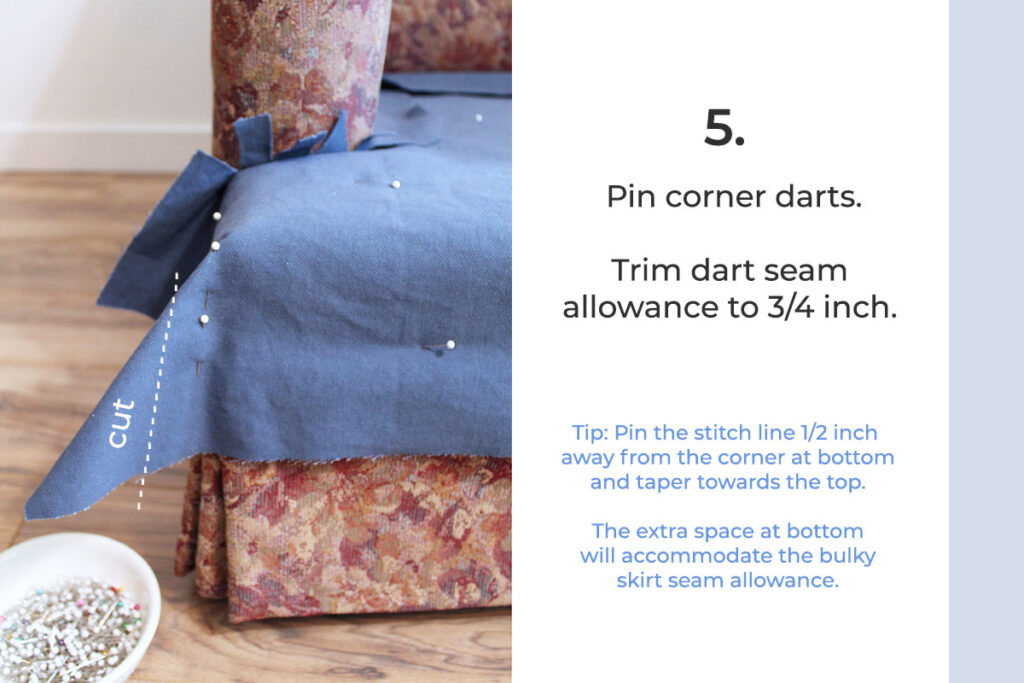
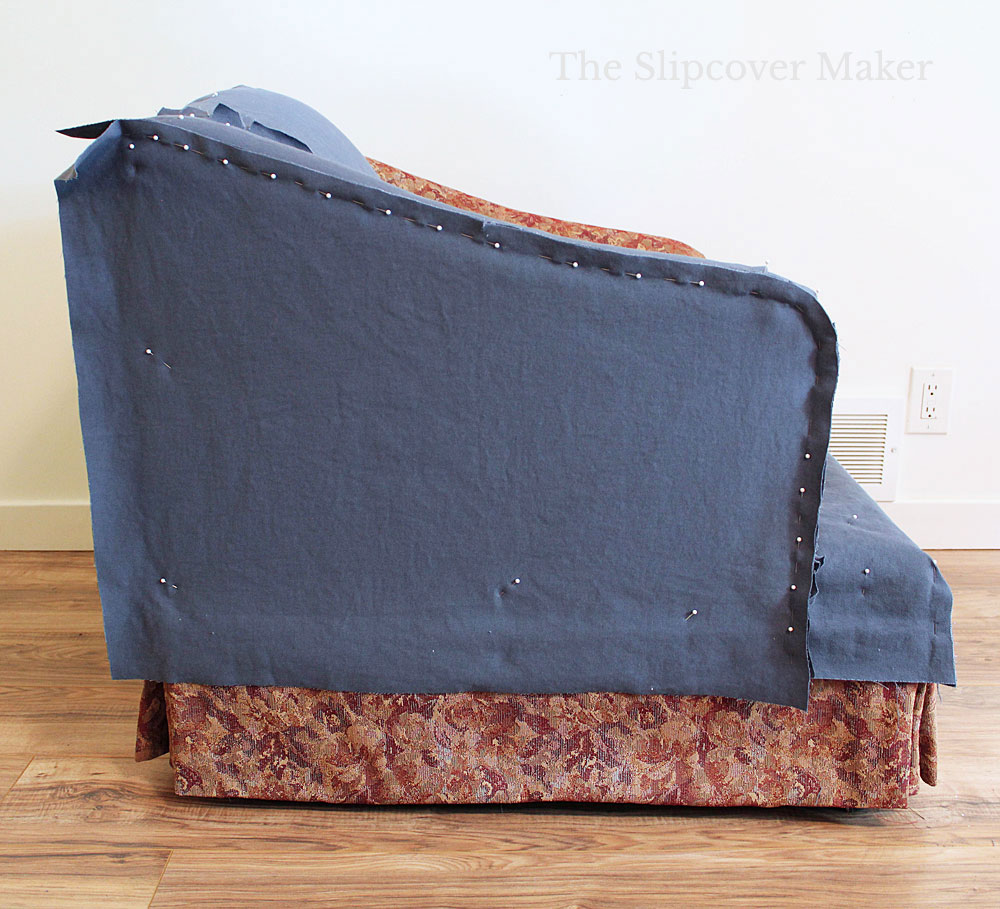
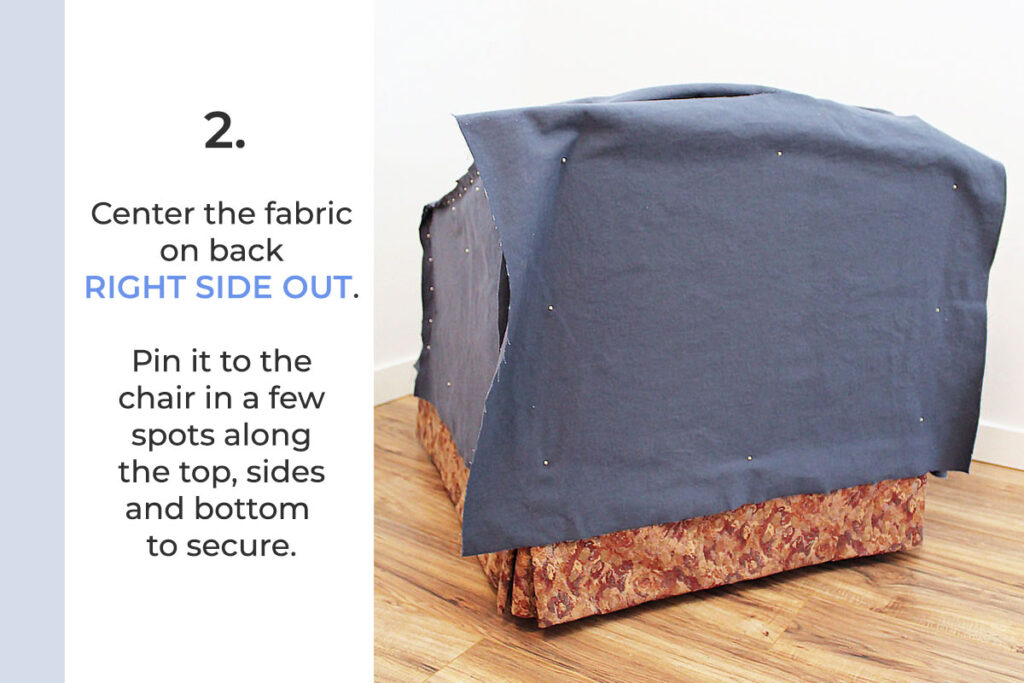
Step 6: Pin & Cut the Back
This is the final step for pinning this English rolled arm chair slipcover!
The back on this chair is a simple one piece. I start by pinning it along the top, capturing the contoured shape as I go.
Then, I finish by pinning it to the inner arms at the back corners.
Click through this slideshow to see how it’s done.
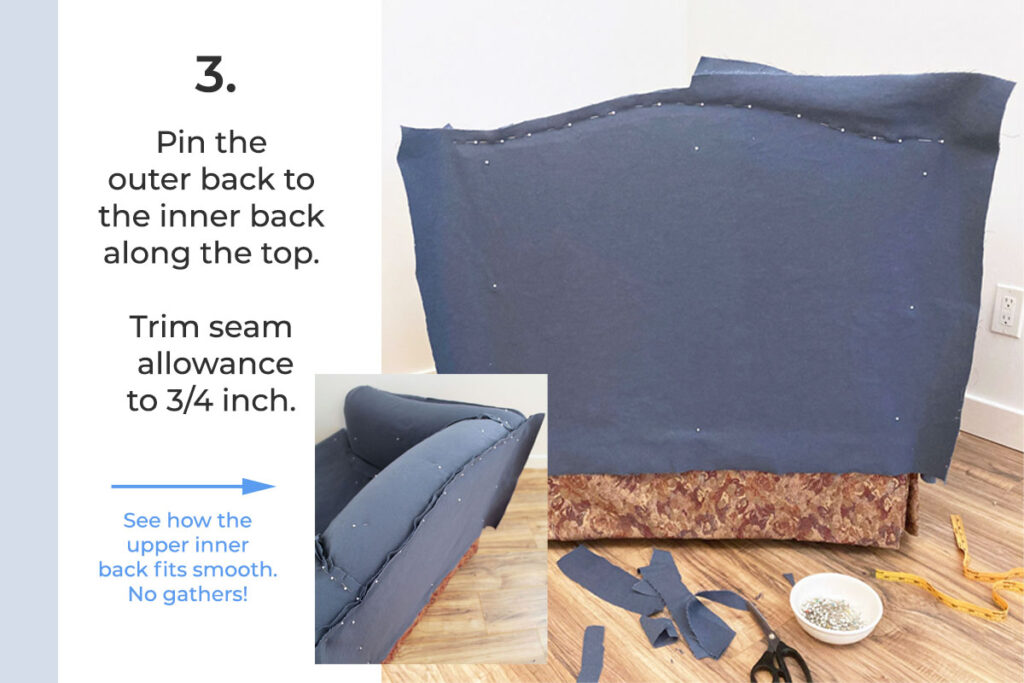
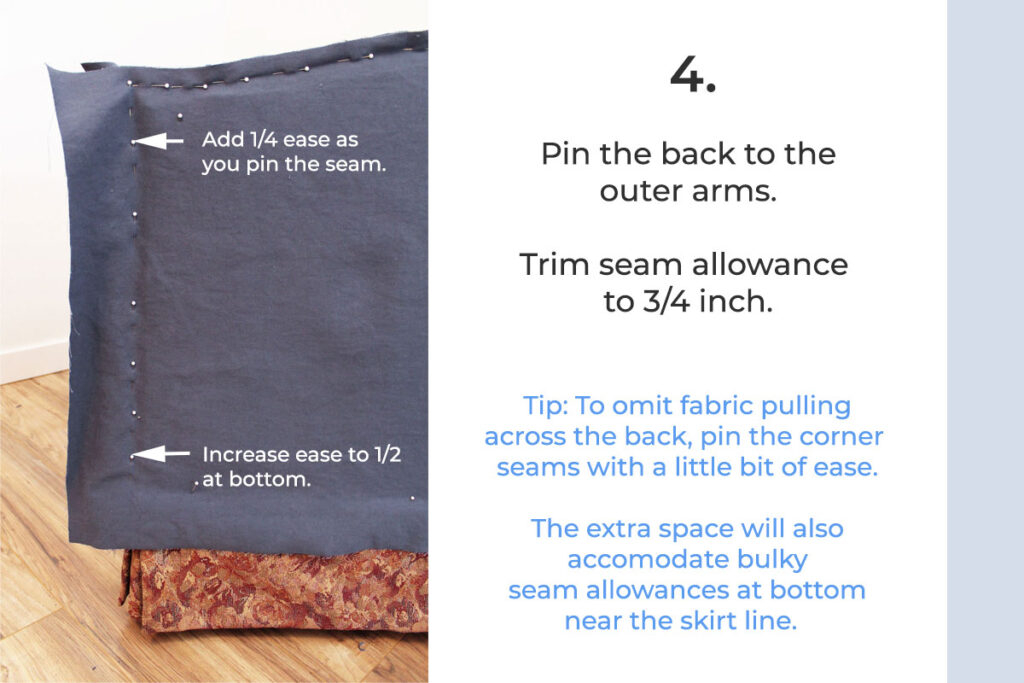
It’s common to fit the back too tight. When that happens, the fabric pulls across chair and puts strain the corner seams, and the zipper, if your slipcover has one.
To avoid this problem, I add ease to the corner seams as I pin. Here’s how:
- Start pinning the seam from the top and work down.
- Place your pins 1/4 inch away from the corner as you begin to pin.
- Slowly increase the ease in tiny bits as you pin down the seam.
- Increase the ease to 1/2 inch as you reach the bottom of the seam where it meets the skirt line.
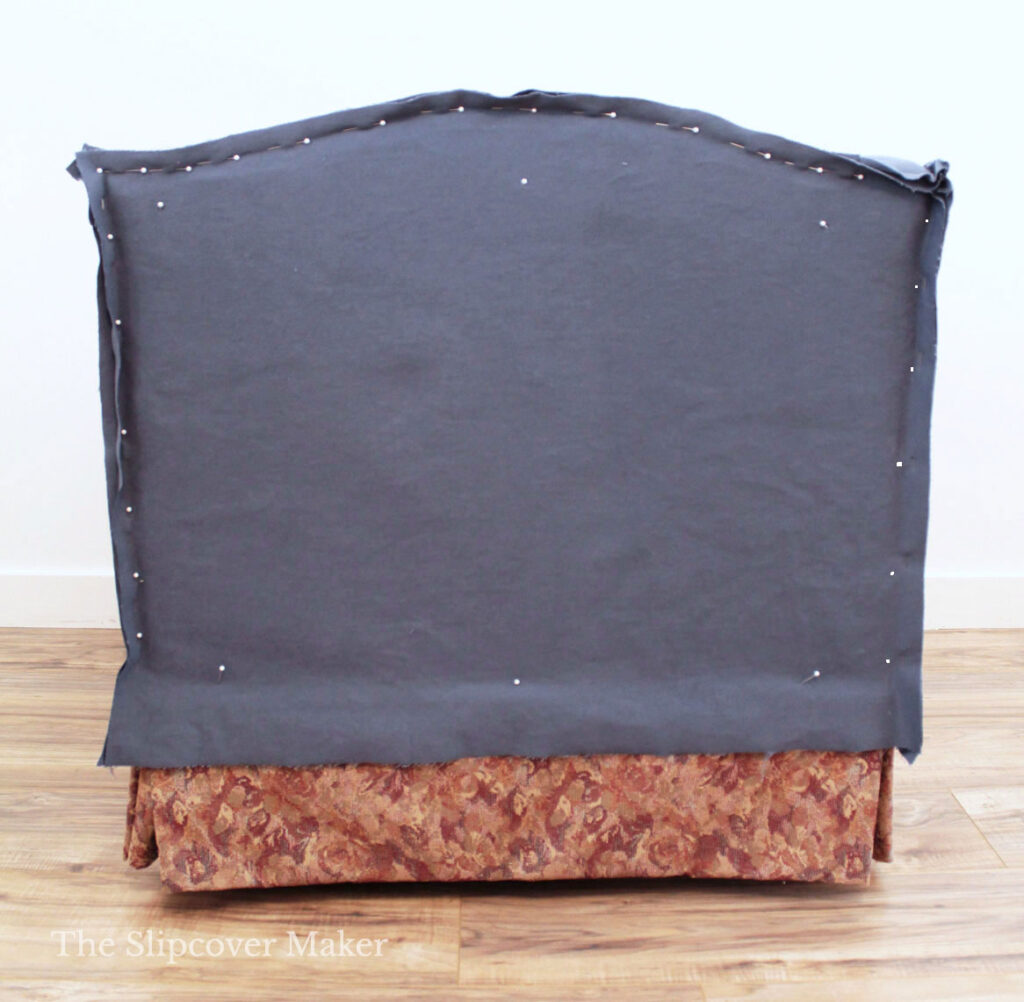
Back completed! This is what the back looks like after it’s pinned and cut with seam allowances trimmed to 3/4 inch.
What’s next?
After your pin fitting is completed, you are ready for Part 2 of this 4 part series. It’s all about prepping your pin fitted slipcover for sewing. You’ll learn:
- How to mark and cut the skirt line and add notches to the seam allowances.
- Remove the slipcover from the chair while it’s still pinned.
- Unpin the slipcover on the table and label the pieces. Yep, that’s right! The entire slipcover gets taken apart for easy sewing.
Then, in Part 3, you will learn how to to sew the slipcover pieces together.
And, in Part 4 I will share how to make the tailored skirt and the box cushion cover.
I love that you want to learn how to make a good fitting slipcover! Imagine your worn & loved furniture finally looking new again, and without spending a fortune!
Many thanks for providing this tutorial for beginners! Looks much more straightforward than pinning wrong side out. Looking forward to the next step!
You’re welcome! I hope you get a chance to give it a try.
You are truly amazing, your work is beautiful!
Thanks for this, I’ll be following along for part 2. I’m planning to make a heavyweight linen slipcover for a couch. The arms are different than yours, having a separate front piece, curved. I’ve made slipcovers for this couch before, and for chairs, but it always involves a lot of seat of the pants measuring, as well as cursing! I hope to learn new stuff!
Hi Catherine, Be sure to follow the pin fit steps in the order shown for best results. And, of course modify the inner back, inner and outer arm instructions for your regular rolled arm style. What’s with all of the measuring?? The cursing I totally understand! 🙂
Thank you so much for generously sharing your inspiring pro talents. I have looked at tutorials til im crosseyed — this is the clearest and most helpful! Im ready for part 2 – 4!! Appreciate you!
Hi Megan, I really appreciate your feedback. Clear and concise is my goal!
Hi Karen! You are amazing. I found you on Pinterest last week and love all your words and images! You inspired me to start an arm chair a couple days ago. I’ve had the bolts of white denim for years but could never find just the right instruction. I used your tutorial for doing a box cushion yesterday. Yay!! You are now a ‘bookmark’ on my laptop! And this post for pinning right side out came in the knick of time. Will definitely be using it. Thank you, thank you, thank you! Carol
Thanks very much, Carol. I’m honored to be a bookmark on your laptop! I hope you love your new slipcovers.
@Slipcovermaker, I am washing my fabric this week! 🙂 I have a sofa, club chair, and ottoman to make covers for. Been following you a long time, just now getting up the nerve to try!
That’s great, RW! Just take it step by step and you will do fine. Tip: Before you cut into your fabric, do a stitch test on your sewing machine to see if it can handle up to 4 layers without choking. If it can’t, omit the welt cord, This will eliminate a lot of frustration.
Thanks so much for sharing your knowledge with us.. You make it look so easy but your skills are amazing. Right now I’m making new cushion covers for the seat and back cushions of a teak chair. I thought it would be so easy, being an experienced sewer, using the existing cushion covers for patterns. However I chose ultra suede for the new covers. Straight pins don’t pass through 2 layers of this fabric and I have had to use vinyl covered paper clips to join fabric. They pop off at the least pressure when I’m sewing and it has been slow going (much ripping out). Did I mention that there’s a lot of piping? The actual sewing is easy-it’s the fitting of one pattern piece to another. I’ve finished 2 back seat cushions (2 chairs so twice the fun). Now I’m about to tackle the seat cushions. I would appreciate any advice from sewers experienced in sewing with this beautiful but challenging fabric.
Hi Maureen, Get Wonder Clips! I use them instead of pins or paper clips. They hold fabric layers tight. Also, visit Threads Magazine website and search for articles about working with Ultrasuede. They offer very good tips.
What a clear and concise tutorial! While I took my first sewing class at age 9 and have sewed consistently since, I have never made a slipcover for anything other than an ottoman or chair seat. I already have a chair I can try this on and can’t wait. Thanks so much for sharing your vast knowledge!
Sherri — I’m so glad my tutorial has inspired you to slipcover your chair! With your sewing know-how and experience with making an ottoman cover, I think you’ll do great.
Wowsa!! This will be a great series!! I’m excited to slipcovers my own pair of chairs now!
Cindy — I can’t wait to see the final results!
This is the technique I learned many years ago. It works very well. Problem now – I am too old to get up and down on the floor!
Hi Mary, It’s nice to meet another right side out pinner! It really is a smart slipcover method.
Did you already have a talent for sewing? I’m learning for the whole point of making slipcovers to sell and do some for myself. I feel dumb as a rock. I will follow this tiputorial. I aporeciate you sharing the information.
Hi Patsy, I learned to sew when I was a kid. I learned how to pin fit slipcovers only 10 years ago at age 55. If you know sewing basics, you are half way there. I think it’s awesome you want to learn slipcover making!
Thank you for this series! Lots of great info!
You’re welcome, Colleen! I hope it helps you make a beautiful slipcover.
Thank you so much for this! Looking forward to the next one!
My pleasure, Wendy! I appreciate you following along.
Hi Karen, I have been following your posts for about 6 months. You are so gifted in slipcovering and your tutorials are amazing! I have inherited my parents Hickory Chair sofa, a beautiful well built piece and plan to slipcover it. I have found your posts so very helpful and look forward to the process. Thanks for sharing all that you do!
Hi Mitzie, You’re welcome! I love knowing my posts are helpful to you. A slipcover on your Hickory sofa will look beautiful!
I have slipcovered a couch, chair, ottoman and two wingback chairs to keep busy during lockdowns here in Ontario, Canada. I was just lamenting how I wished you could pin with the right side of the fabric showing and voila, along came this wonderful tutorial. I will definitely give this method a try on my next project. Thank you for sharing your knowledge so generously.
Hi Debby — I love when the right information arrives just in time! Enjoy the tutorials and let me know how they work out for you.
I’ve been hoping you’d do some kind of extensive, detailed tutorial but I planned on paying for it. This is such a fabulous gift – thank you! I recently finished two chair slipcovers that look about 85% of what I hoped. Today’s post showed me at least two sections where I had a lot of trouble. I’d never considered having a tuck-in at that vertical spot between the inner arm and the inner seat back. How does that stay tucked in? The other trouble spot was adding ease in the back piece. I used your button and loop idea over a zipper placket but sewed the back on so tightly that while it fits perfectly, it also pulls apart so much that the placket exposes the zipper. ARGH. I can’t wait to try again but this time without the incredibly tedious pinning inside out, taking the cover off and on, sewing one section at a time, etc. I am SO thrilled that you’re doing this for us.
You’re welcome, Tracey! I love teaching and will be doing more of it going forward. And, good questions and comments! I will post a Q & A later this week and will include yours. I agree — pinning inside out, taking the cover off and on and sewing one section at a time is tedious. That process alters the fit of the slipcover not to mention it can be very frustrating.
Marvelous! So helpful, and generous of you to share.
Hi Ester! If you try the right side out method let me know how your pin fitting turns out.
I certainly will! Thanks for reach-out.😌🌷
Your work is beautiful!! I just finished my first slipcover on my angled sectional. I used drop cloth since it is my first time, but have purchased fabric for the real thing thru Big Duck Canvas. This tutorial is very timely for me as I have a chair that I would like to slipcover & has the same arms!! Thank you for all of your hard work on your posts: the pics, the writing, all of it!! Cathy
You’re welcome, Cathy! I’m impressed your first slipcover was a sectional! Let me know how your second one turns out using the right side out method.
Thank you so much for your great tutorials and inspiring slipcovers! I’m having difficulty pinning accurately, so that the cut line (and so seam line) are both smooth. When I take the pinned slipcover off the sofa, I see that I’ve cut and pinned the fabric a bit wavy, so after sew it, my sewing lines are warped. I’m practicing using scrap fabric, so no worries there. If you have any tips on pinning more accurately, I would appreciate it! Thank you again!
Hi Denise, Great question! I’d like to answer it more in depth in an upcoming post and maybe include a how-to video to show you how I do it. For now, I can tell you it takes practice to pin and cut seams straight and smooth. The process is just as much about using your fingers to feel the pin’s position as it is visual. It’s hard to explain in writing! I suggest pinning seams in small sections at a time. Take a look at your pins — are they lined up straight and/or following a curve evenly? If not, adjust them. Then, use a small measuring guide to mark the 3/4″ seam allowance (your cut line). Practice pinning and cutting like this for awhile. It will really help to train your eye. As a result, you will pin and cut more accurately with ease.
Hi Karen,
Thank you for answering! I zoomed into your photos, and see that the point where each pin enters and exits the fabric forms a very uniform seam line. This definitely will take some practice…. thank you for all your useful tips and detailed instructions. I truly appreciate your taking the time to share your expertise!