Slipcover Pin Fit Tutorial Part 4: Skirt & Cushion Cover
This slipcover sewing tutorial shows you how to make a tailored skirt and cushion cover. These are the finishing touches that give your DIY chair cover a professional look.
Hi everyone! Part 4 of my slipcover pin fit tutorial series is finally here!
There are a lot of good tips and step-by-step instructions packed into this last post of the series.
If you’ve already completed pin fitting and sewing your slipcover, you only have a couple more things to make. You’ll be enjoying your beautiful new cover in no time!
In this post, you will learn how to create a unlined skirt with corner pleats and attach it to your slipcover body. And, I’ll walk you through how to make a box cushion cover with a zipper.
Are you new to this 4-part series? Welcome! You can catch up below with the first three:
- Part 1 — How to Pin Fit a Slipcover Right Side Out
- Part 2 — Sewing Prep
- Part 3 — Sewing the Body
- 5 Ways to Make Sewing Your Slipcover Hassle-Free
Let’s start with the skirt!
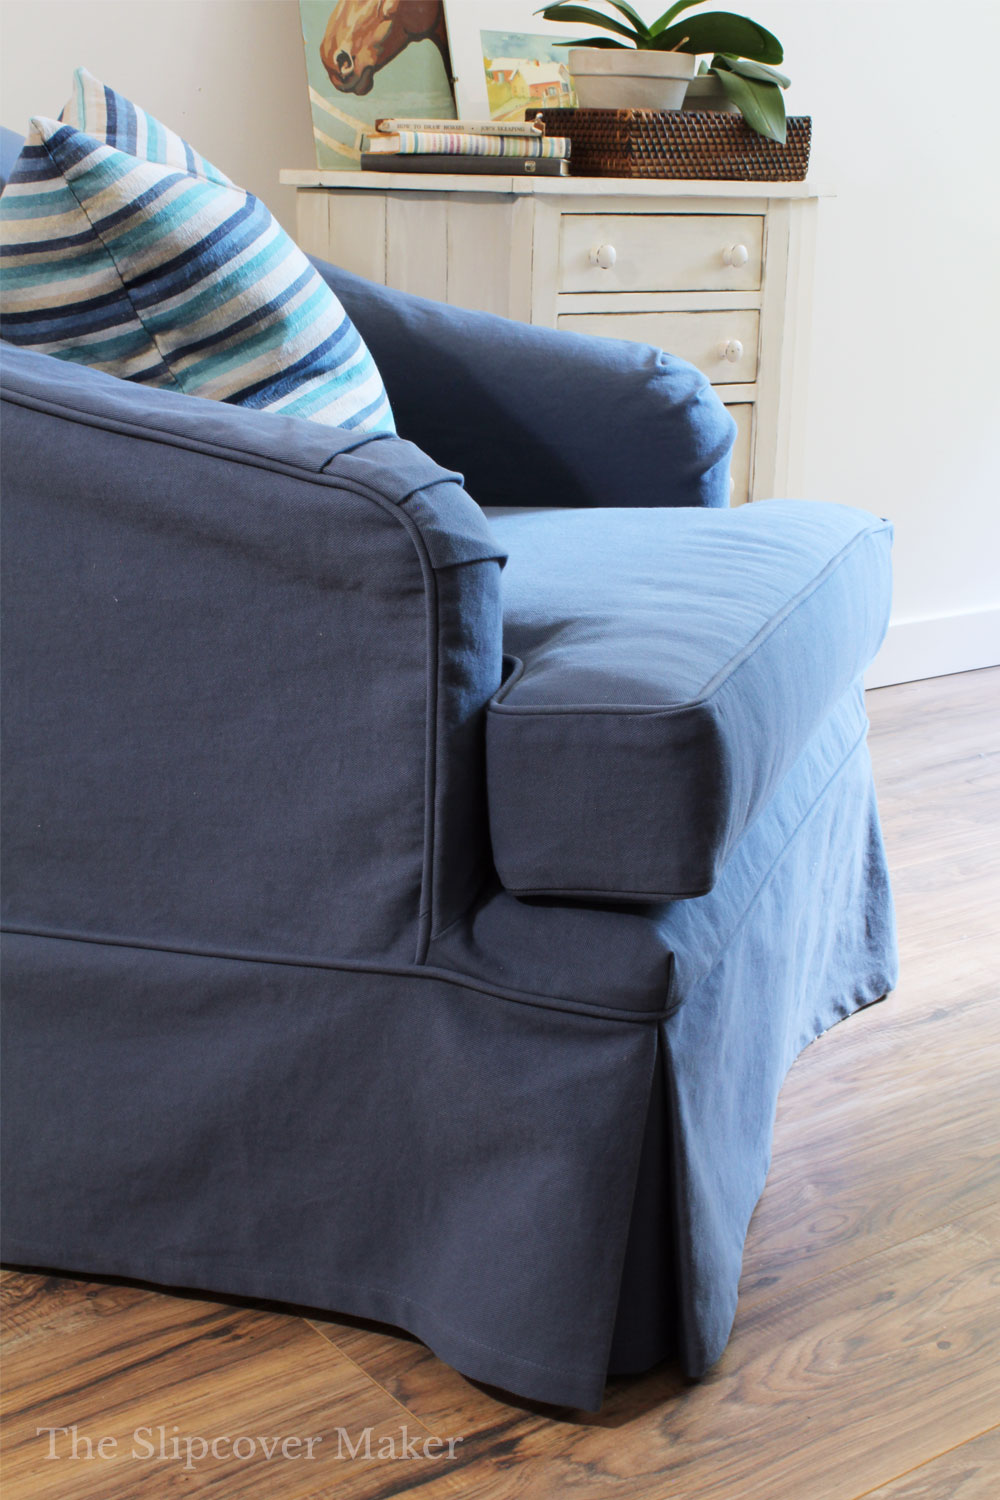
First, a little prep. If you want to trim your skirt seam with welt cord, now’s the time to add it.
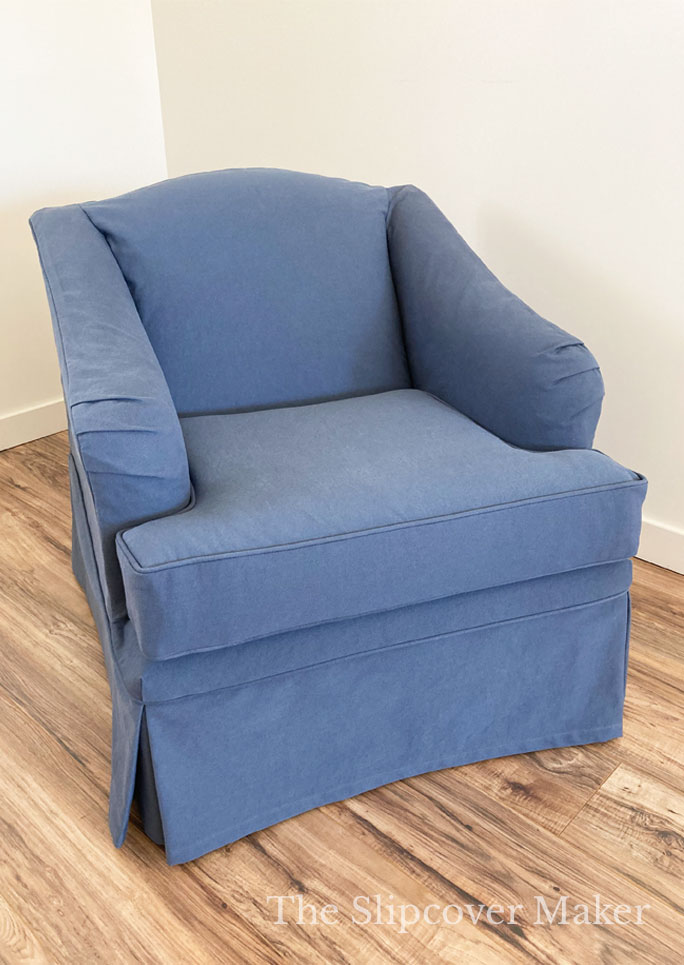
After you’ve completed sewing your slipcover body, stitch the welt cord around the bottom edge and overlock the seam allowance. See my chair above.
If you don’t want welt cord at the skirt seam, just overlock the slipcover bottom edge all around the body.
OK, on with Part 1 of making the skirt.
Step 1: Measure & Cut Skirt Panels
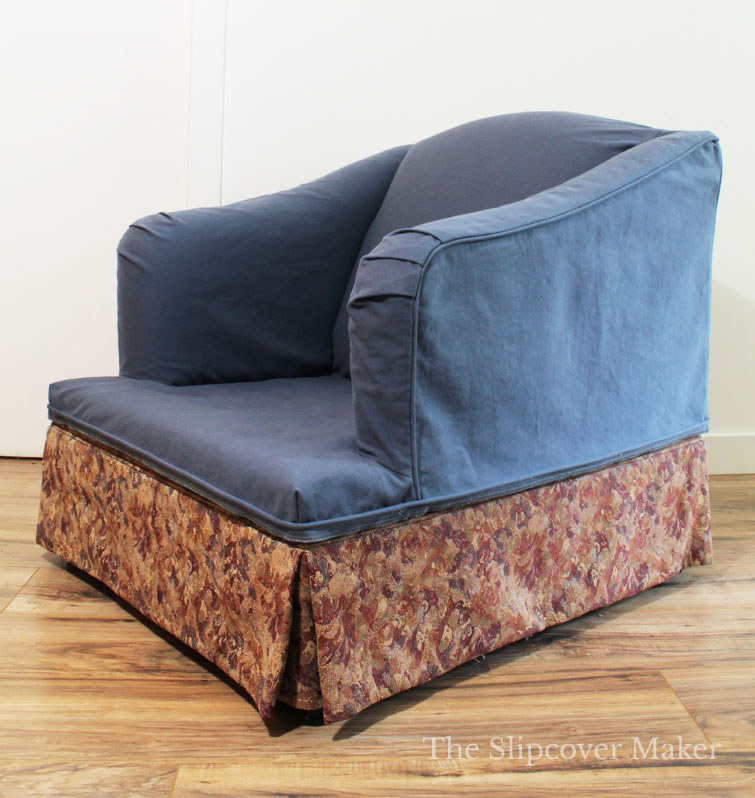
My slipcover has an unlined skirt with an inverted box pleat at each corner and a rolled hem. It opens at the left back corner (below the zipper) with a Velcro closure.
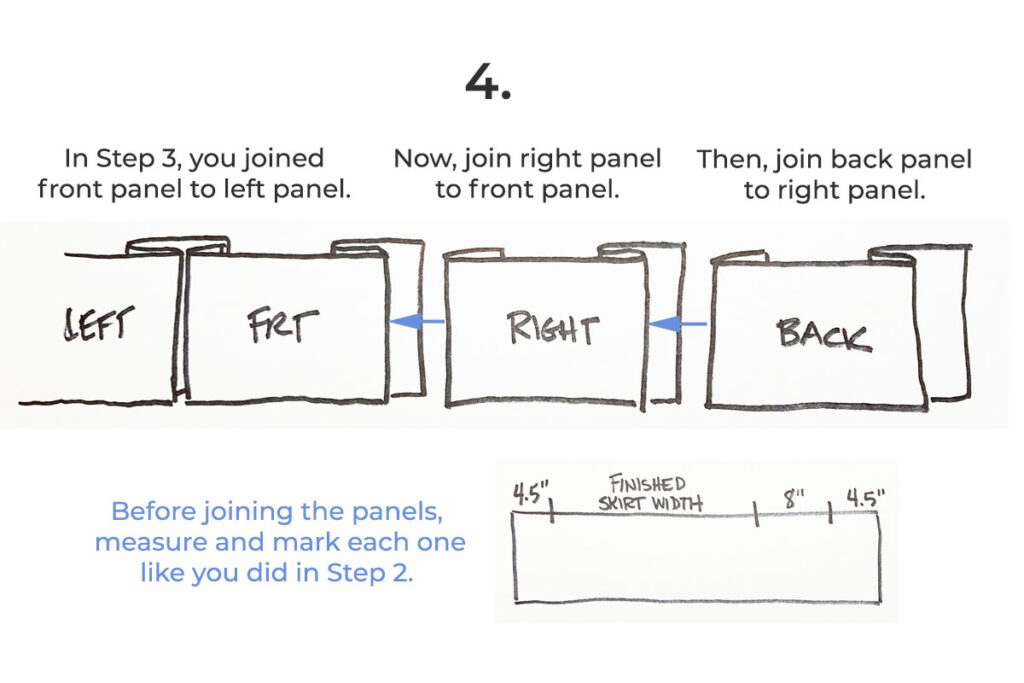
It’s made up of four individual panels that join together like this:
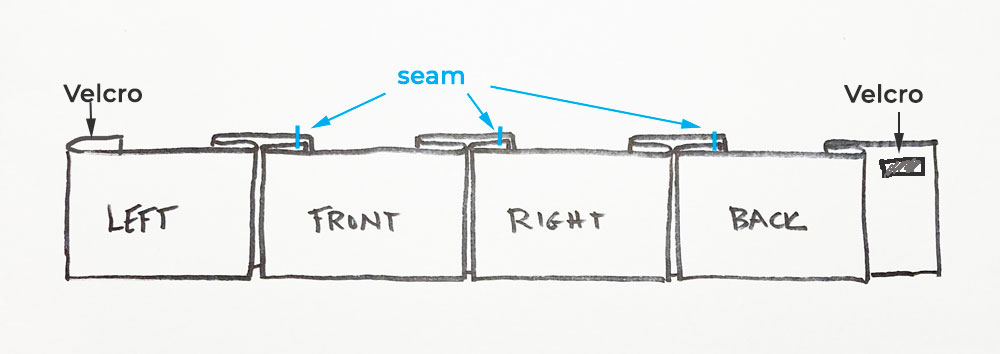
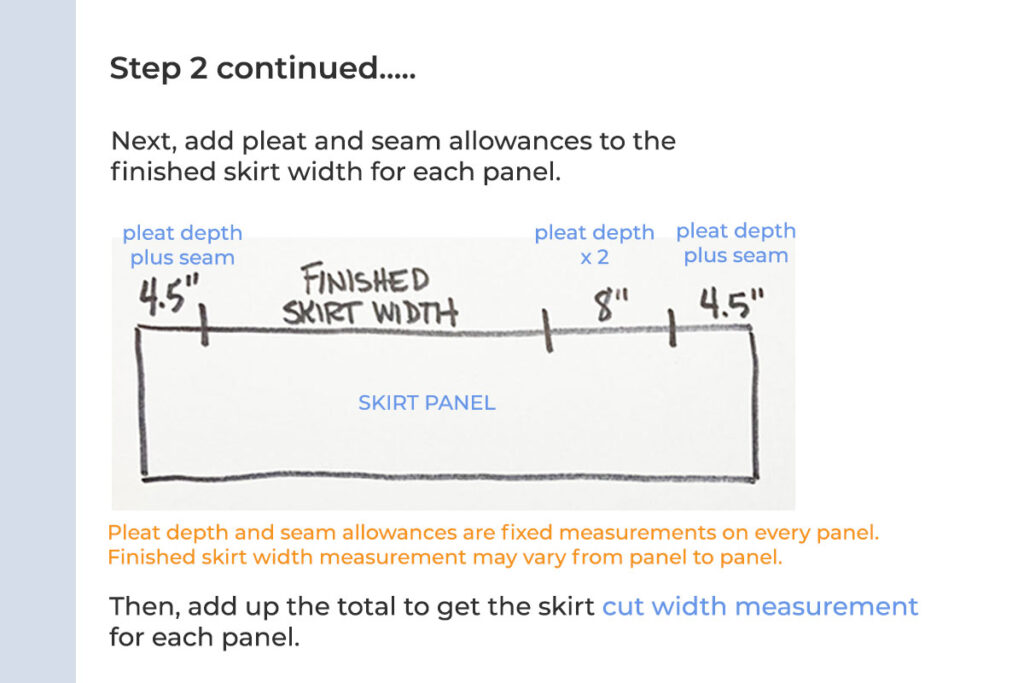
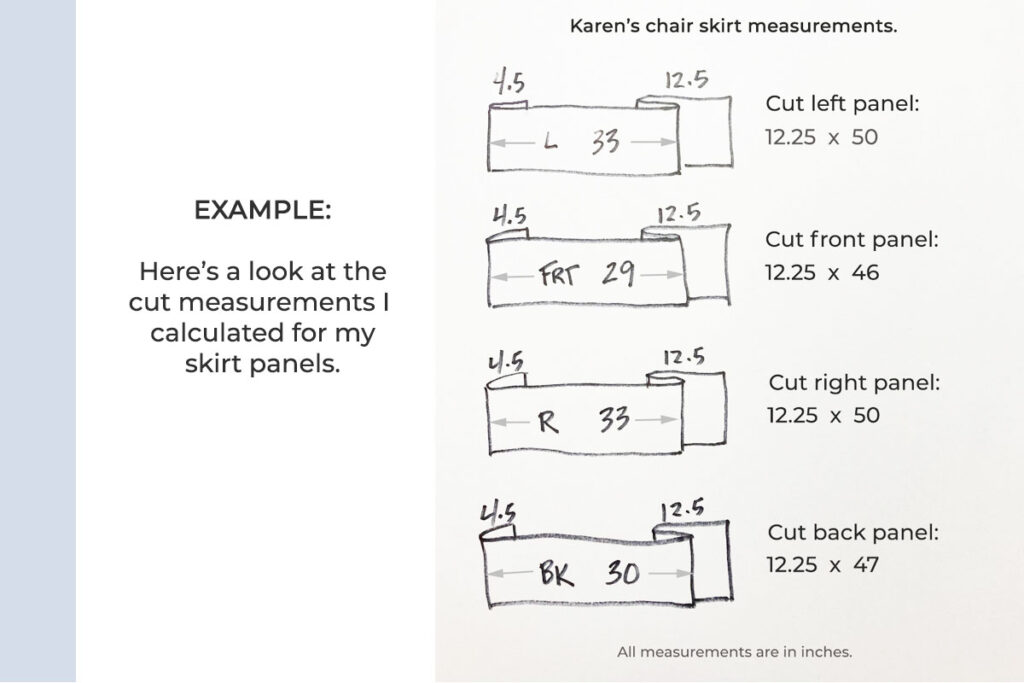
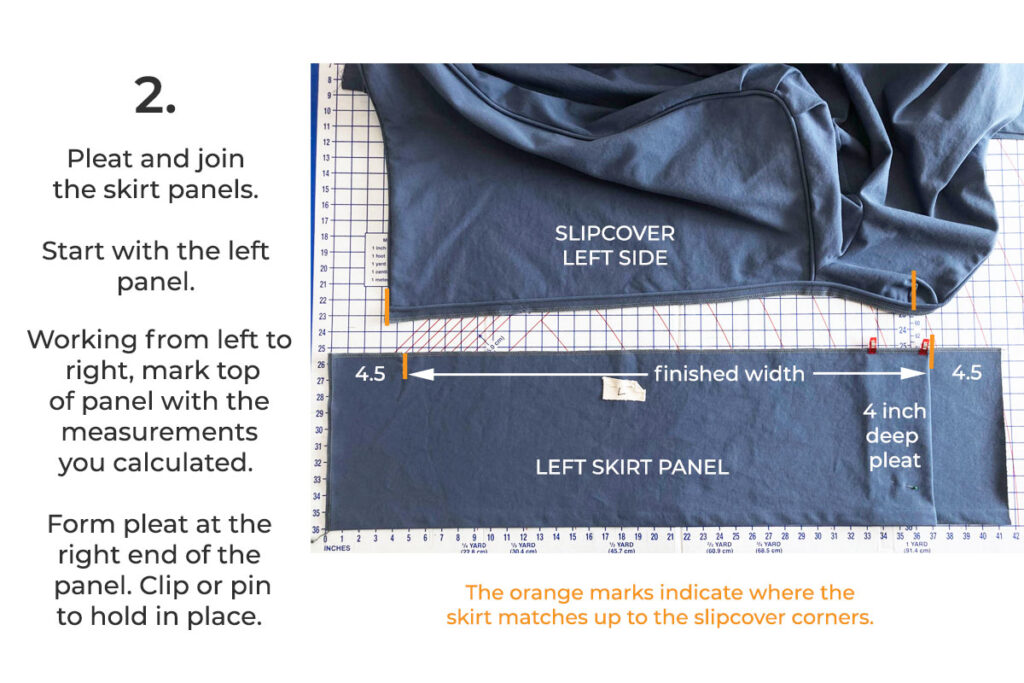
To determine the cut measurement of each panel, I had to first figure out the skirt height, width, pleat depth, hem and seam allowances.
Get out your measuring tape and calculator!
In this slideshow, I will walk you through how to determine your skirt panel measurements.
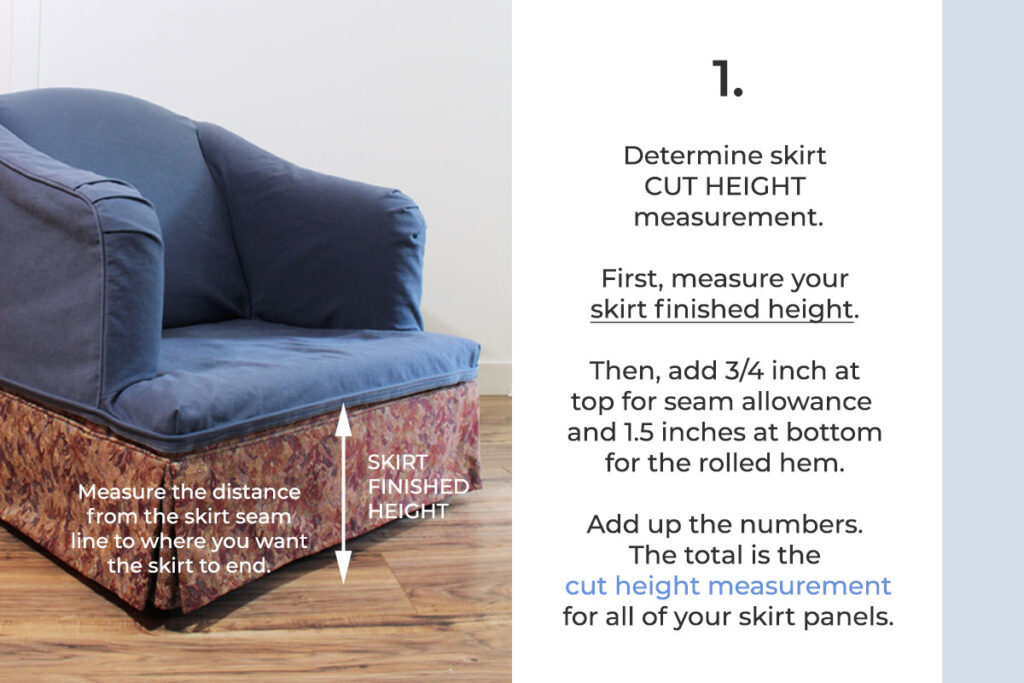
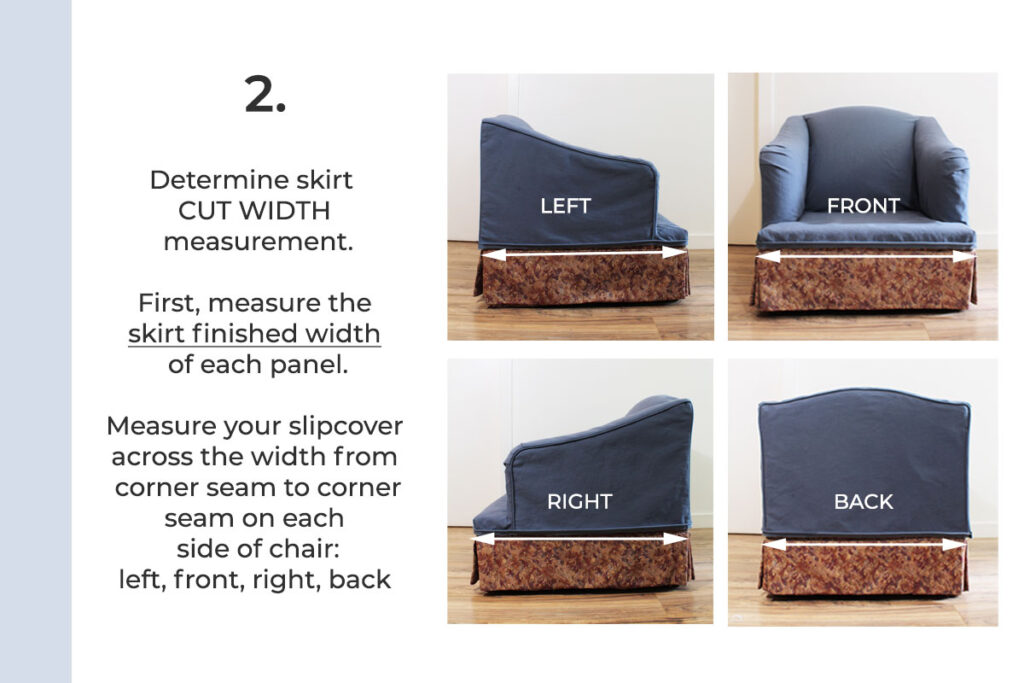
When measuring the skirt finished width, you can keep the slipcover on your chair and take the measurements as shown in Step 2. Or, remove the slipcover and measure it on your table. That’s what I do.
Once you’ve determined your skirt cut measurements, you are ready to cut the panels.
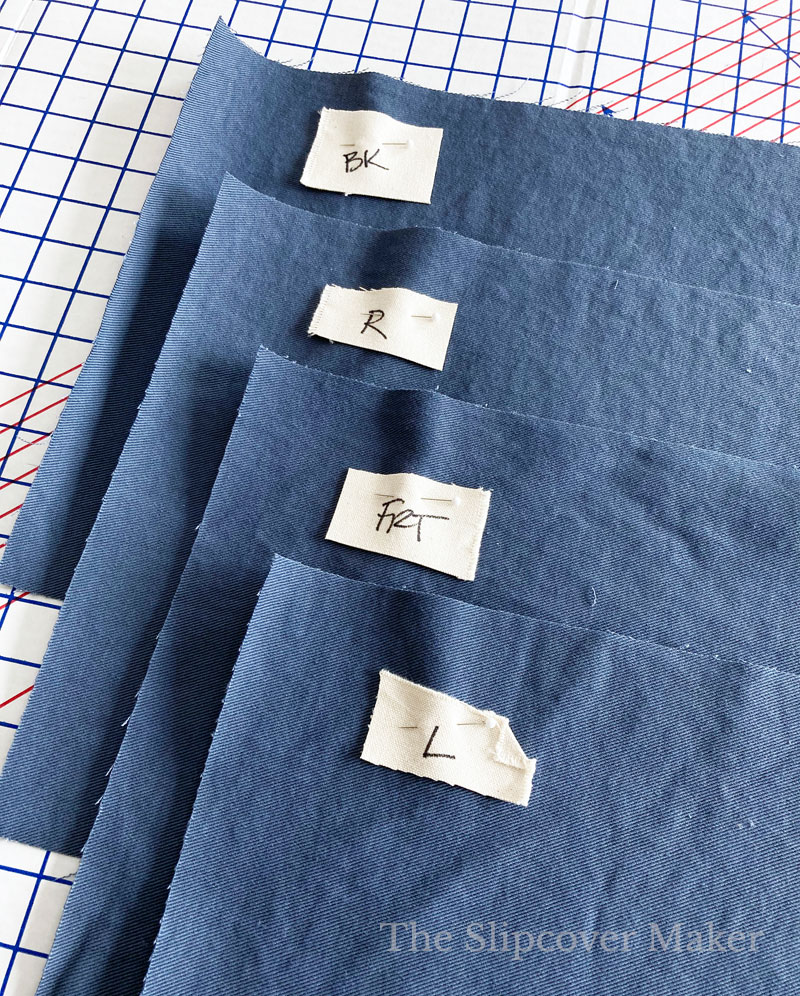
Your cut skirt panels will probably be varying lengths. Be sure to attach a label to each panel to identify left, front, right and back.
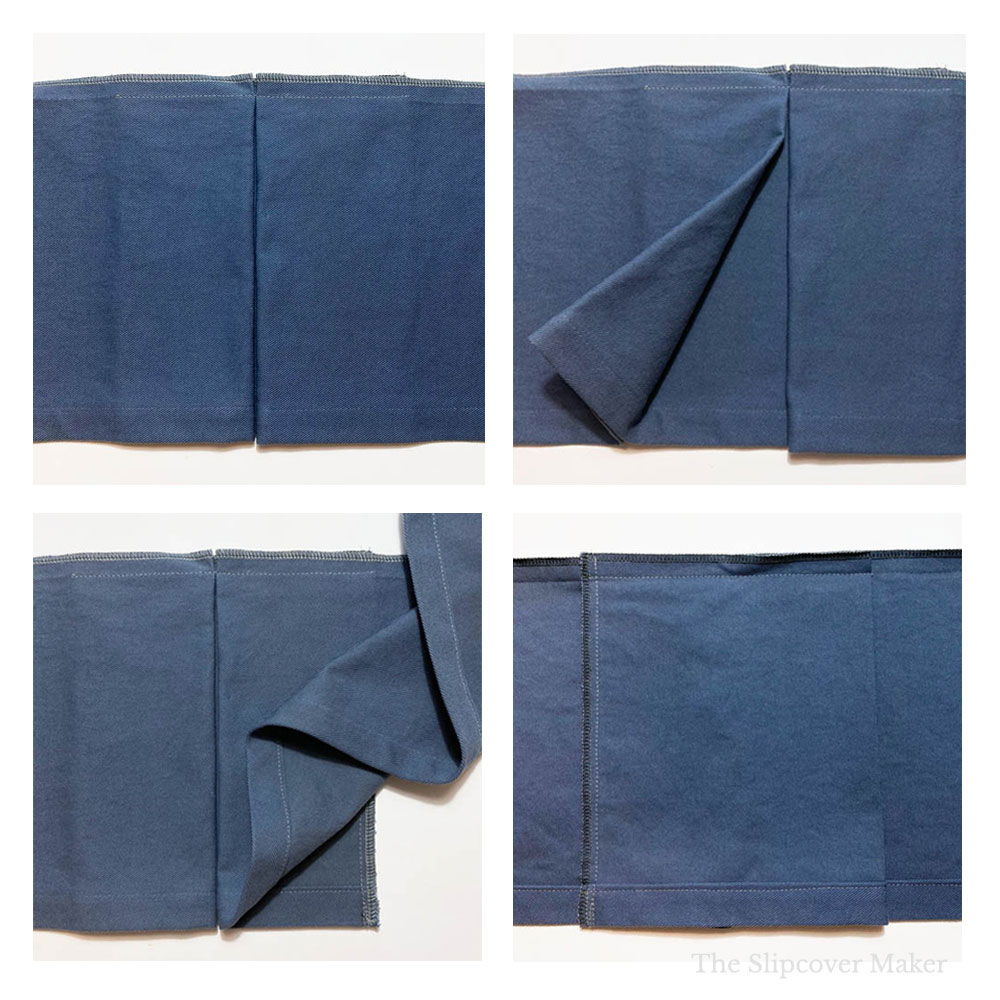
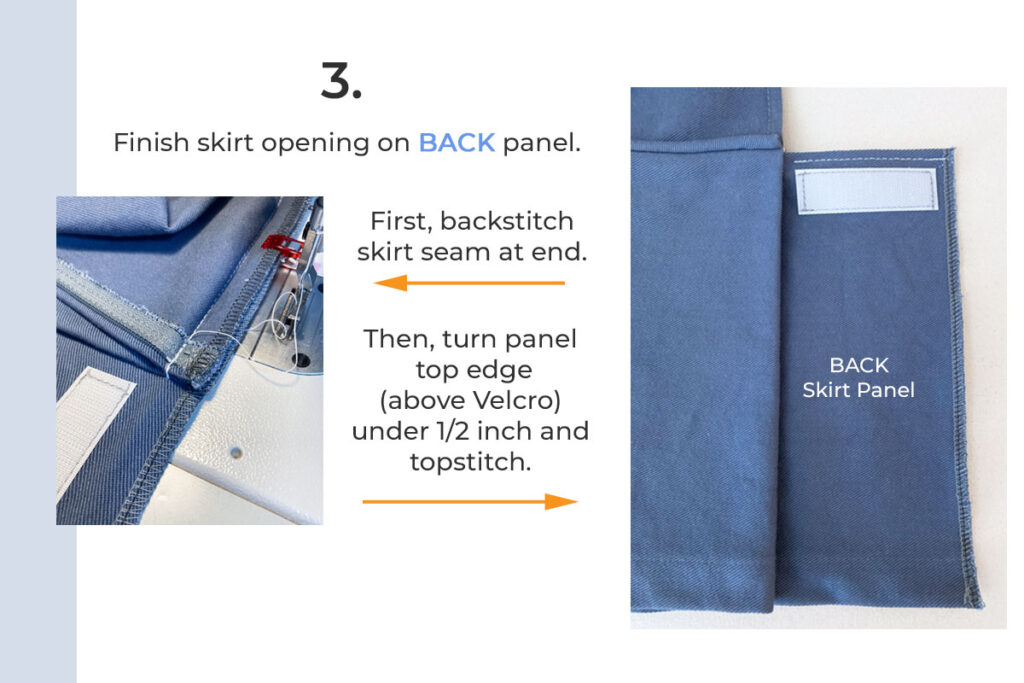
Now, that your skirt panels are cut, it’s time to hem and join them together.
Step 2: Hem & Join Skirt Panels
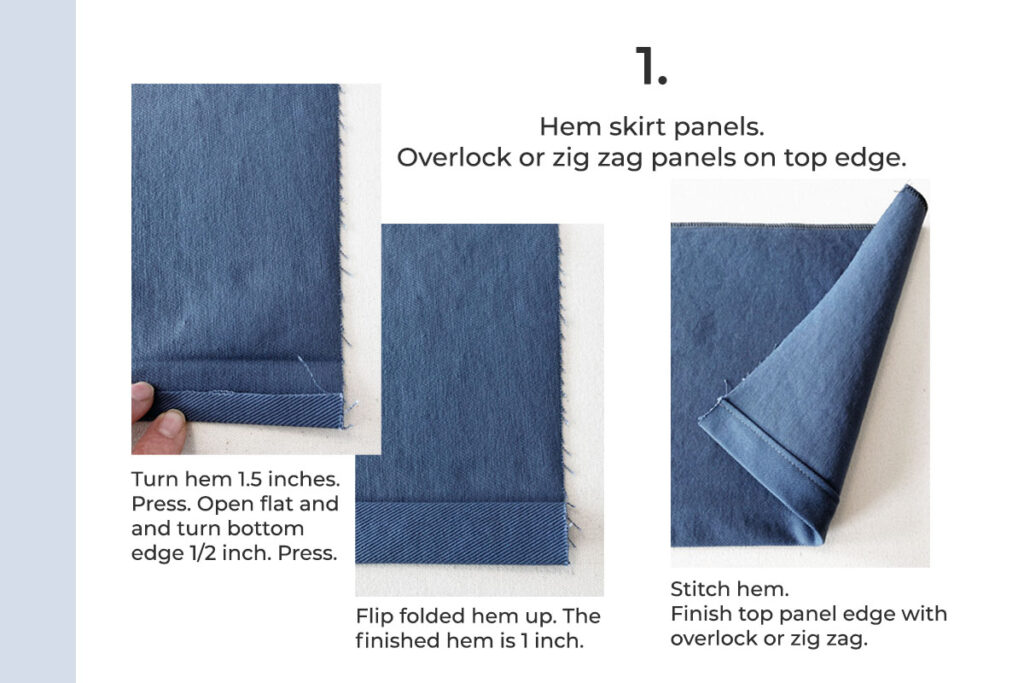
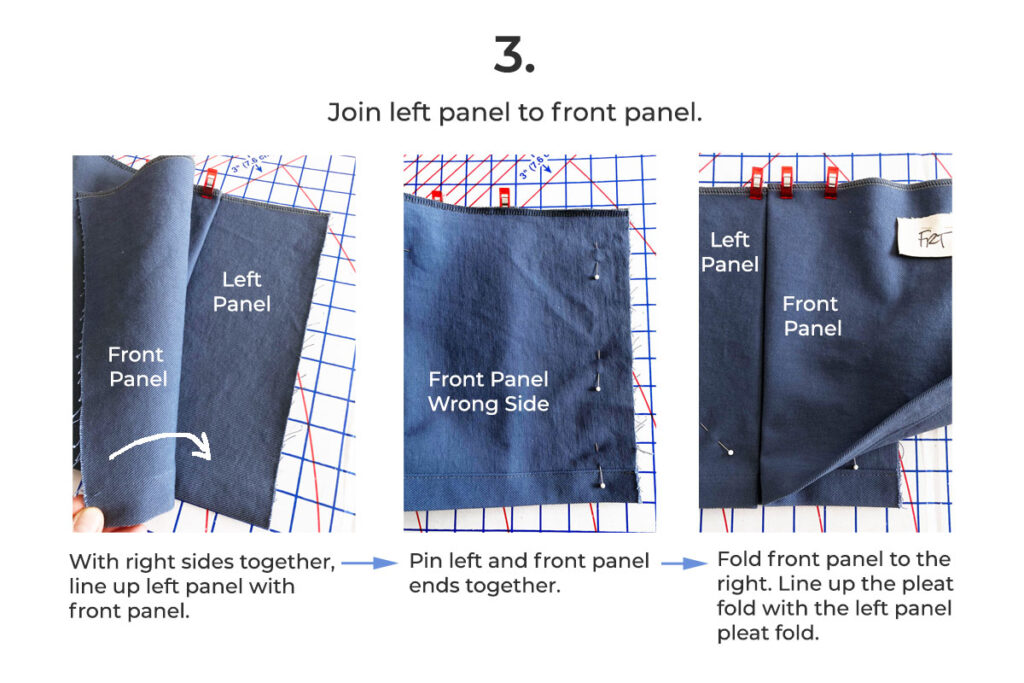
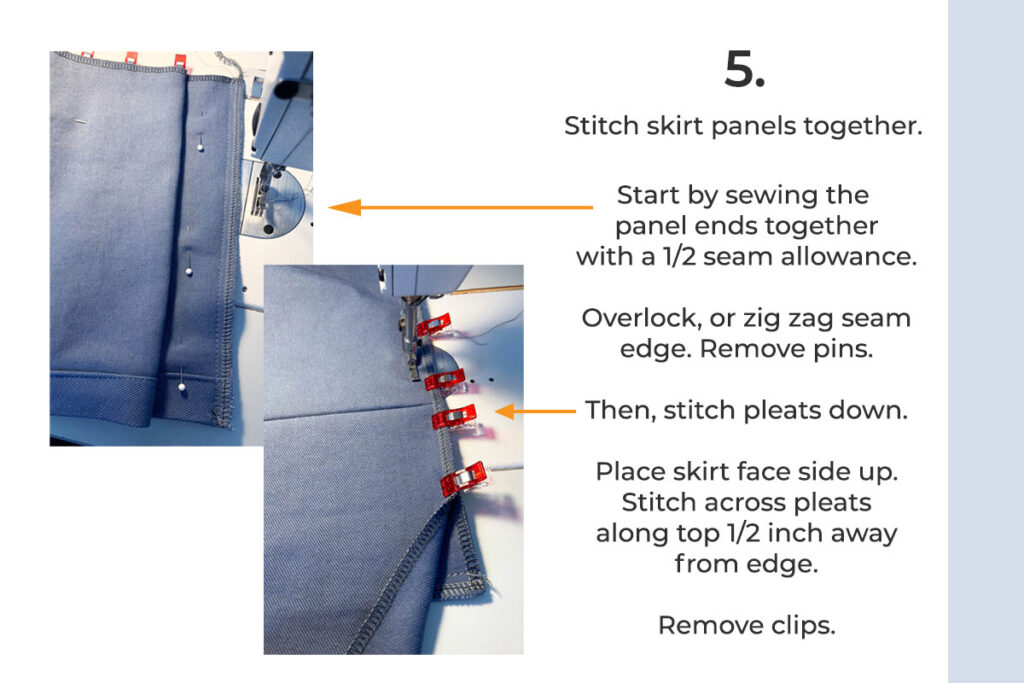
Below is a look at two skirt panels joined. I shot different views of the same pleat so you could see how it’s constructed.
Tips for creating a skirt that hangs straight and smooth:
- Mark and cut skirt panels on a grid cutting mat to ensure right angles at corners and straight cut lines. I use this folding cardboard mat.
- Do not press the pleats. Let the pleat fold and hang naturally.
- Create a minimum 4 inch pleat depth each side of pleat fold (8 inches across the back side of box pleat plus seam allowance). This amount gives weight to the pleat so it doesn’t pop open.
When you’ve stitched all panels together, you are ready to attach the skirt to your slipcover.
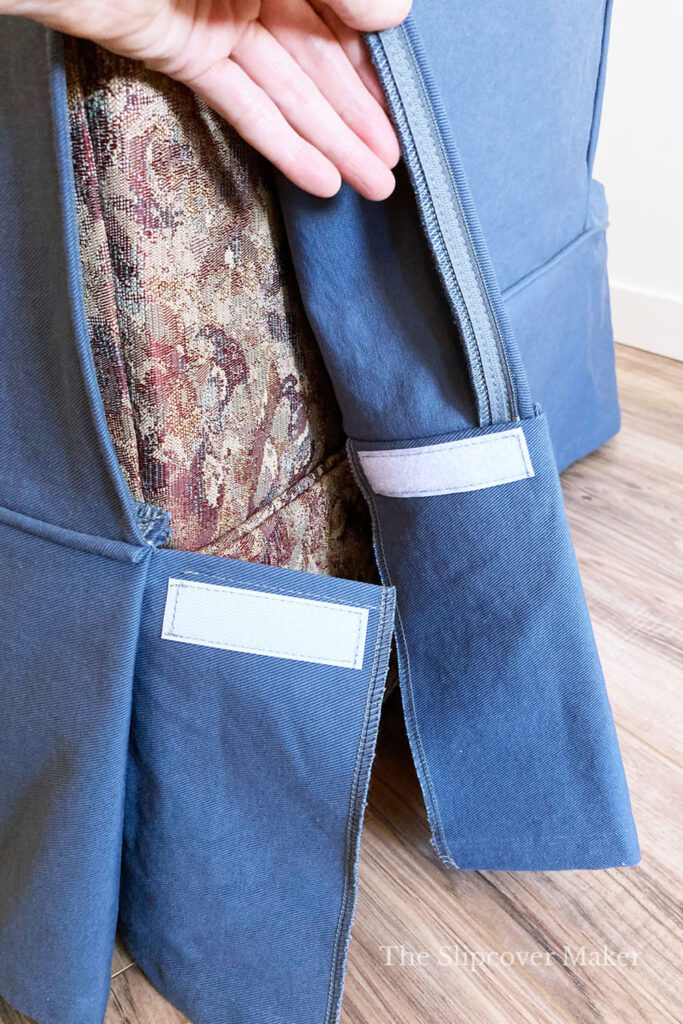
Step 3: Attach Skirt to Slipcover
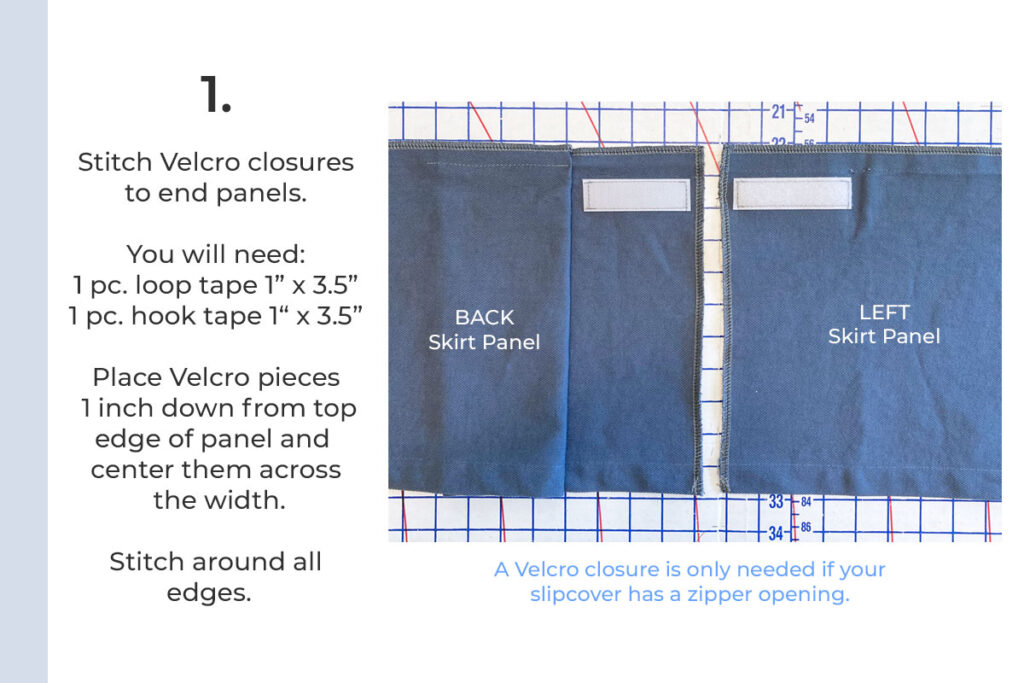
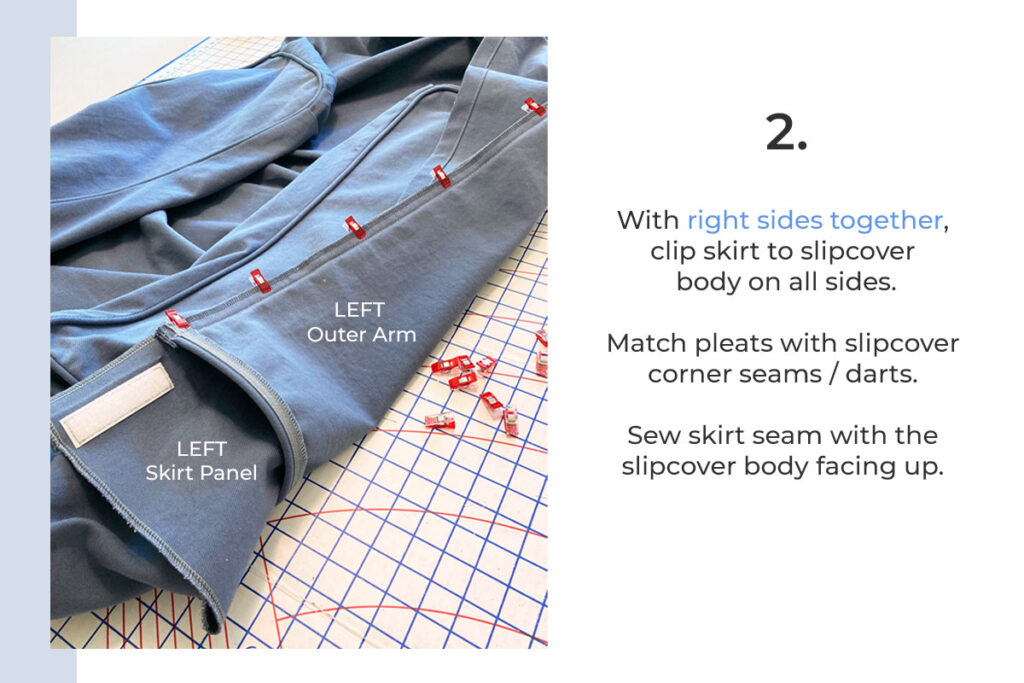
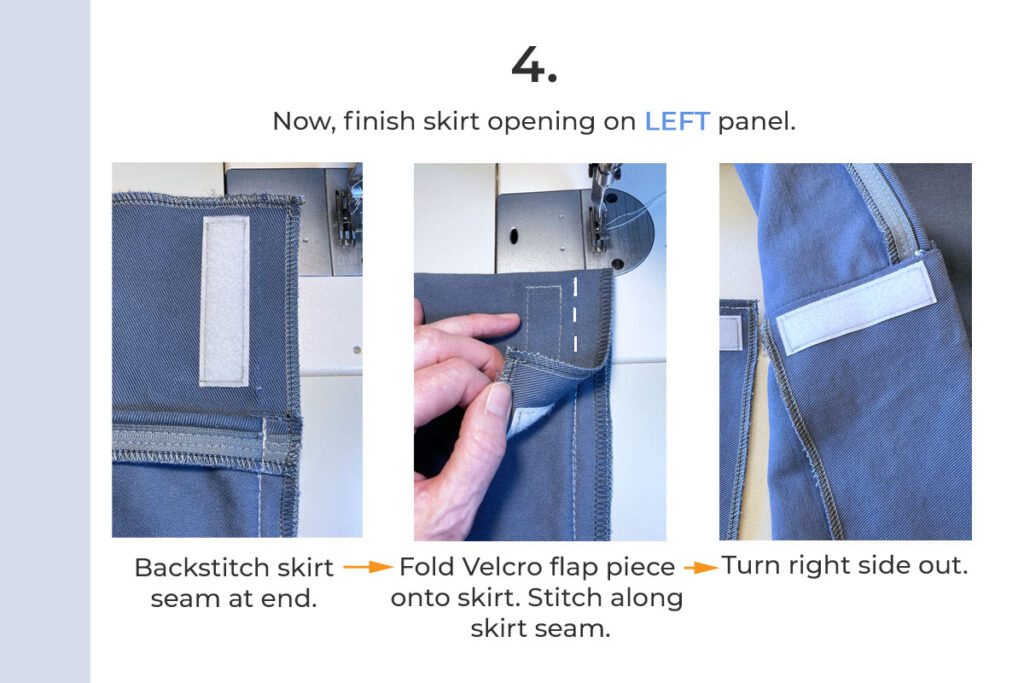
Here’s how the finished opening looks on the skirt back left corner.
If your slipcover doesn’t have a zipper opening, attach the back and left skirt ends just as you did with the other panels.
Next up, make the cushion cover.
OK, now that your skirt is finished, the next thing to do is cut and sew your cushion cover.
Making a new cover for your seat cushion doesn’t require pin fitting.
Instead, you will trace off your cushion shape, make the zipper and boxing panel and stitch it all together.
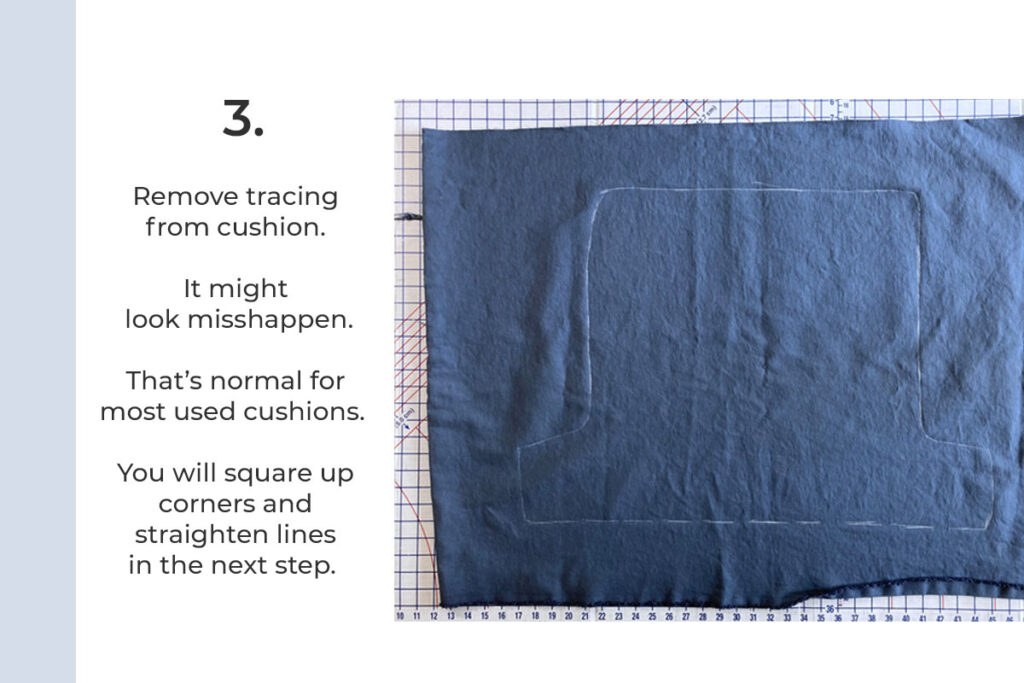
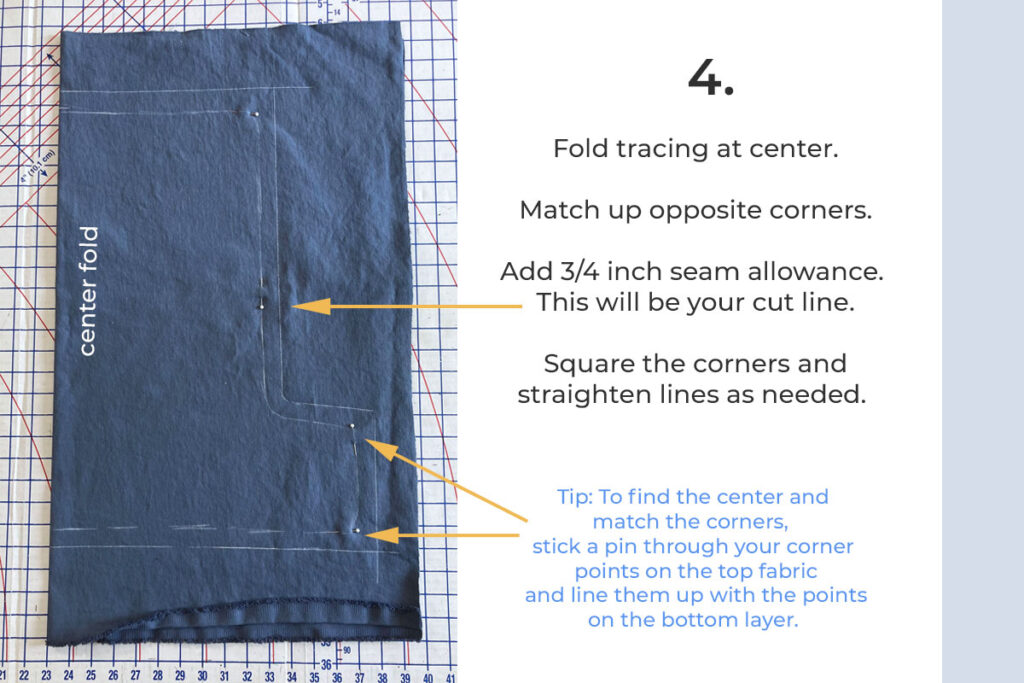
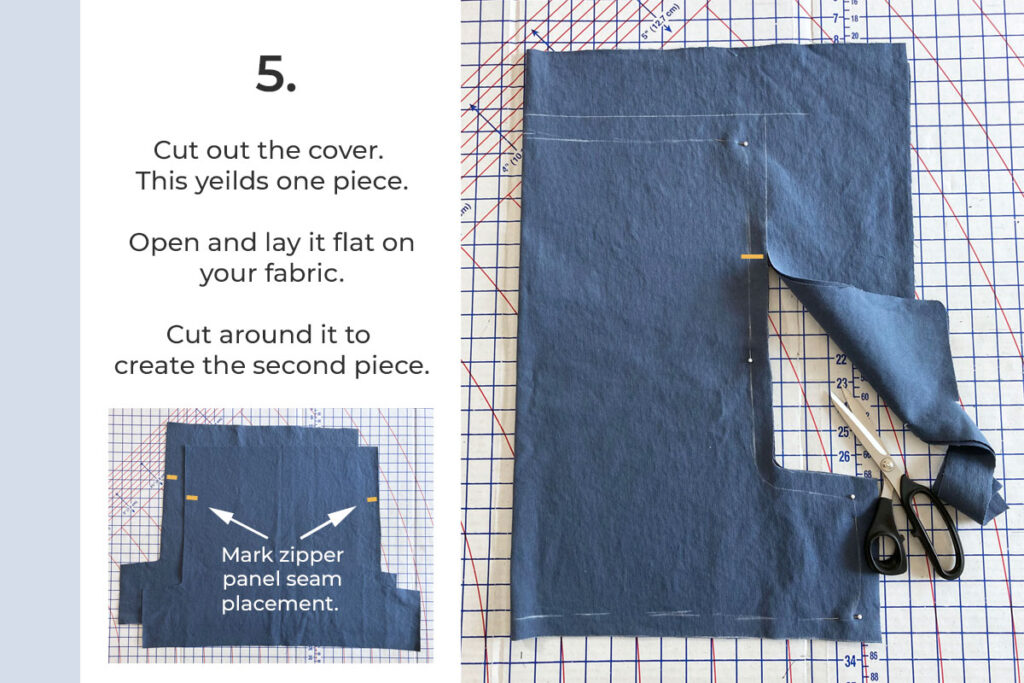
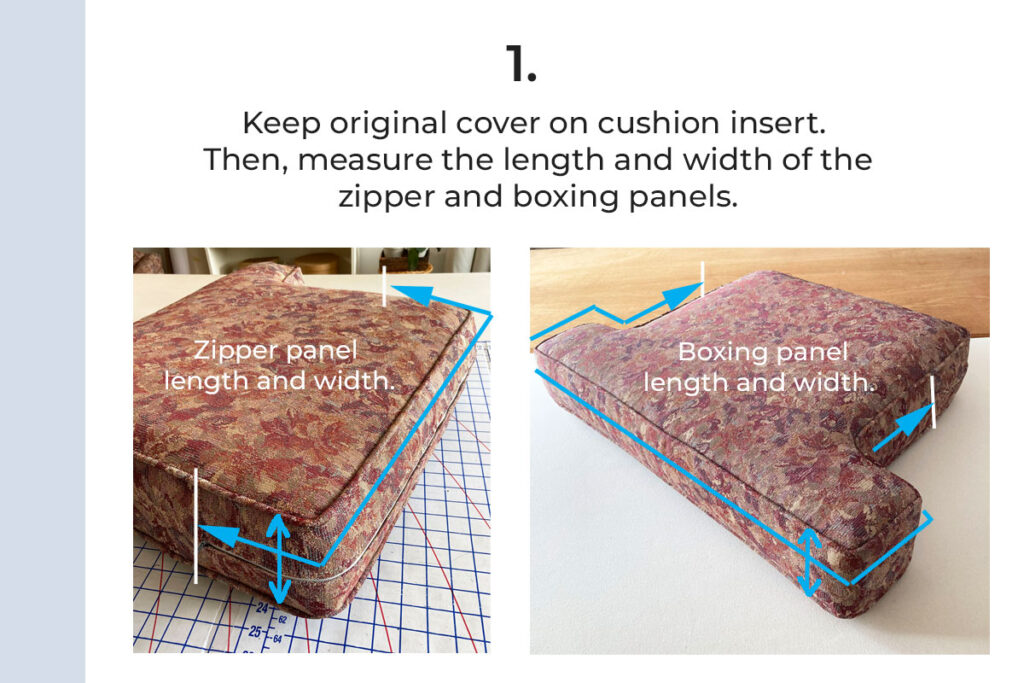
Step 1: Trace & Cut Cushion Cover
In this slideshow, I will show you how I made my top and bottom cushion cover pieces.
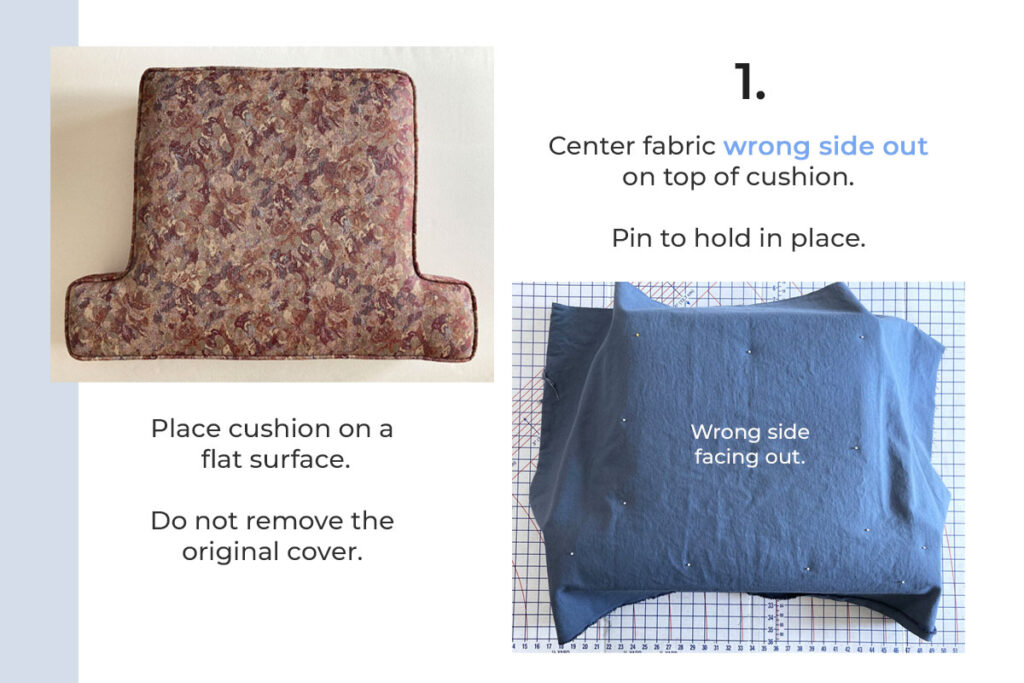
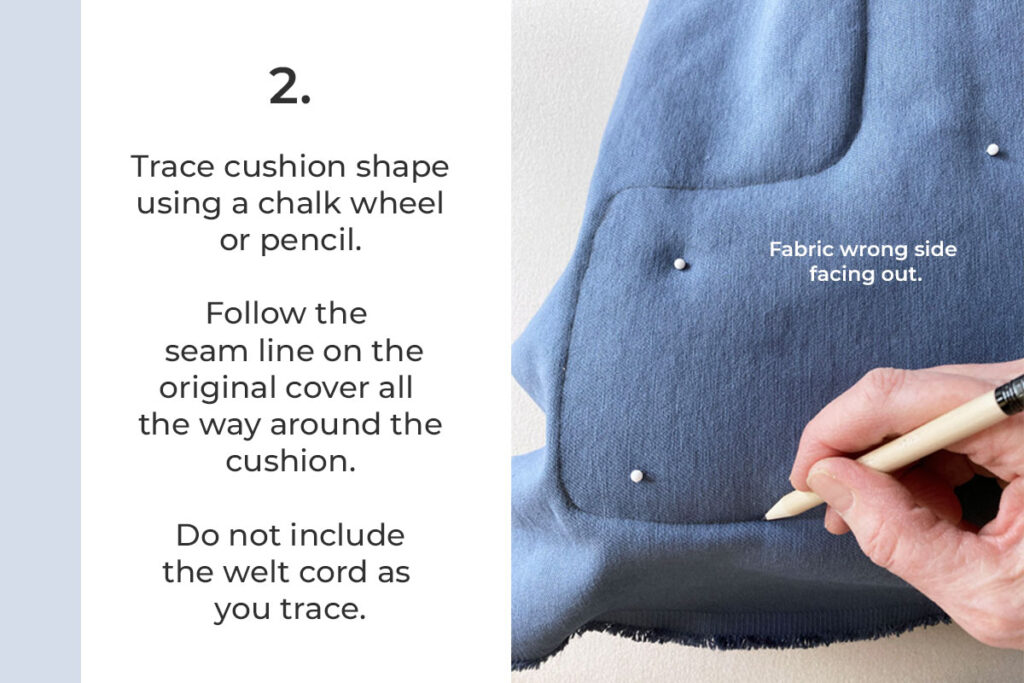
The cushion on my chair is a T-Shape box style with a zipper opening and welt cord.
You can use this tutorial to create any shape of box cushion cover. Just be sure to trace off the shape of your cushion with the original cover on it.
You will remove the original cushion cover only when you are ready to put on your new one.
You don’t have to add a welt cord like I did. But if you want it, this is the time to add it.
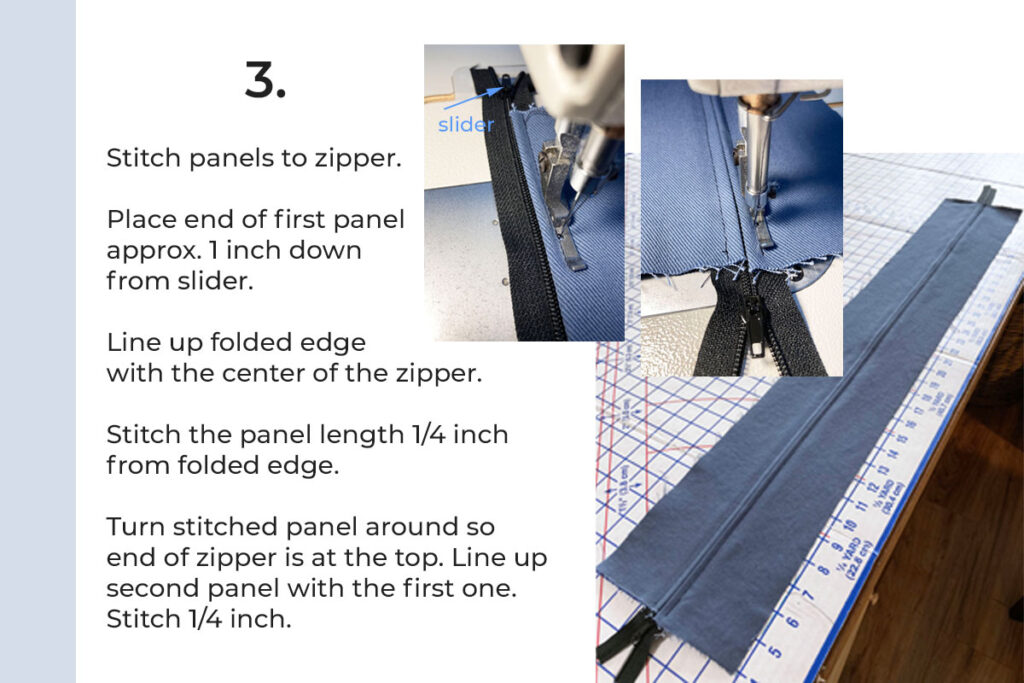
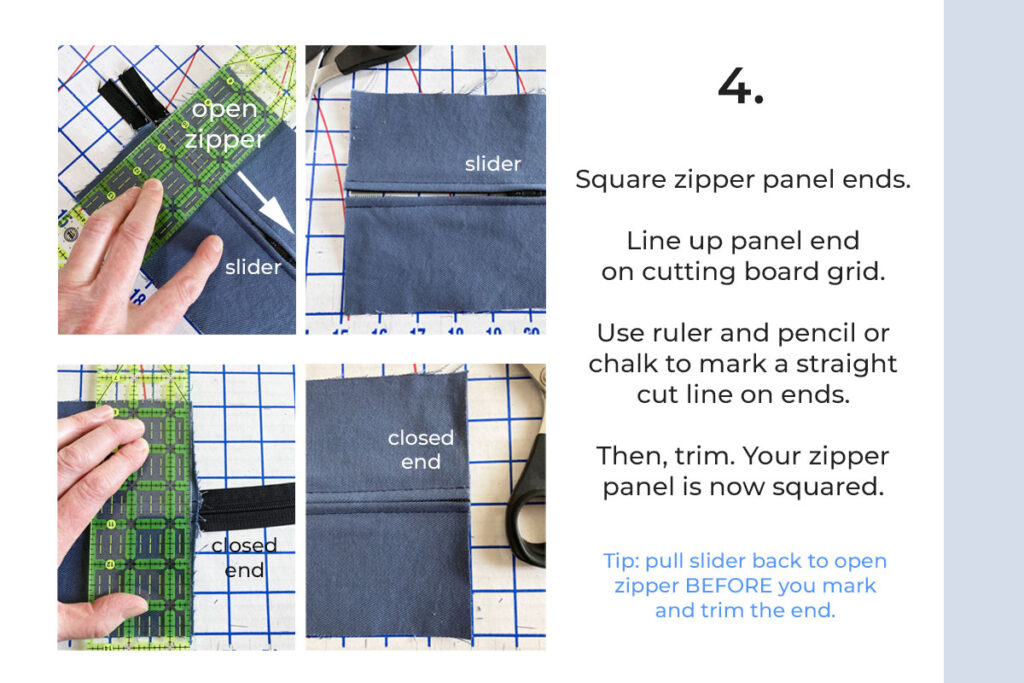
Now, you’re ready to make the zipper and boxing panel. This is the piece that connects the top and bottom cushion pieces. And, it creates the opening at top for easy on and off.
Take a look at this slideshow to learn how I cut and sew my zipper and boxing panels.
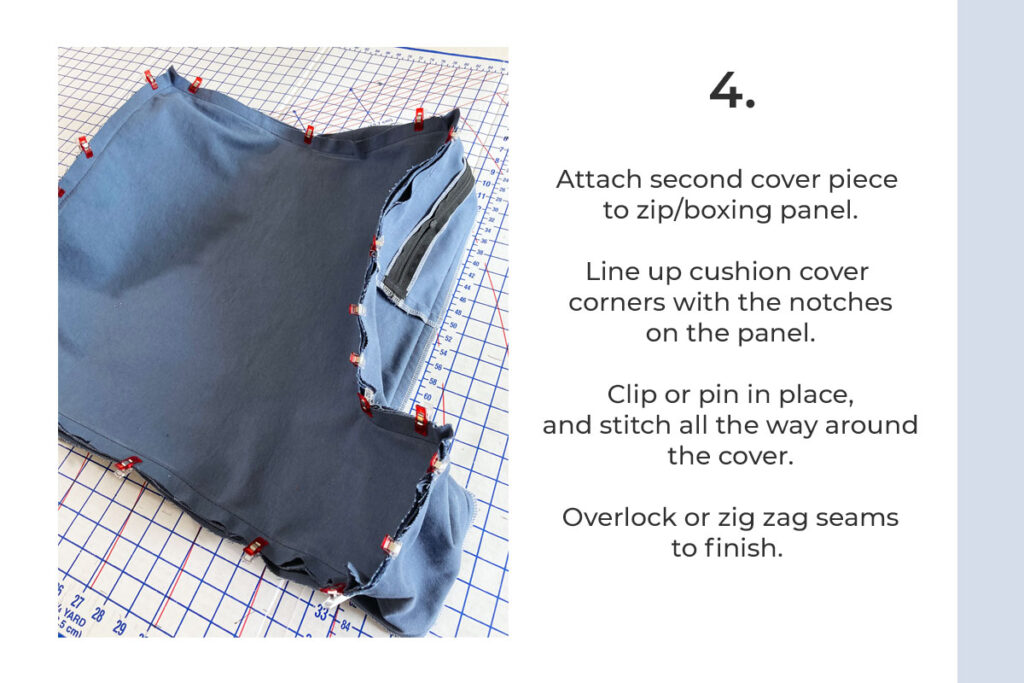
Step 2: Make Zipper & Boxing Panels
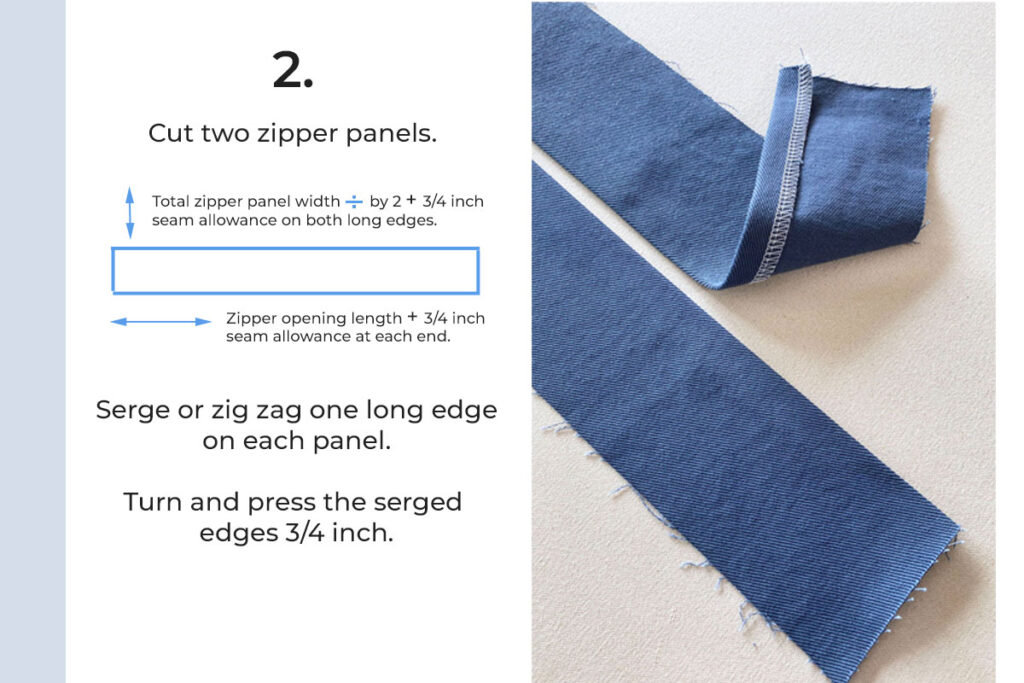
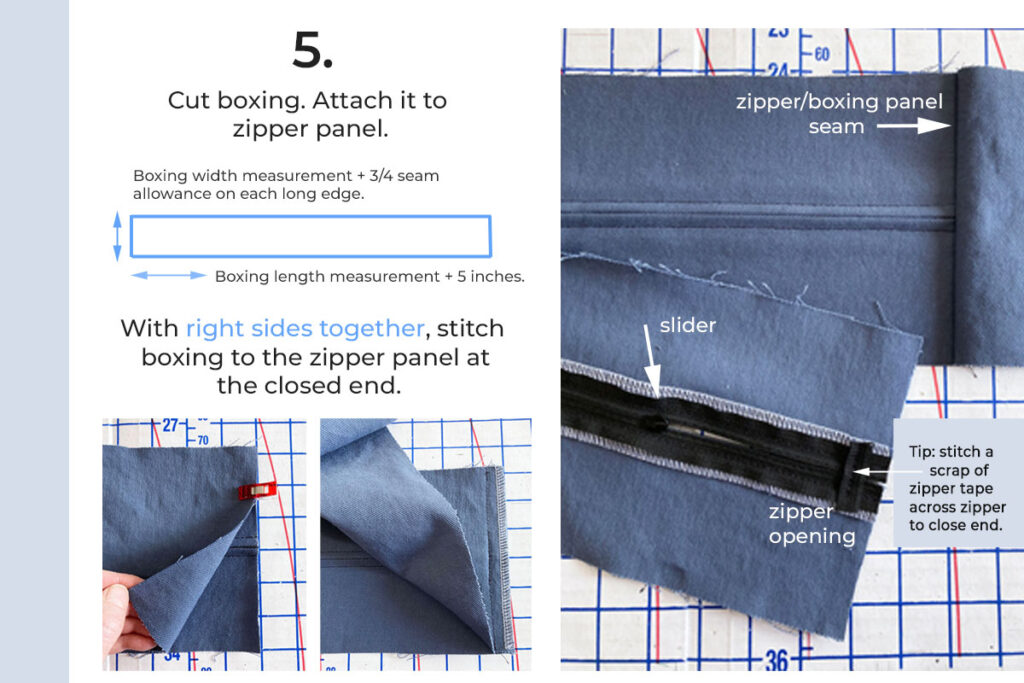
Zippers: For seat and back cushion covers, I recommend nylon coil zipper tape by the yard in size 4.5 or 5 with a metal slider, auto-lock or non-lock
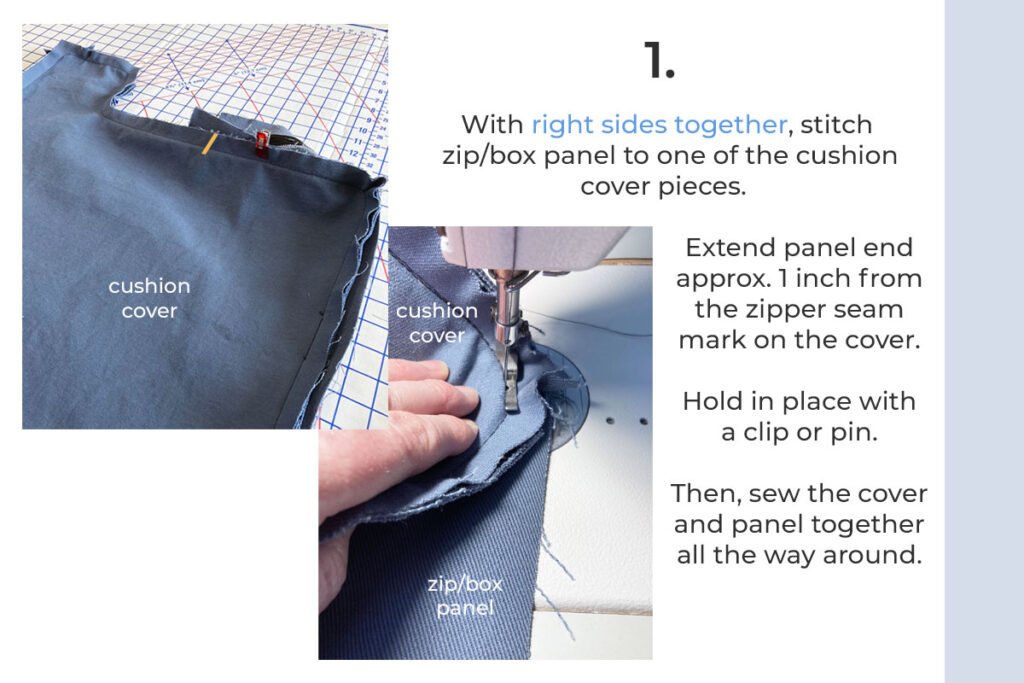
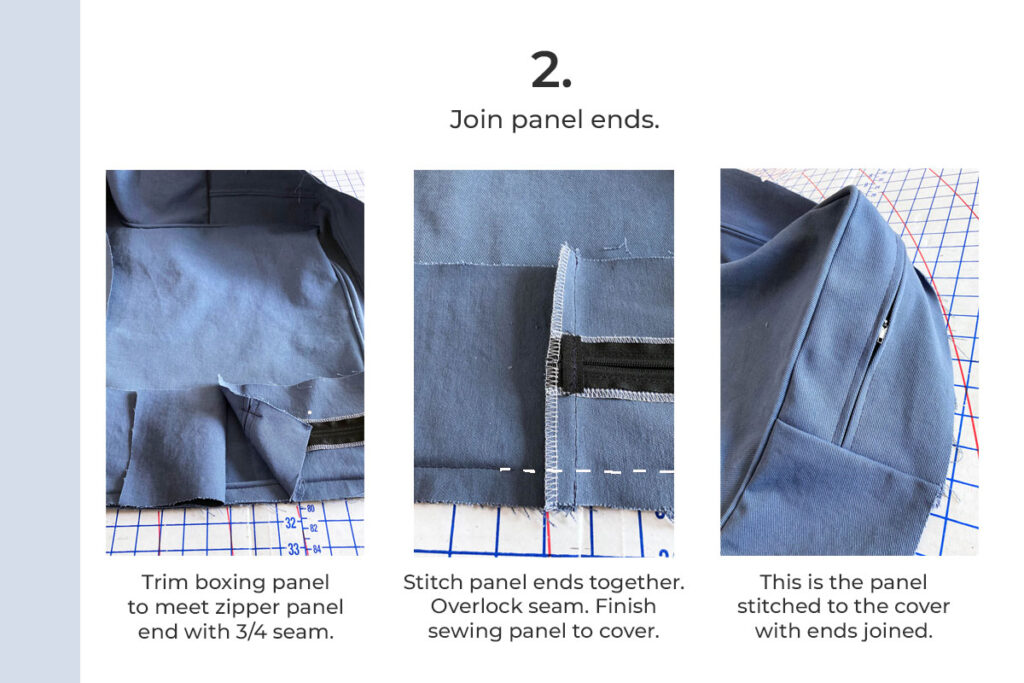
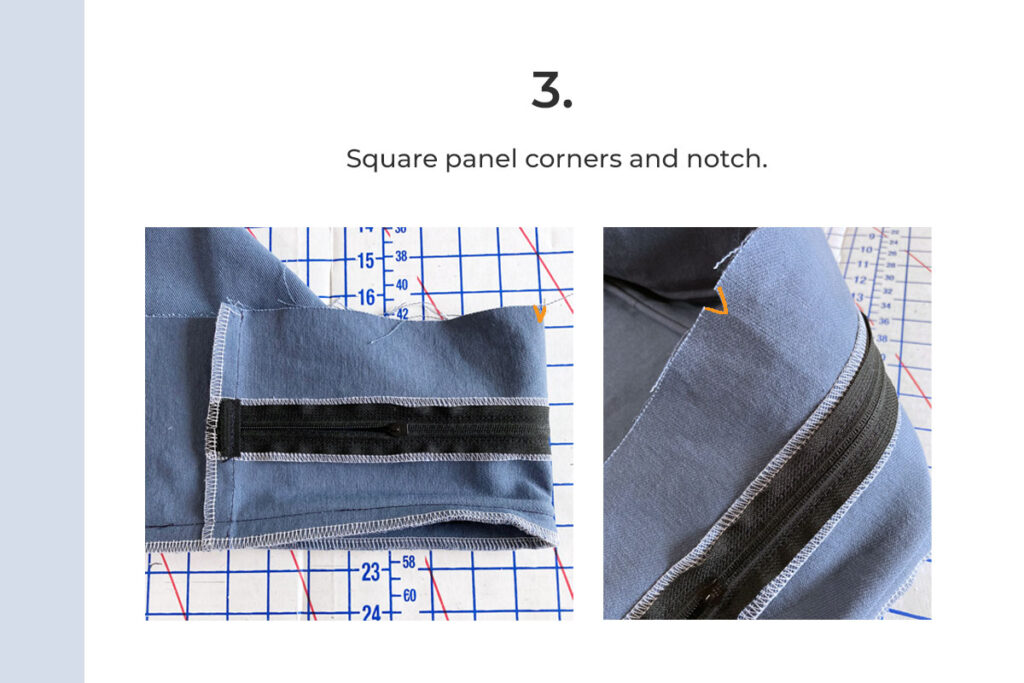
Once you have your zip/box panel made up, you can sew your cushion cover together.
Step 3: Sew Cushion Cover
When your new cushion cover it completed, turn it right side out. Remove the original cover and put on your new one.
Tip: As you put your new cover on the cushion insert, reach inside and flip the welt cord seam allowance towards the center of the boxing. This will minimize bulk and help create smooth seams.
Now for the super exciting part. Your slipcover is FINISHED! Install it and see how fab it looks!
I think you will be amazed at the transformation. And, feel a sense of pride that you made it yourself.
Keep in mind, making a good fitting slipcover takes practice and patience. Follow the tutorials in order, take your time and enjoy the process. You’ll do great!
As always, thanks for following! And, let me know how your slipcover turned out. — Karen
I’m seriously drooling over your skills Karen. I have read and re-read the first three parts in preparation for my own slipcovers and can only hope mine will turn out as good!! Thanks so much for this tutorial!!
You’re welcome, Cindy! I’m cheering you on! I have a hunch your new slipcovers will turn out beautifully.
I had to come back and leave another comment after re-reading this post. Your attention to detail is amazing. This 4 part tutorial has helped me to understand about tuck-ins, how to pin-fit correctly, and how to assemble the pieces in a logical sequence. I have made slipcovers in the past but never with the amount of precision you have shown. I know that I will refer back to this series over and over again when I tackle my own pair of chairs that need a slipcover! Wish me luck! Thanks so much for this tutorial!!
Cindy — I’m thrilled you’ve gleaned new slipcover skills from my tutorials. I love that!
I am in awe of you and your talent
Thank you, Kim! Your comment made my day!
Karen, your slip covers are stunning. What amazing talent!!!
Thank you, Tammy! I appreciate you stopping by.