Designing a Color-Blocked Slipcover
Last month, I shared a peek at my color-blocked slipcover project I had just started. I combined five fabrics in shades of cream, taupe, oatmeal, off-white and dark khaki, each one in a different weave and texture.
My slipcover is finished now and I’m surprised at how well it turned out, given that the process was not as straightforward as working with just one solid color fabric.
I discovered there was more to the design process than I thought!
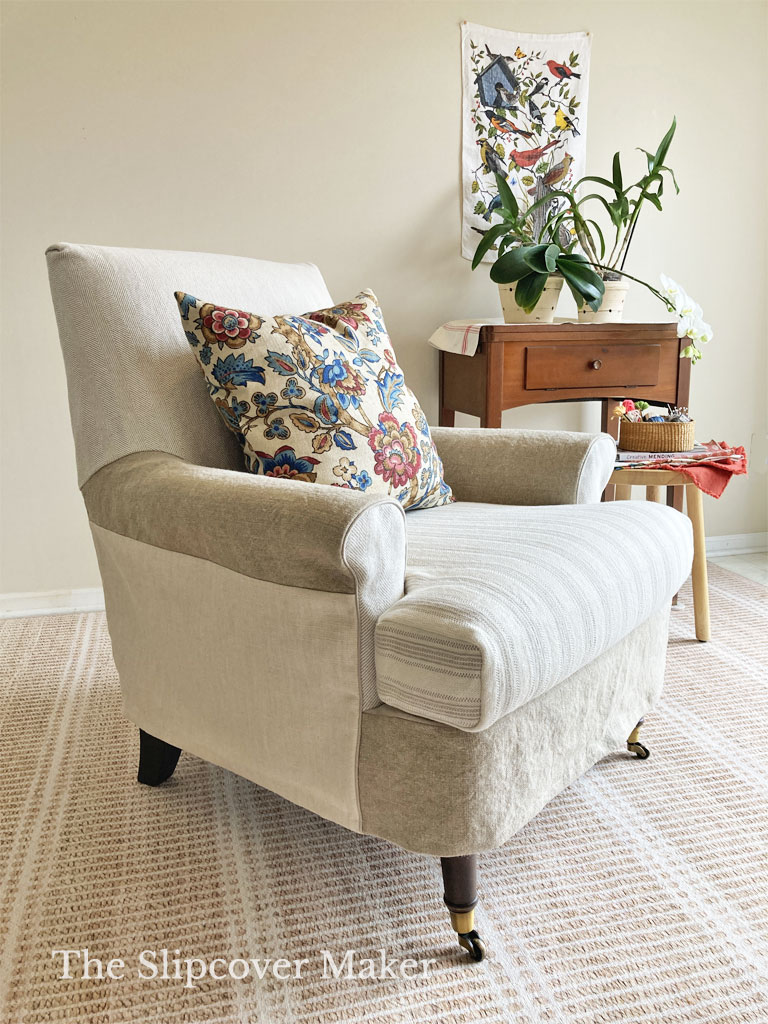
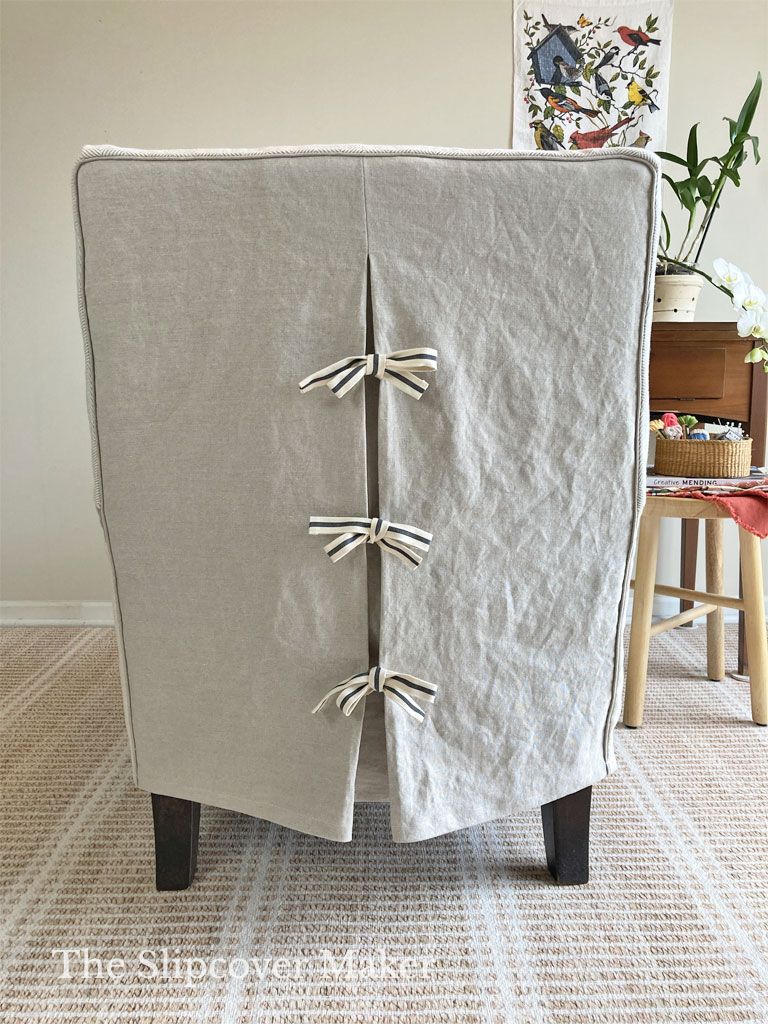
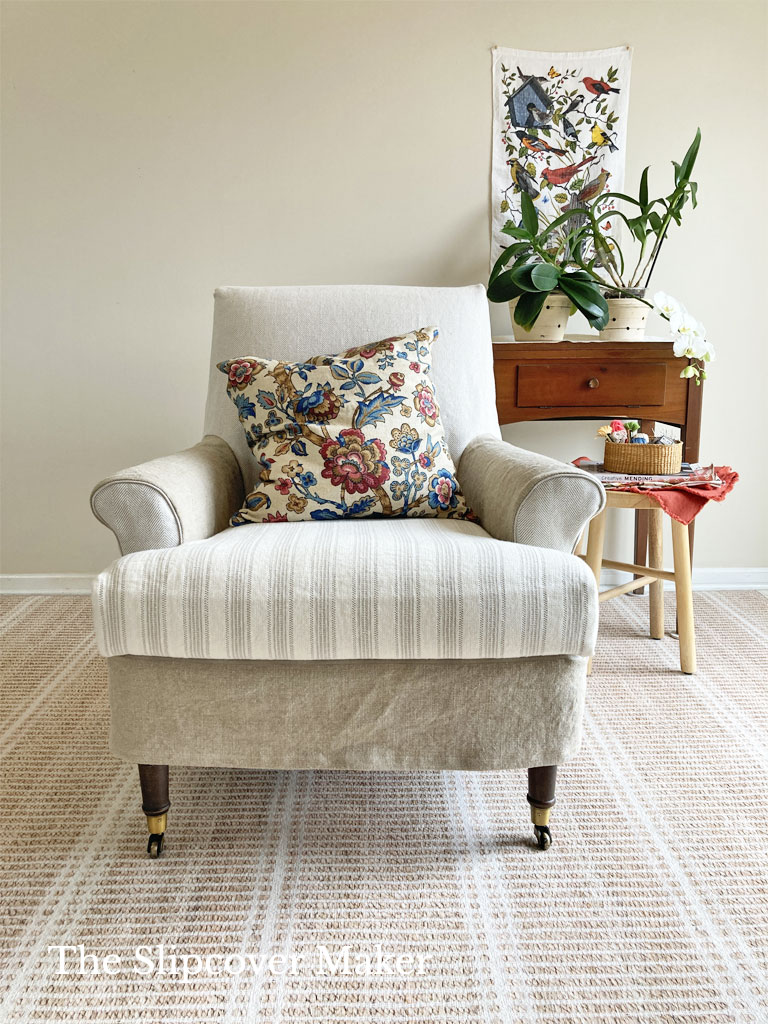
My design vision was clear right from the start. I wanted a relaxed fit, a turned hem, a center back pleat opening with ties, and micro welt cord on the front arms and around the back.
Fit, hem, openings, and trim are the type of details I think about when designing any slipcover.
But for this project, there were additional design considerations: What’s the best color placement? Do I have enough yardage of each fabric? Are the fabrics compatible with each other in weight, drape and shrinkage? Which fabric will be the easiest to pin fit the rounded inner back section?
Here are the design decisions I made and why:
Color & Fabric Placement
I wanted the colors to look balanced across the chair front, sides and back. A symmetrical color placement would work best to create a pleasing transition from one fabric to the next.
After taking measurements from my chair, I estimated how much yardage would be needed to cover each section. Then, I created a sketch of which fabrics go where.
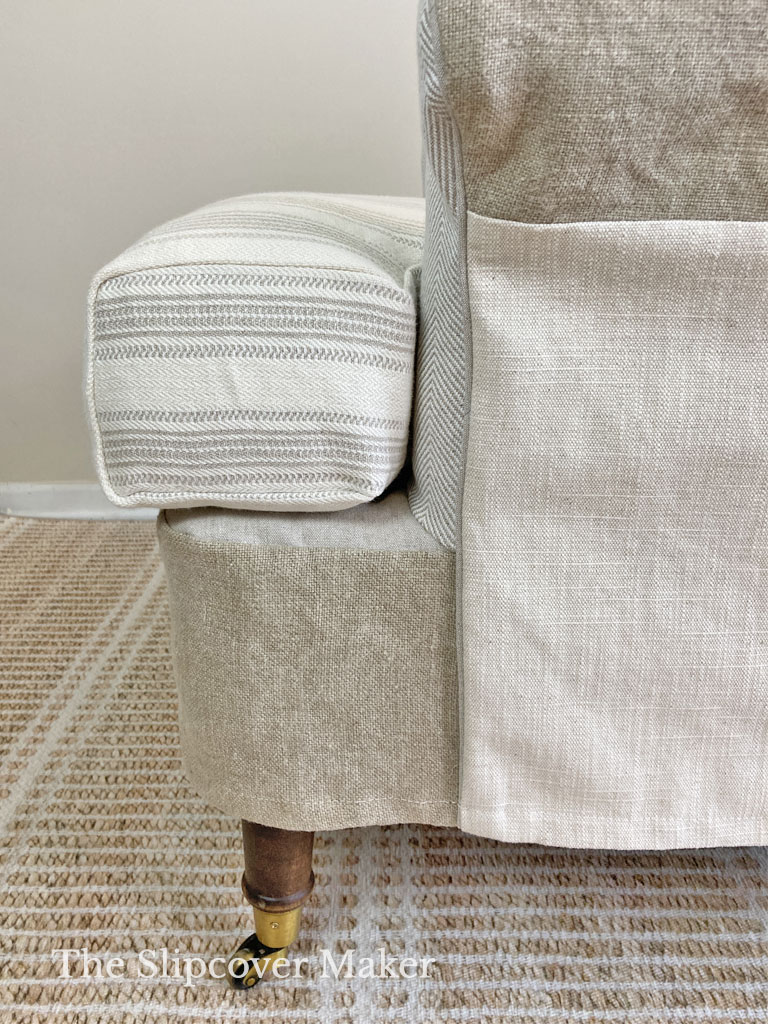
I started with the inner arms and lower front panel. I had just enough of the dark khaki linen to cover those areas. The symmetry between that color and those areas of the chair set the foundation.
From there, I placed the oatmeal herringbone on both front arms and the inner back. Then, I put the cream cotton-linen on both outer arms.
That took care of three of the five fabrics. So far, so good!
Next up, the beautiful herringbone awning stripe. It’s the most novel of the lot, so naturally I reserved it for the seat cushion. I didn’t have extra to use anywhere else.
And that left me with the taupe hemp canvas. I had plenty for the slipcover back, deck area, bias welt strips, and the cushion zipper panel.
Fabric Compatibility
As I was designing the color placement, I also had to keep in mind the weight, drape, give, and shrinkage of each fabric.
Fortunately, all of my fabrics were approximately the same weight and had the same shrinkage rate. I knew they were compatible when it came to coverage and stitching seams.
It was also important to place the fabrics on the areas of the chair they were most compatible with.
For example, the taupe hemp canvas barely has any give. It’s not very supple, which made it perfect for the flat areas: the back, deck, and zipper panel.
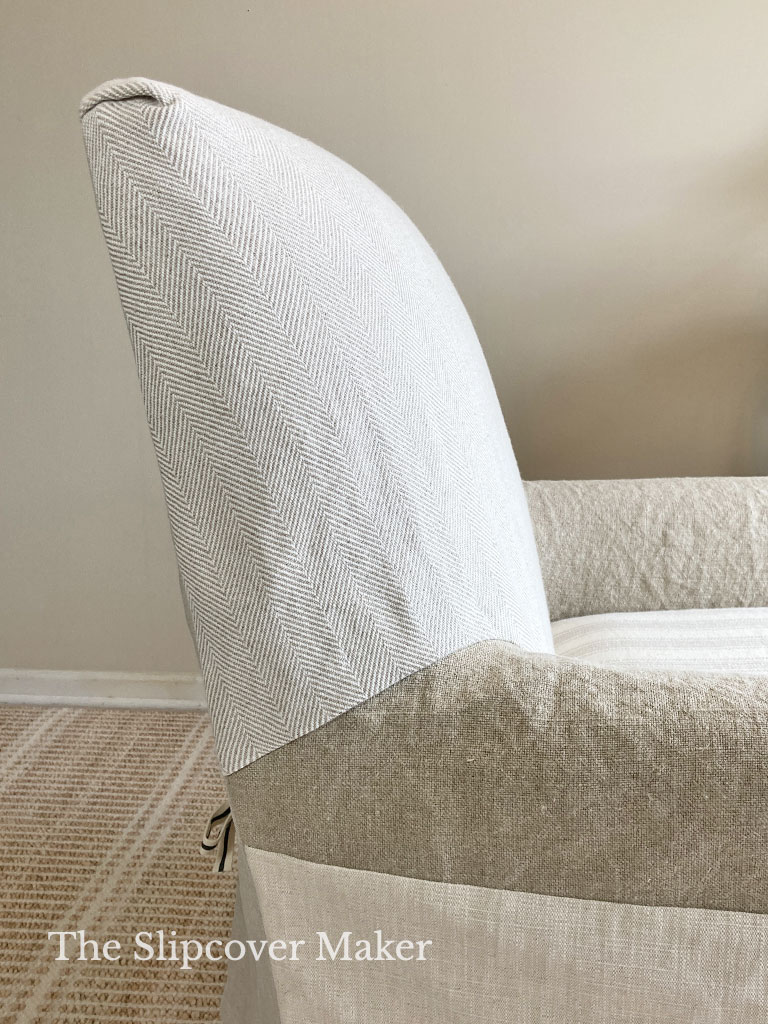
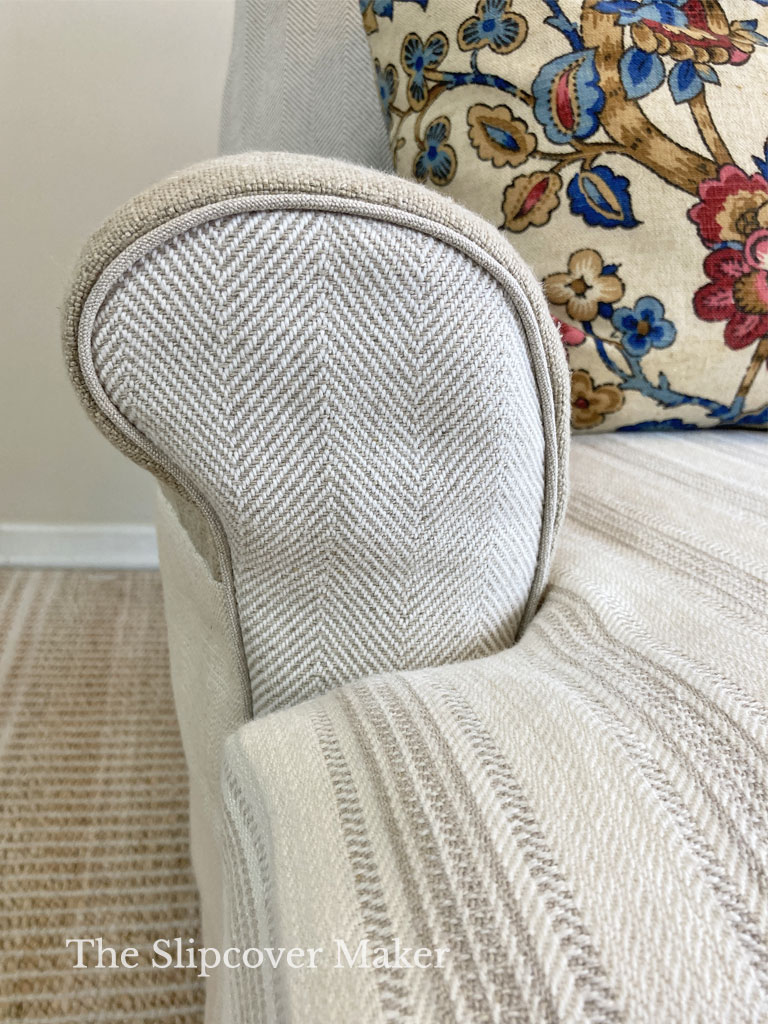
However, the inner back section needed a supple fabric. My chair’s tight back design is rounded across the width and tapers to square upper corners. To create a good fit on that area, the fabric had to give a little bit.
The soft, oatmeal herringbone worked beautifully.
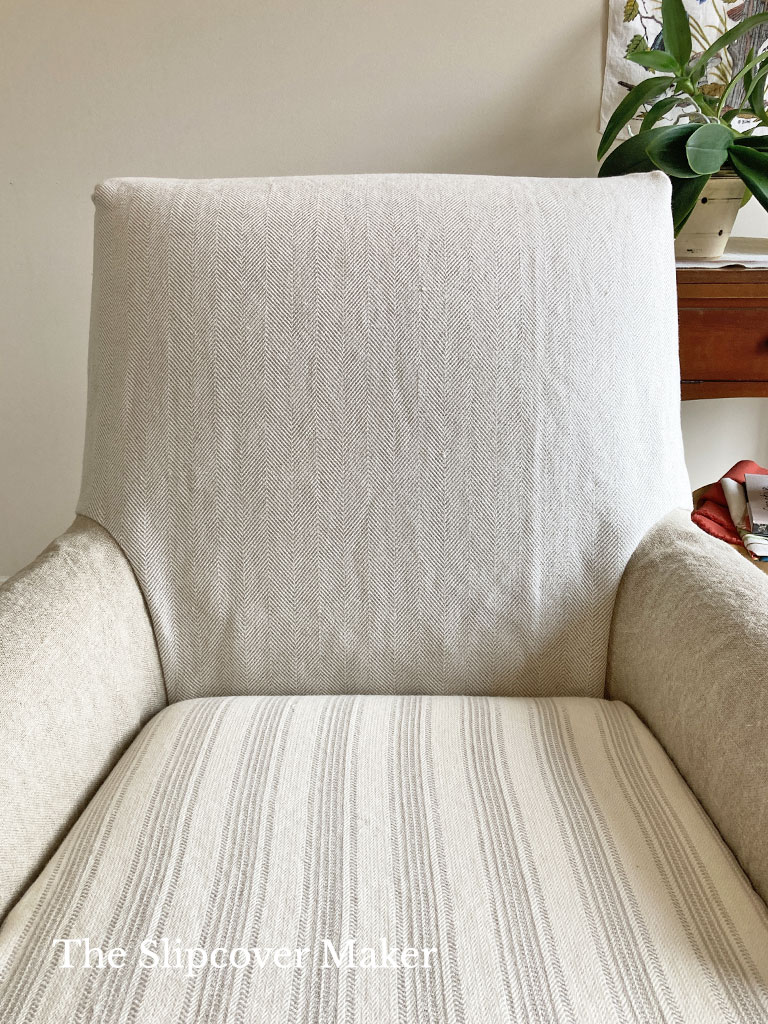
As you can see, the slipcover fits smoothly across the inner back and shapes around the inner arm curves. No puckering or pulling. The little bit of excess fabric that gets pushed up to the upper corners during the pin fitting was easily folded into a small, neat tuck on each side.
By comparison, here’s an example of what happens when fabric is NOT compatible with the chair and slipcover design.
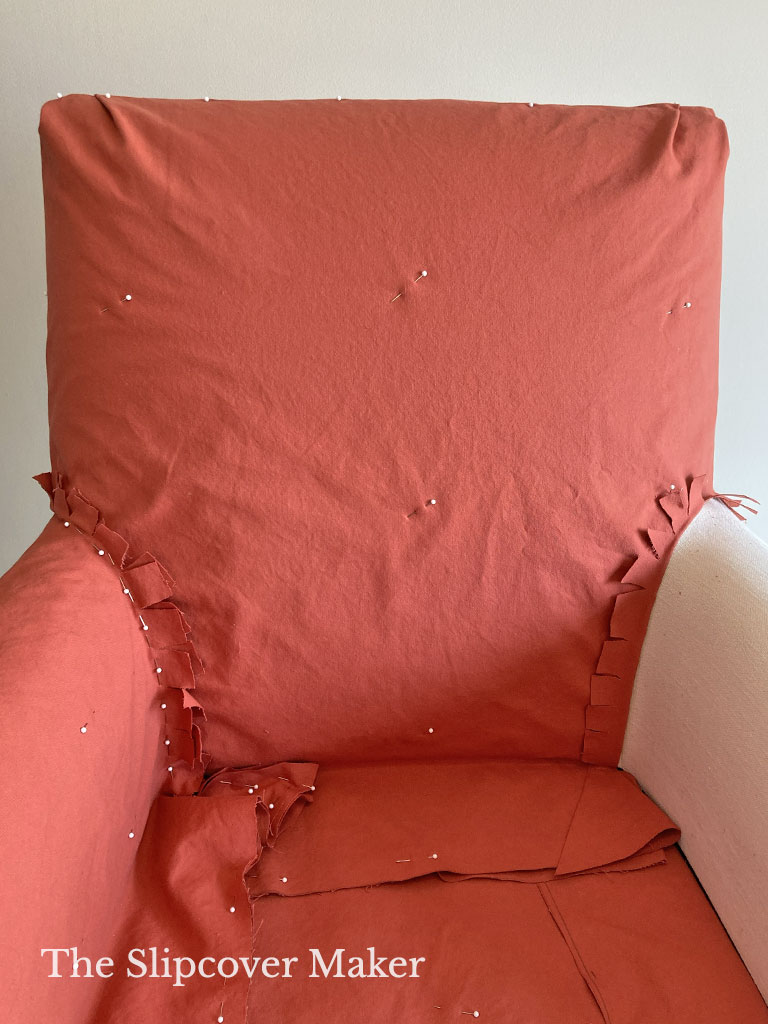
This is the same tight back chair. Before I made my color-blocked slipcover, I attempted to make a cover using this $5/yard orange cotton canvas that I had never worked with before.
As I started the pin fitting, I discovered the canvas was very stiff and didn’t have any give. It was not supple at all! This was one of those tricky fabrics — the surface felt soft, but the dense weave was sort of tough, similar to tote bag canvas.
No matter what I did, the canvas pulled and puckered. I could not get the fabric to ease around the curves and lay smooth. Even the excess fabric at the upper corners couldn’t be controlled with a proper pleat.
Even though my color-blocked project took more thought and time than most slipcovers I make, I’m happy I made the effort. It was a good exercise in design.
If you have a combination of fabrics you love that have been stored away for years (like mine), dig them out of your stash! It’s time to start enjoying them again. Color blocking is a budget-friendly and creative solution for using fabrics on hand to make something of beauty and purpose.
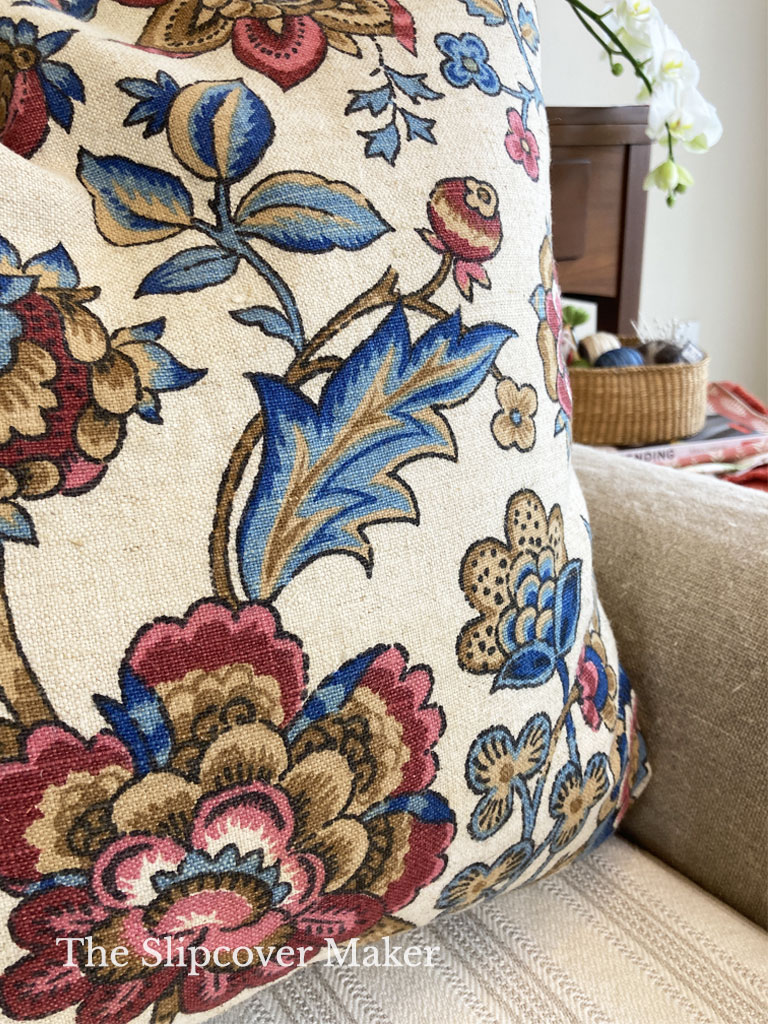
Side note: Making a throw pillow cover was the easiest part of my project!
I used this lovely vintage Waverly print called Flanders Stitch. I found it online a few years back at Laurel Leaf Farm, my favorite seller of old-style cottage-y fabrics and home goods.
Turned out beautiful!
Thanks, Ramona! The last time I designed a multi-fabric item was back in the ’90s when color-blocking bright, primary colors was trendy. It was not pretty. Haha!
Love it! My wingback chair desperately needs to be redone and I’ve been trying to decide whether to have it reupholstered or make a cover for it myself. This is motivating me to go through my stash of fabrics.
Definitely look through your stash, gardencat! I hope you find a combination of fabrics that are perfect for slipcovering your wingback.
You are amazing!
You’re very kind, Sunny.
Beautiful!
Kim, hello! Thank you.
I haven’t made any slipcovers in a long time, but I have to admit that your idea has me interested again. Your chair looks fantastic, and I love the mix of fabrics! What a great way to use smaller pieces of fabric, too!
Oh good, Paula! Playing around with different combinations of colors and fabrics will definitely spark a bunch of design ideas. Have fun!
Beautiful fabrics and a great design job! It is fun to combine fabrics (maybe that is why so many people quilt) but the process definitely takes thoughtful consideration. Especially when you are doing it all on your own.
Thank you, Vicki! I agree, it’s fun to combine colors and fabrics. It really gets the creative juices flowing!
I love the neutrals together. That chair is beautiful.
Thanks, Elizabeth! I love this combination of neutrals, too. The overall look is peaceful.
That looks *great*! And it is especially helpful to see the attempt with the “wrong” fabric to really comprehend how much difference the right choice makes. Any concerns about how the individual fabrics will respond to laundering?
sdb, great question! No I don’t have any concerns because I preshrunk each fabric before I committed to the project. I wanted to make sure they would be compatible when it came to laundering the slipcover. The amount of shrinkage in the width and length was pretty much the same in all of the fabrics. The hot wash and hot dry worked out most of the shrinkage. Any residual shrinkage from future washings (overtime) will be minimal, which I don’t think will affect the fit as long I wash on cold and low tumble dry. I don’t wash my slipcovers very often because I’m the only person using them.
Yes, the right fabric makes all the difference! I’m glad my orange slipcover flop was helpful. 🙂
Good points, thanks!
Just gorgeous! Such a cute idea. It looks so inviting. Great job! Love your blog.
Stephanie, thanks so much! It turned out so much cuter and cozier than I thought it would. I love when that happens!
I looooove this. Unique and lovely. Thank you.
You’re welcome, Kimberlee. So glad you enjoyed the post!