How To Slipcover a T-Shape Deck with Tuck-ins
Deck tuck-ins help keep your slipcover in place and enhance the fit of the area under the seat cushion(s), inner arms, and inner back.
In this step-by-step tutorial, I will guide you through an easy cut-and-pin process for creating tuck-ins for a T-shape deck as well as answer these questions:
- What is a deck tuck-in?
- Do all chair and sofa slipcovers need tuck-ins?
- What is the best width for deck tuck-ins?
- How do deck tuck-ins join to the inner arm and inner back?
If you are new to slipcover making, you might feel intimidated by the process of measuring, cutting, pinning, and sewing tuck-ins. I felt the same way when I first started making custom covers. It was difficult to find clear instructions at that time. This left me with no option but to figure it out on my own.
Today, I’m happy to share my method. Let’s start with the basics and then dive into the tutorial!
What is a deck tuck-in?
A deck tuck-in is simply an extension of the deck fabric, which is then pinned and sewn to the inner arm and inner back tuck-ins. The result is a two-layer tuck-in that resembles a flap.
When you install your slipcover on your furniture, you stuff the tuck-ins into the gap around the deck. The tuck-ins help keep the slipover from shifting and gives the deck, inner arms, and inner back a smooth fit.
Do all slipcovers need tuck-ins?
If your chair or sofa doesn’t have a tuck-in space around the deck edge, there is no need to create tuck-ins on your slipcover.
Check your chair to see if there is a tuck-in space between the deck edges and the inner arms, and the inner back. On some furniture the gap is obvious. It’s open and easy to stick your hand into the space.
On other pieces, the tuck-in space is barely noticeable because the gap is narrow and tight. If that’s the case, stick your hand or a ruler in it. If it slides in, you know there is a tuck-in space.
What is the best width for deck tuck-ins?
The width of your deck tuck-in should equal the tuck-in space depth.
Stick a ruler down into the tuck-in space to measure the depth. Do this on all three sides of the deck. For example, if the depth of each tuck-in space measures 3 inches then that’s how wide to cut your tuck-in width. The width measurement includes the seam allowance. No need to add extra.
However, sometimes the tuck-in depth measurement at the sides of the deck will differ from the back tuck-in space. In that case, choose the smallest measurement of the two and make all tuck-ins the same size.
Now, let’s get started with the tutorial!
How to Slipcover a T-Shape Slipcover Deck with Tuck-Ins
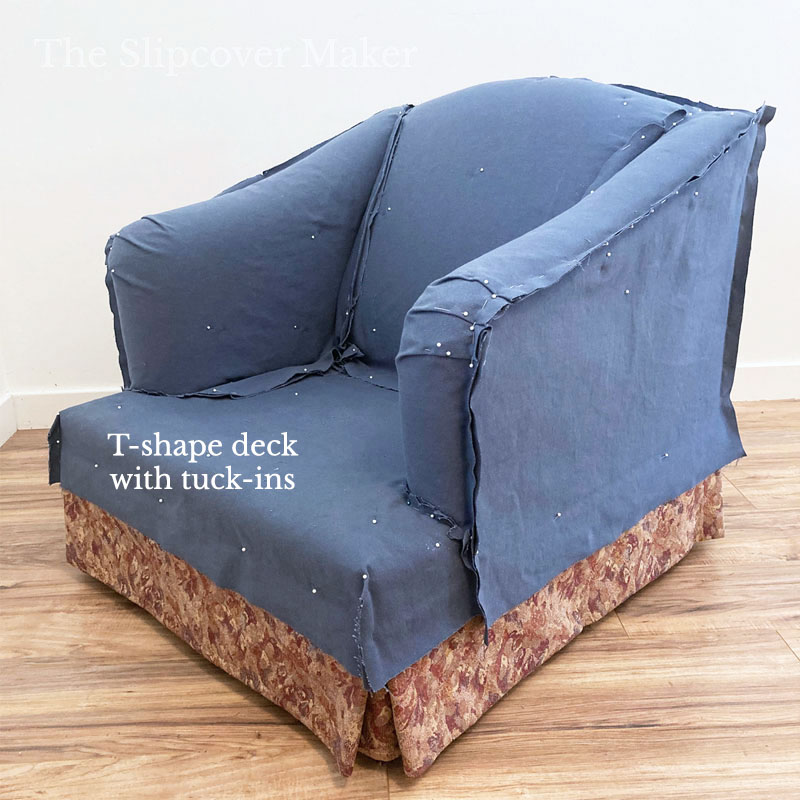
NOTE: I used the right side pin fit method to create the slipcover in the tutorial. All of the fabric pieces are placed on the chair with the right side facing out.

STEP ONE:
Center your slipcover fabric right side out on the deck.
TIP: The deck is the flat area UNDER the loose seat cushion on your chair or sofa.

STEP TWO:
Pin the fabric in a few spots on the deck to hold it in place. Flip up the fabric at the back and pin it to inner back to keep it out of the way for now.
Fold the fabric along the inner arms and measure out the tuck-in width from the fold. Then, mark the tuck-in cut lines. Remember, the width of your tuck-in should match the depth of the tuck-in space.
Start your tuck-in cuts at least 2 inches back from the front of the arm. See the photo above.

STEP THREE:
First, cut the tuck-ins along the inner arms from the start point to the end of the fabric. Don’t cut off the excess fabric near the front of the arm. You will need that to pin around the arm.
Then, fold down the tuck-in fabric from the inner back. Mark your cut line and cut.
All of the deck tuck-ins should be cut the same width.

STEP FOUR:
Trim the front end of the deck tuck-in so it slopes a bit as shown in the photo above. That shape will be easier to sew than a sharp corner when it’s time to assemble the slipcover.
Then, cut the deck fabric around the front arms. Make small relief cuts one at a time as you shape the fabric around the curve of the arm. Relief cuts help the fabric relax and lay flat around curves.
There is no tuck-in in this area. You are creating a seam allowance here.
TIP: Stop the relief cuts about 1/4 inch from the seam line.

STEP FIVE:
The T-shape deck on this chair is designed to spill over the deck a few inches at the front and sides. It will be seamed to a skirt later on. This style of deck requires a front corner darts.
Pin a dart at the corners. Then, trim the seam allowance to 3/4 inch.
TIP: Pin the dart starting at the top. As you near the bottom, taper your pins outward by adding 1/2 inch. The extra ease at the bottom will accommodate the bulky skirt seam allowance.

Deck Completed!
Here is what the T-shape deck looks like after it’s pinned and cut.
This pin fit tutorial is an excerpt from my 4-part series, How To Pin Fit a Slipcover Right Side Out. Check it out to learn how I pinned, cut, and sewed the entire slipcover including cushion covers and the skirt.
TIP: If your chair has a T-shape tight seat instead of the flat deck as shown above, you will find tips for creating tuck-ins in this post, Slipcover Fit Tips for Tight Seat Armchairs
Now, that leaves us with one last question:
How do deck tuck-ins join to the inner arms and back?
I will use the floral slipcover below to explain.

I cut and pinned the T-deck tuck-ins the same I did on the blue denim slipcover in the tutorial above.
The only difference was the deck on this cover did not spill over the front and sides. Instead, I seamed it to the nose edge. The nose is the front panel of the chair that wraps around the front.
The nose corners on this chair are curved therefore no corner seams were needed.

In the photo above, you can see how the tuck-ins are cut, layered and pinned. Here’s how I did it:
- First, I pinned the deck to the chair and cut the deck tuck-ins.
- Then, I pinned the floral inner back section and cut its tuck-in to match the size and shape of the deck tuck-in.
- Next, I pinned the floral inner arm sections to the inner back. I cut the inner arm tuck-ins to match the size and shape of deck tuck-ins.
- Finally, I pinned the tuck-in layers together and cut a few notches along the edge.
TIP: Use the notches as guidelines to match up the tuck-in sections when you get ready to sew them together.

Here’s what the finished T-deck looks like. You can see the two tuck-in layers seamed together.

And, here’s how the T-shape deck looks tucked in around the deck. It’s smooth and flat, ready for the seat cushion to be placed on top.
Keep in mind, I pinned this floral cover using the right side out method.
When I completed the pin fitting, I removed the slipcover from the chair, unpinned the seams, and sewed the slipcover sections together in a specific order. See how I did it in STEP 1 and STEP 2 of this post.
That’s it for this week! I hope you found the tutorial and tips helpful. Let me know about your deck tuck-in challenges and triumphs in the comments below. Thanks for reading!
I don’t usually comment BUT this is the best tutorial I have ever seen with the photo’s and cutting description. Really really good. Big help. Thank you for the time & effort you put into this and sharing with us novices. It will make it so much easier next time I decide to make another cover. I usually run into a problem with the inner back deck where the sides and the back and the deck all meet up. Don’t know how to properly sew all that together.
Linda — thanks for your comment! I’m glad the photos and descriptions are helpful. This post was about pinning and cutting the T-deck tuck-ins. To learn about how to sew the deck and tuck-ins to the slipcover, check out STEP 2 ATTACH THE DECK in this post, https://slipcovermaker.com/slipcover-pin-fit-tutorial-part-3-sewing-the-body/
I know it’s hard to describe step-by-step instructions and show with pictures, but that intersection where inner arm meets decking meets front of roll arm always confuses me. I get it pinned and take it off to see and struggle with which seam to sew first
I guess you call that a four corners?
Faye — there is a specific order to sewing the slipcover. Once you understand the sequence, I think it will easier for you to sew the tuck-in corner intersections. The sewing order will depend on which pin fit method you use. I use the right side pin method. I explain the sewing order in this post https://slipcovermaker.com/slipcover-pin-fit-tutorial-part-3-sewing-the-body/and show photos in Step 1 and Step 2.
Bonjour,
Merci pour les explications, mais j’ai beaucoup de mal avec l’anglais 😕, alors je n’ai pas tout compris.
Le problème pour moi c’est le passage de l’étape épinglage à l’étape couture. Faut-il marquer les futures coutures avec un crayon ou un feutre spécial couture ?
Merci pour votre réponse.
Bien cordialement
Viviane
Viviane — I don’t speak French. I used Google to translate your questions. The answers can be found in today’s blog post but you will have to use Google to translate the post.
Thank you for this! Your tutorials are so inspiring. Quick question, if I wanted to make a one-piece slipcover for a t-cushion sofa, would I follow the steps above but add extra allowance to tuck in around the t-cushion? Thank you in advance!
Donna — I don’t know exactly what you mean by a one-piece slipcover. But if you are trying to slipcover over top of the seat cushions, I would check out this post for tuck-in tips https://slipcovermaker.com/slipcover-fit-tips-for-tight-seat-armchairs/.