Best Slipcover Seam Finishes to Prevent Fraying
These slipcover seam finishes will keep fabric raw edges from fraying and prolong the life of your custom-made covers. Launder your slipcovers with confidence, knowing they won’t unravel at the seams.
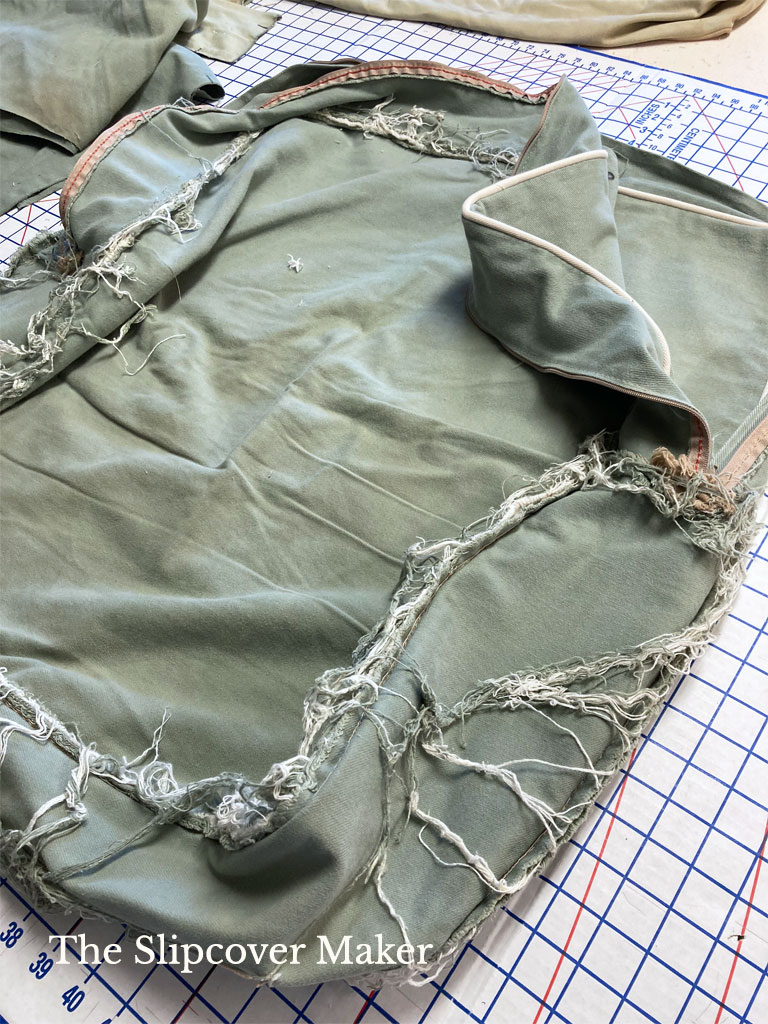
When I deconstruct an old slipcover to use it as a pattern, I notice right away all the usual signs of age. Most are faded and stained, but the overall shape and seams are intact.
But the inside of this factory-made slipcover was a shocker! The seam allowances had never been finished. As a result, they frayed right down to the seam stitch lines from washing and wear. The seams were on the verge of tearing apart.
Finishing your slipcover seams is a must if you are making a washable slipcover and want it to last as long as possible. The extra effort is well worth it.
In today’s post, I talk about the two slipcover seam finishes that work best and why you might use them on cut yardage edges before preshrink.

Slipcover seam finishes fall under two categories: decorative and functional.
Decorative Finishes
Decorative seam finishes are visible on the outside of the slipcover. Welt cord, topstitch, and flange are some of the most common. They are the pretty, custom details that add polish to a slipcover.
Functional Finishes
Functional seam finishes are sewn on the inside of the slipcover. They include specific types of stitches such as overlock, zigzag, back stitch, etc. that help strengthen seams, reinforce zippers, and prevent raw seam edges from unraveling.

So, which stitch types work best for finishing your slipcover seams?
Overlock Stitch
This is my number one favorite anti-fray stitch. I use a 4-thread industrial serger, which produces a double row of straight stitches and loops that reinforce the seam and wrap the raw edges.
I overlock the seam allowances after I sew each section of my slipcover with a straight stitch. This goes for cushion covers, too. With my industrial serger, I can easily overlock through multiple layers of seam allowance. See the photo above.
If you can’t overlock multiple layers using your home serger, you can overlock around each slipcover piece before you stitch them together. This method works great when you use the right side out pin fit method.
If my slipcover calls for topstitching, I add it AFTER I overlock the seams.
Zigzag Stitch
This simple stitch is a good alternative to an overlock stitch when you don’t have an industrial or home serger. A zigzag finish won’t wrap the raw edge like an overlock stitch, but it still does a decent job at slowing down fraying, and on some fabrics, prevents it all altogether.
Using your home sewing machine, zigzag through the multiple layers of seam allowance after you stitch the slipcover seam.
If your machine can handle the thickness, zigzag along the edges of each slipcover piece before you stitch the seams.
I set my zigzag to the widest width and set the length around 3. Each machine is different, so be sure to do a test on fabric scrap to find the right zigzag setting for your project. There is no need to make the zigzag a satin stitch. Set the length so there is a bit of open space between the zigs and the zags.
As you stitch, keep the zigzag close to the raw edge of the seam allowance but not over the edge.
Seam Finish on Cut Yardage
Should you use the overlock stitch or zigzag to finish cut yardage edges?
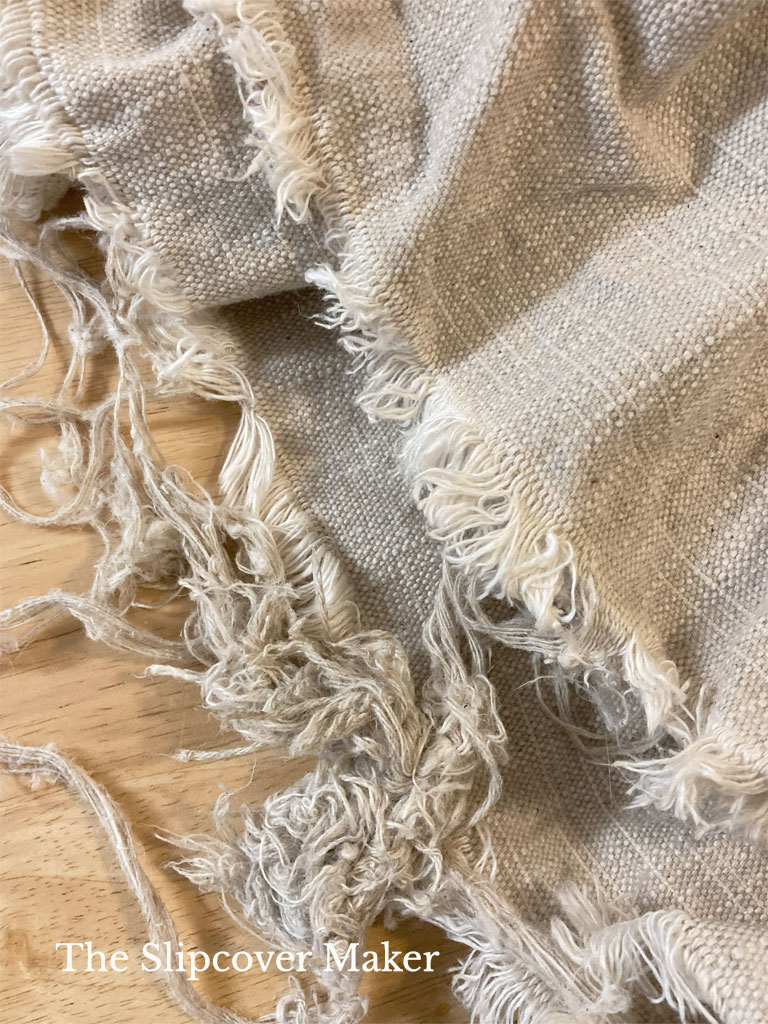
Yes! I finish edges on cut yardage with an overlock stitch before I preshrink linen, hemp, linen blends, and any other fabric that has a loose weave, nubby yarns, raised textures, etc. This prevents the yarns along the cut raw edges from unraveling and tangling.
The photo above shows a cotton-linen fabric without finished edges just out of the washer and dryer. The yarns frayed like crazy, one to two inches on each cut edge. They tangled and pulled, making the cut yardage edges puckered and wavy.
Below is the photo of the same fabric but finished with an overlock stitch. No fraying or tangles after preshrink!
Finishing yardage cut edges isn’t as important as finishing slipcover seams. But it sure makes it more pleasant to pull the yardage out of the washer and dryer without having to cut away tangles!

I hope you found these seam finishing tips helpful and inspiring as you plan your next slipcover project. Let me know in the comments below how you finish your slipcover seams.
Thank you for this reminder. Recently, I have been zigzagging woven fabrics before preshrinking. Comes out clean and ready to fold and with no rankles. Love it!
Beth – Works like a charm. I love that, too!
Oh, wow, that is a great idea!
Great tips as always! The overlock with an industrial serger is a novice slipcover makers’s fantasy!
Julie — I know what you mean! I thought I died and went to heaven when I finally got an industrial serger. It makes the process easier and faster that’s for sure.
Great post! The images are very instructive !
Thanks, Nan!
I love beautiful seams and edges! Clean seams always look best whether it is a slipcover, curtains, or garments. Great post Karen – it’s amazing how poorly store-bought items are!
Cindy — me, too!!
I’ve been making washable slipcovers for over 30 years! The first 20 years or so I made them for myself, my family, and my friends. I’m a retired professor and Higher Ed administrator but became a bit bored after retirement so at the urging of a local upholsterer I started a small cottage slipcover business. It takes extra time but I ALWAYS surge every seam! The worst slipcover I’ve ever came across was a Ralph Lauren that literally had large masses of raveling at every seam! I’m also in Michigan and only make slipcovers from September through May. I’m booked into next year already. YES always protect the edges of fabric!!
Kathy — Interestingly, some of the most recognized and supposedly high-quality brand-name slipcovers are poorly manufactured. I say cheers to us custom-makers who take pride in our work. Your Sept-May small cottage slipcover business sounds fantastic!
This post is another important bit of information from you. It is a lot of work to make slipcovers. It would be a shame to have them fall apart because of neglecting this important step. Thank you very much, Karen!
You’re welcome, Nancy!